Monday, October 22, 2018 – Steel Day!

Nothing happened last week. No point in recounting the many reasons that steel day was postponed, but it happened today and it was quite a show. This is a story that we will tell in pictures and their captions.

Picture 1 – The crane arrives. However, there is not much space next to the house and much of it is already filled with building materials, so finding enough room for the crane in a spot where it could level itself was a challenge.
Picture 2 – Part of the solution was simply to move around the stacks of building materials — Easy with a crane!
Picture 3 – While the crane was getting into position, the steel guys were busy prepping the site. Here one man is adjusting the nuts on a set of bolts that will hold the post at the front corner of the house. Adjusting these nuts  allows them to
sets the height of the post.
Picture 5 – Here another man is removing the plywood form from a section of concrete with bolts in it that will hold a wall bracket to which a beam will be connected.
Picture 6 – Here the plywood is off.
Picture 7 – Meanwhile, the truck carrying the beams has arrived and the process begins of unloading the beams so that the truck can leave.
Picture 8 – From the bed of the truck, the beams had to be hoisted through the trees over the driveway.
Picture 9 – The beams were swung to a staging area in what will be the great room of the house and the deck.
Picture 10 – There were 6 beams and a post delivered. Here you can see several of them. The one ending closest to the camera is bigger than the rest: 12″ high rather than 10″ and much heavier gauge. It will create the main support in the ceiling of the great room.
Picture 11 – Remember the plywood that they were removing on a set of wall bolts. Here are those bolts with the bracket attached to them. The man is using a grinder to cut off the extra bolt length, since it will interfere with the placement of the beam.
Picture 12 – With the beam swung into place, first a pry bar and then bolts were used to hold it in place.
Picture 13 – Here is the other end being lined up. This beam will support the east wall of the second floor. If that post looks too short it is. Whoops. A replacement will be delivered tomorrow.
Picture 14 – Here is one end of that big beam for the great room being swung into place on its bracket.
Picture 15 – The other end of this beam sits on the concrete wall by the front door. There are two bolts coming up from the concrete, and the beam must be maneuvered so that the holes in it go down onto those bolts. The beam extends past the wall to support the cantilevered roof that extends past the house.
Picture 16 – Tightening the bolts can get these guys into precarious positions.
Picture 17 – One of the amazing parts of this process is how easily they could fabricate these beams onsite. This beam needs holes in it for bolts coming up out of a different wall. Since it would have been difficult to measure the precise actual placement for these holes, they were made with a torch.
Picture 18- This is the hole.
Picture 19 – But that was only the start, they had to cut this beam to length. It took less than 5 minutes.
Picture 20 – Once it is cut, they grind the melted steel off the end to smooth it.
Picture 21 – Here they are swinging the newly fabricated beam into place. One end connects to the large great room beam. The beam then sits on the southern wall and extends out to support the cantilevered roof.
Picture 22 – This gives an overview of the beams being put in place. The first beam placed is on the left side of the picture near the base of the crane. The next beam to the right is the main beam in the great room.
Picture 22 – To get the beam on the left to line up, they had to cut off some of the flange on the already installed beam to which it was to connect.
Picture 23 – Here you can see an issue created by the fact the the main beam is 12″ high and the others are only 10″ high. Since the walls in the southeast corner are all one height and the main beam sits on one of those walls, the other beams are two inches above the walls. Tomorrow they will need to fabricate a bracket to support it.
Posted in house | Leave a comment

Monday, October 15, 2018

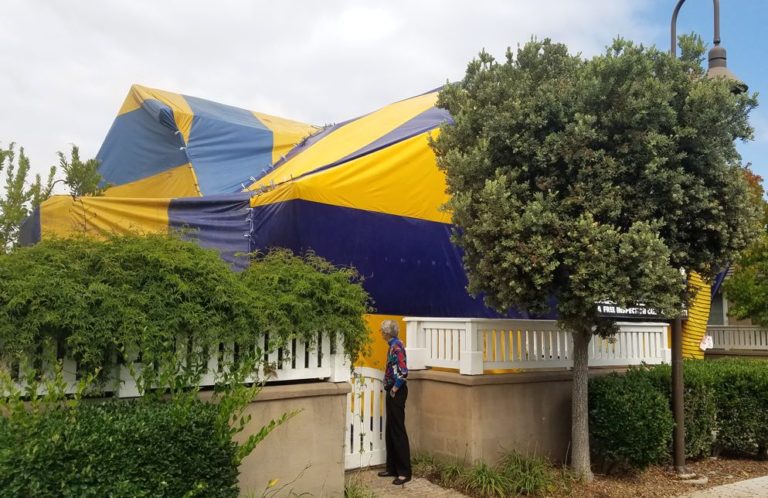
Over the weekend, the house that we are selling on the UCI campus was tented to ensure that there are no termites. We close on the sale of this house a week from Friday.

Otherwise, not much has been happening – sigh. This may in part have been due to the weather. Friday night into Saturday it rained. Then late Sunday evening Santa Ana winds started up. These are hot, dry winds that come off the desert. The high wind warnings were for gusts up to 70 mph. This is the time of year that we pray that there will be no fires — the rain Friday certainly helped on that score — and that the power lines will stay up. In that area we lost out. Our power in Modjeska went out about 6:50 Monday morning and was not restored until about 6PM that evening. However, it is not clear that the weather explains why the steel beam and the framers are now not coming until Thursday.

Our house on the UCI campus is tented for termites prior to its sale.

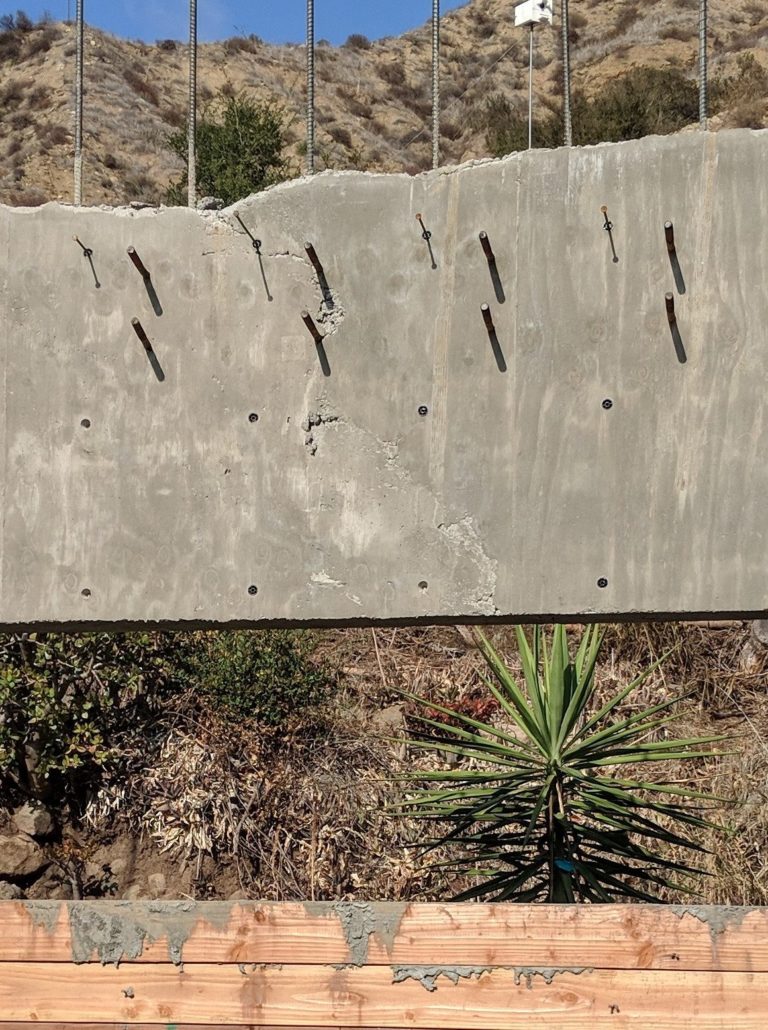
We did, however, manage to resolve one issue that was worrying us. After consulting with the contractor and the structural engineer, a plan was developed to deal with a “cold joint” in the concrete span of wall over one of the windows. (The diagonal line of imperfections in the concrete is shown in the picture below.) This occurred because, when this section of the wall was being poured, the section on the left exhausted the delivery of one truck and the second truck did not arrive for over an hour, so the concrete on the left was already partially set when the concrete on the right was poured. (The trucks are meant to arrive shortly after one another, but the supplier does not always cooperate.) Fortunately, all that is necessary is to remove the “honeycombed” concrete at this joint and then patch the gap with special materials.

Posted in house | Leave a comment

Wednesday-Thursday, Oct 10-11, 2018

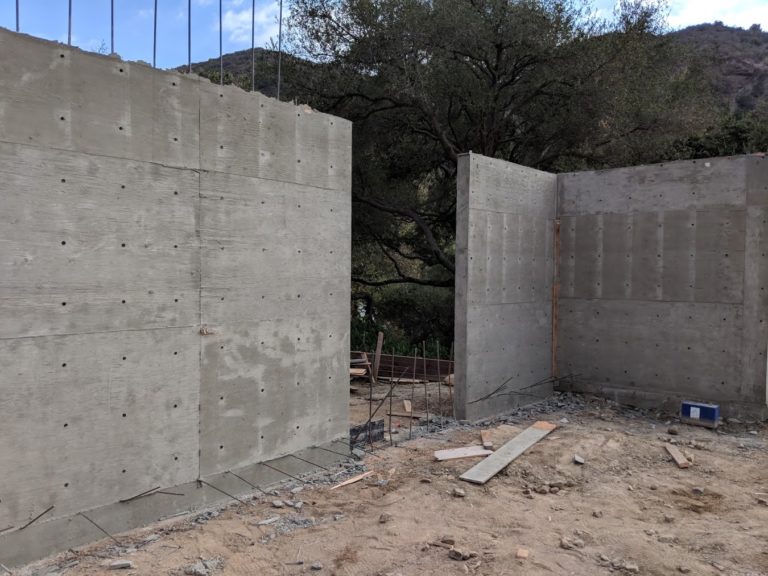
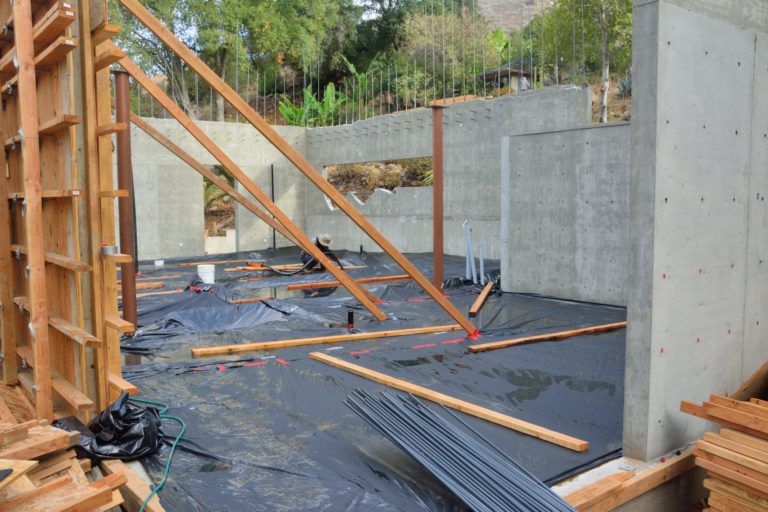
On Wednesday, the concrete trucks came and poured all the walls that were framed for pouring.  We had an appointment with the designer who is helping us with plans for the interior, so we were unable to come watch. There wasn’t any point in posting any photos last night–since forms with concrete in them look much like the ones from the day before that are empty.

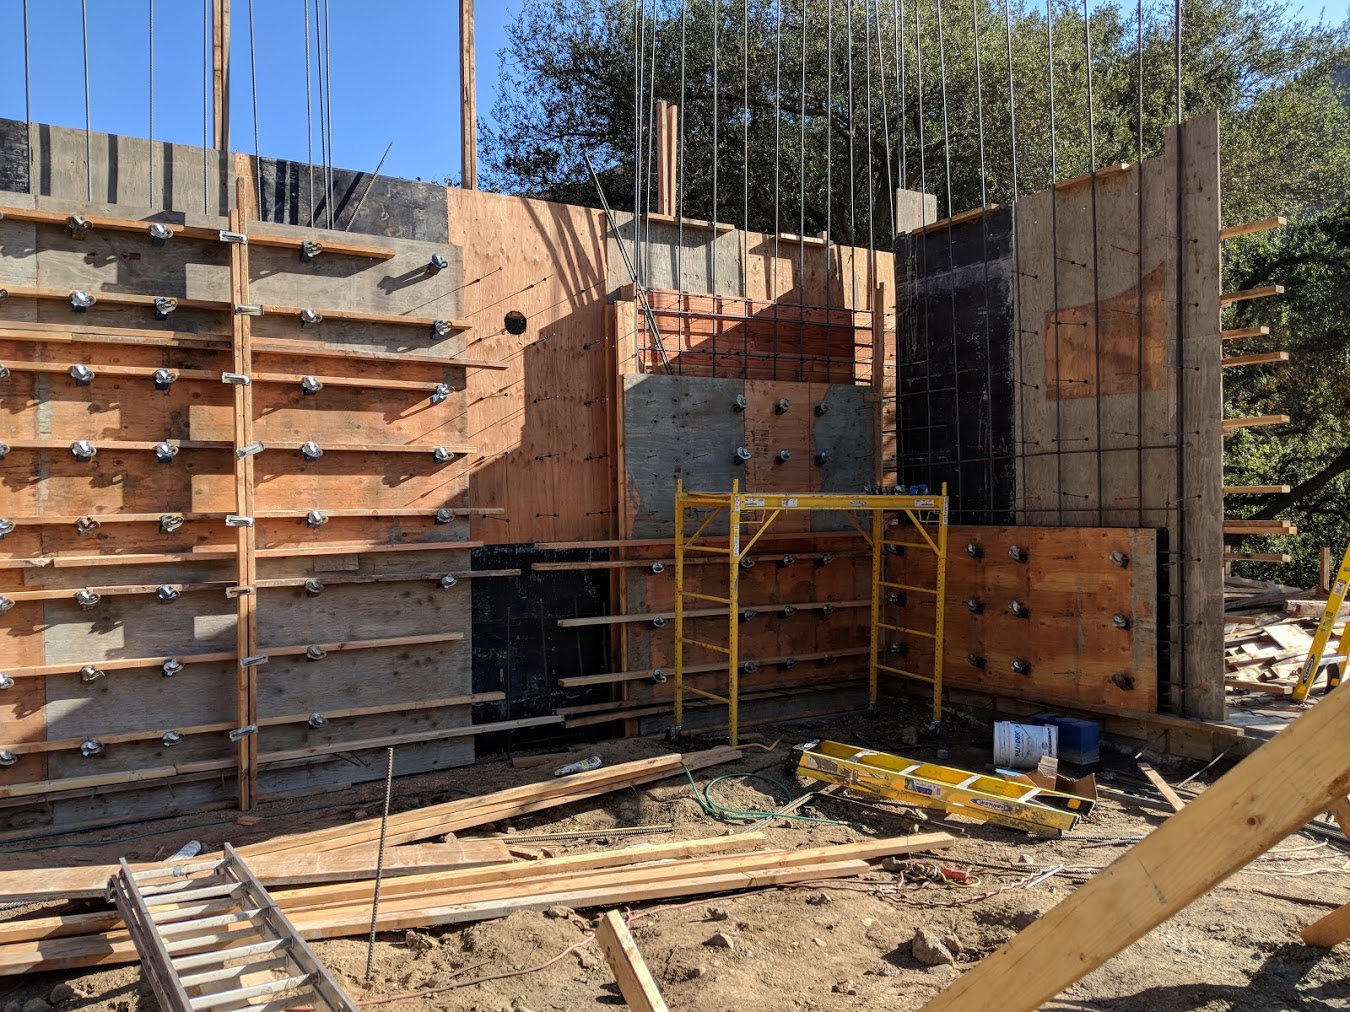
But  Thursday was a very different story.  All the wood forms were removed, so all the new walls are completely visible. The major one is, of course, the front door wall with its board formed texture. The opening is where the front door and a sidelight and transom window will fit. Picture 2 is a closeup of the wall. The wooden square on the right blocked out the space that will be the bottom of a tall window on the landing of the stairs to the second floor.

Picture 1.  Board-formed textured wall with gap for front door.
Picture 2.  Closeup of wall above.

Picture 3 is the opposite side of the wall (the opening is where the front door will go), which is just the regular texture.

Picture 3. The inside of the front wall, taken later when the plywood had been removed from the door opening.

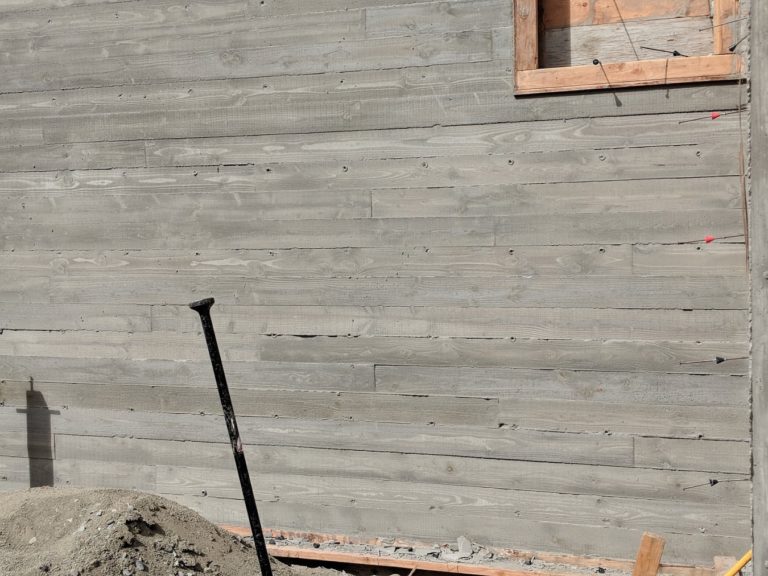
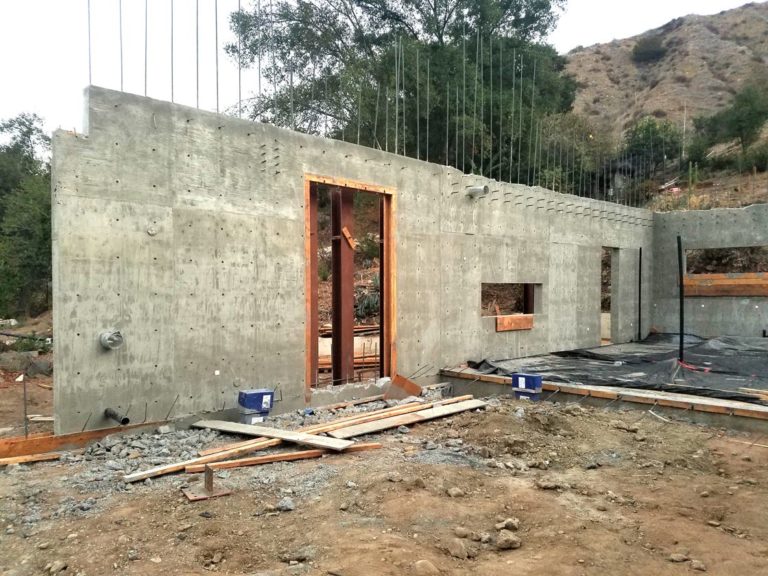
Picture 4 shows the west wall. Only the part on the left is new. To the left of that will be the edge of a floor-to-ceiling window that will wrap around the corner. At the left of the new section of wall, you can see the exhaust vent and air intake for the wood stove that will be there. To the right of that is the window, which will be in the dining room, that will allow in light that has filtered through the gabion wall. Further to the right, high in the wall, is the exhaust vent for the hood that will be over the stove that will be in the kitchen corner there. Continuing to the right is an opening for a window that will be over the counter but under the upper cabinets. Continuing on is the opening for the back door. Then, in the back wall is a high window that will be in the laundry room.

Picture 4 – The west wall of the house.

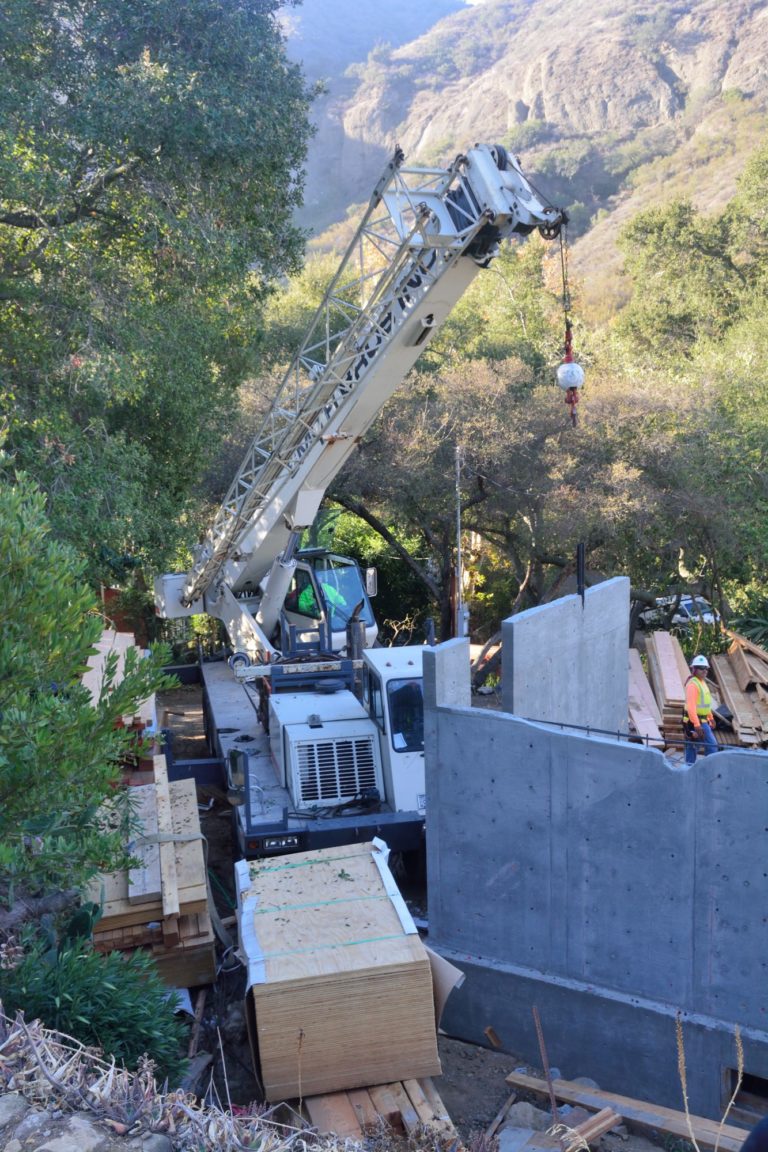
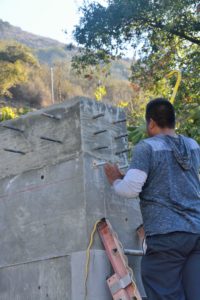
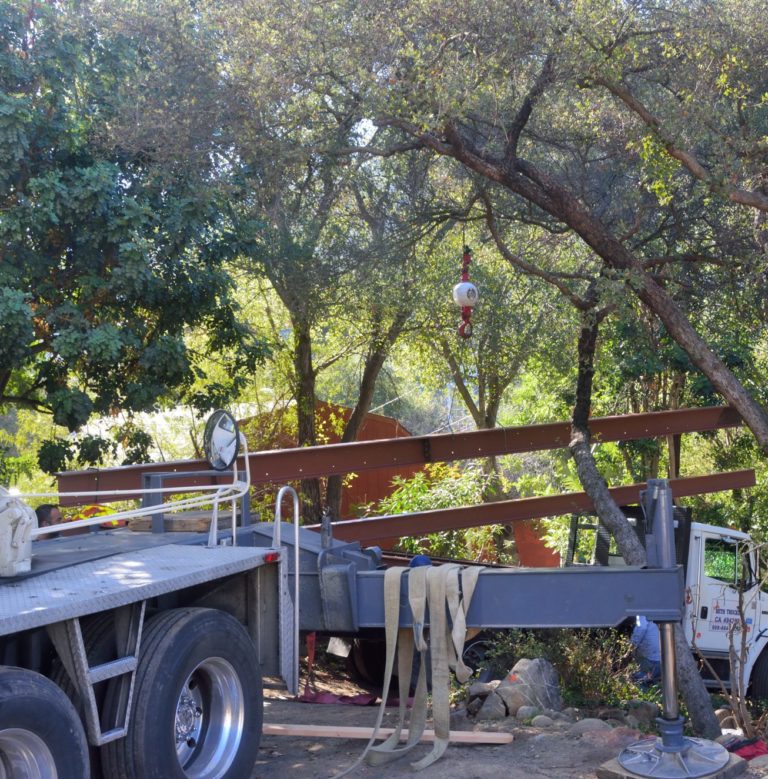
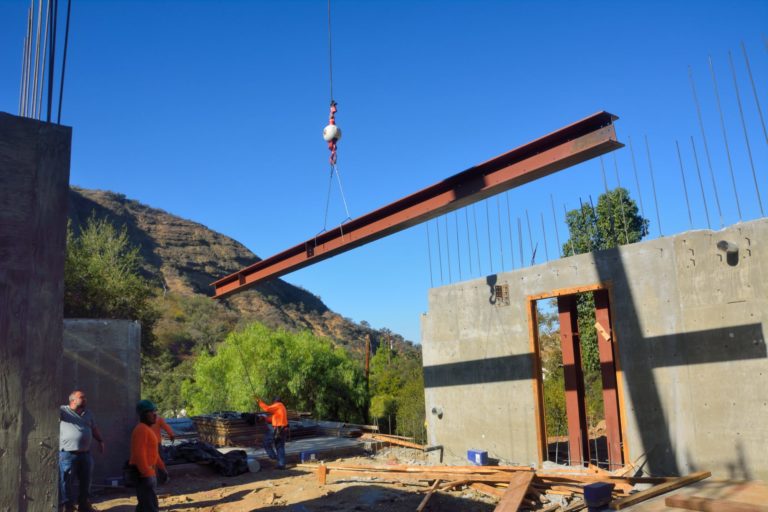
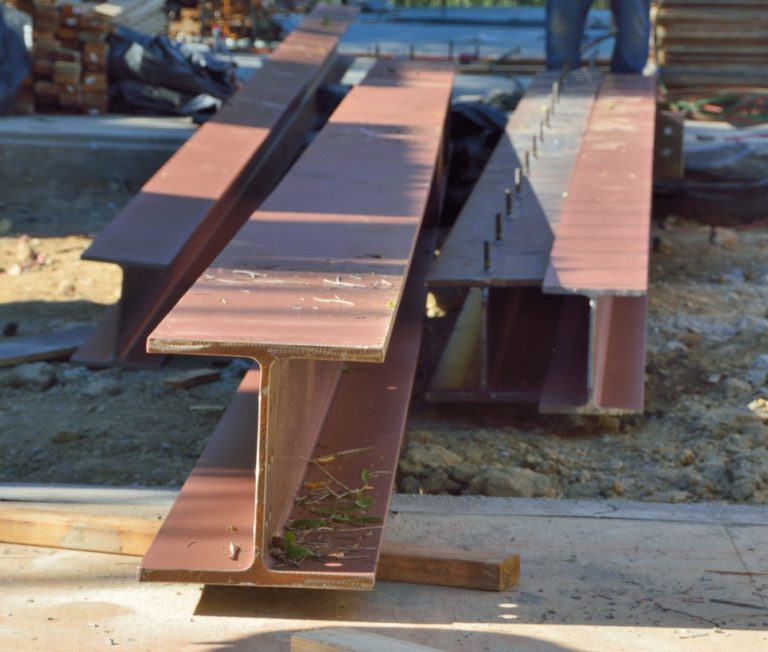
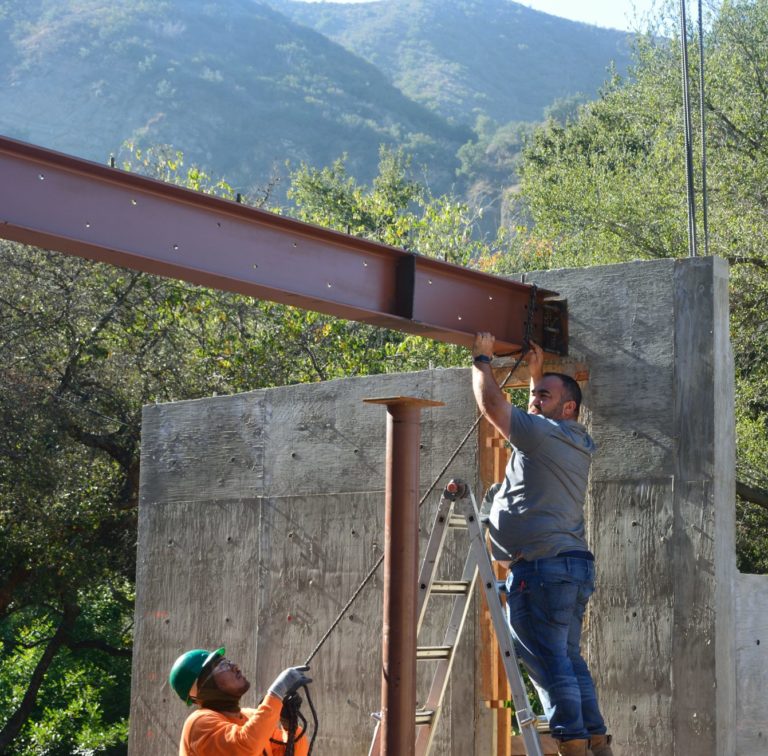
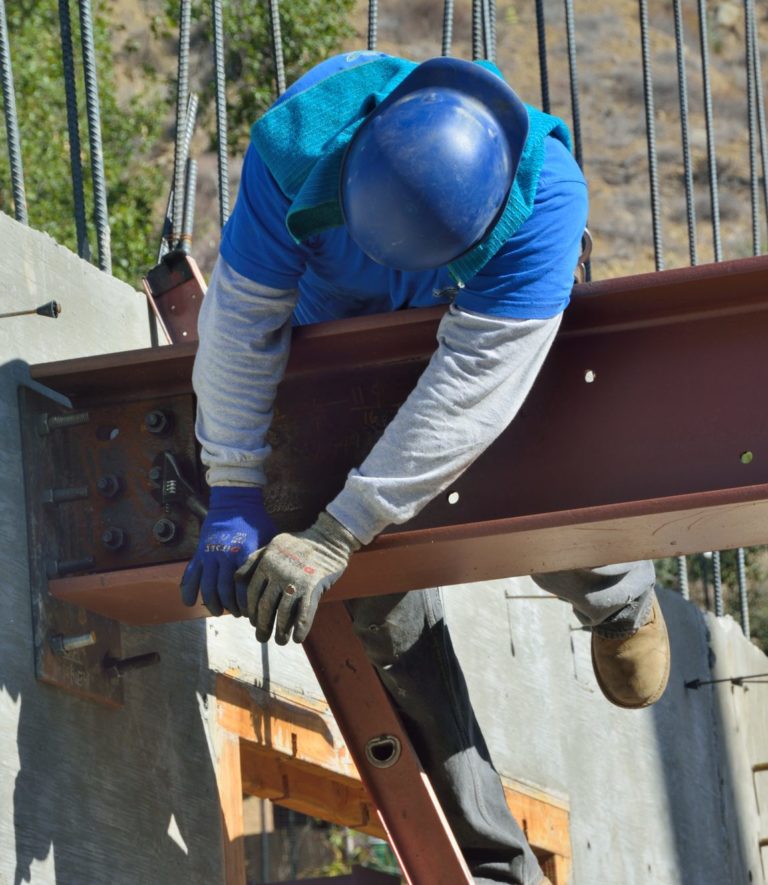
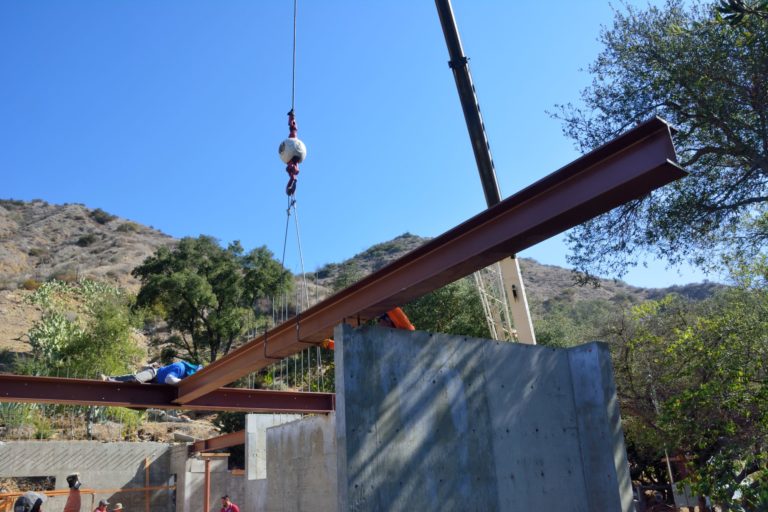
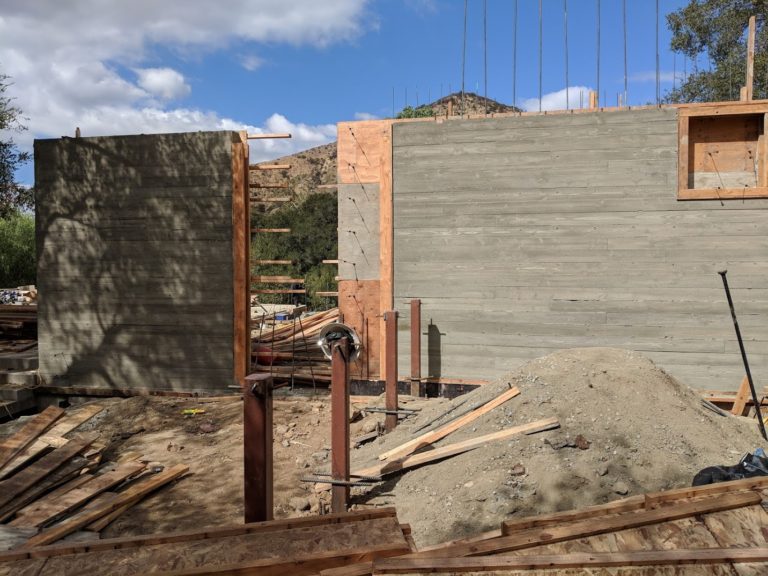
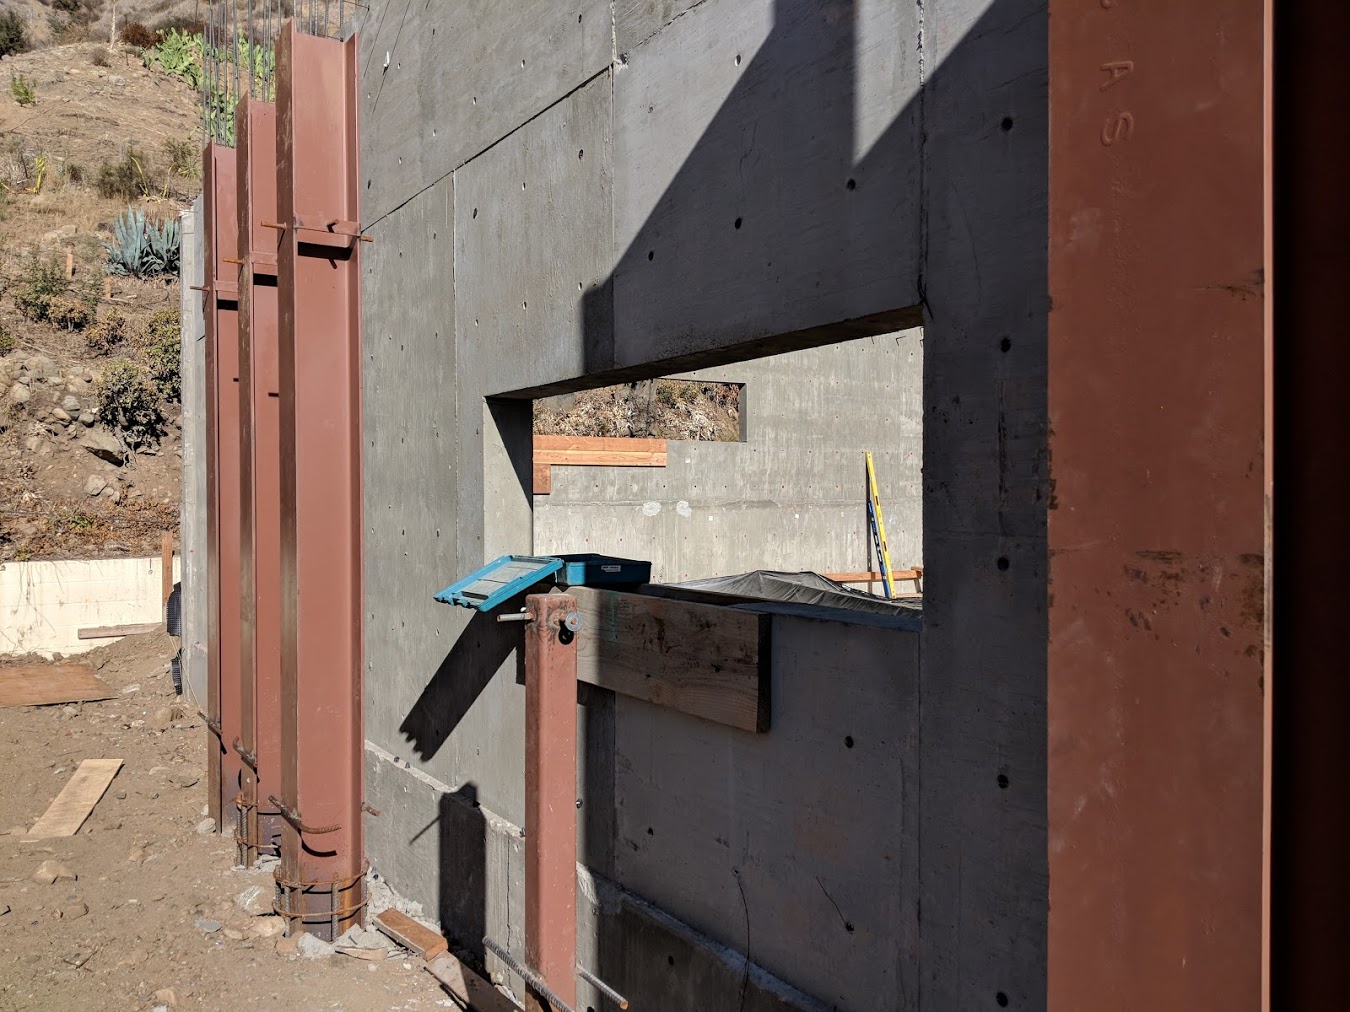
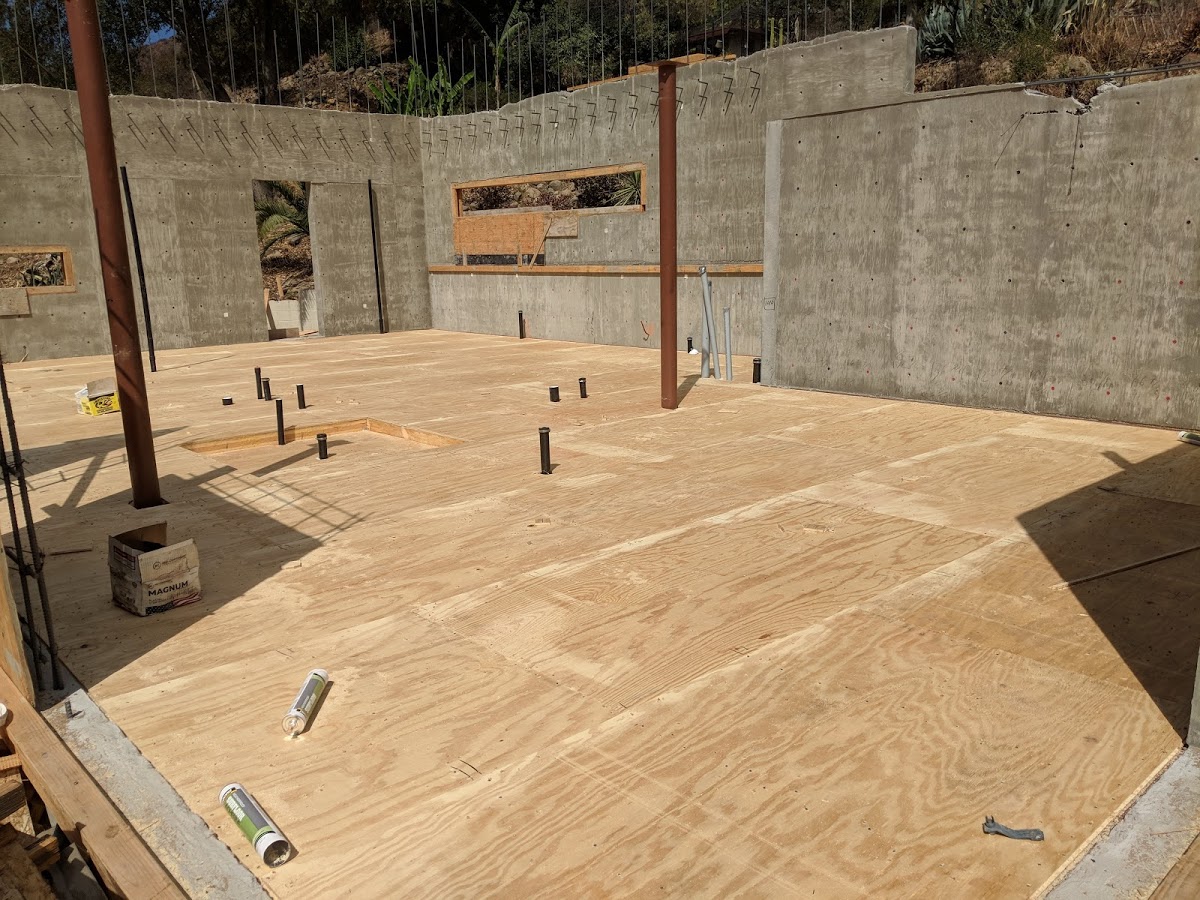
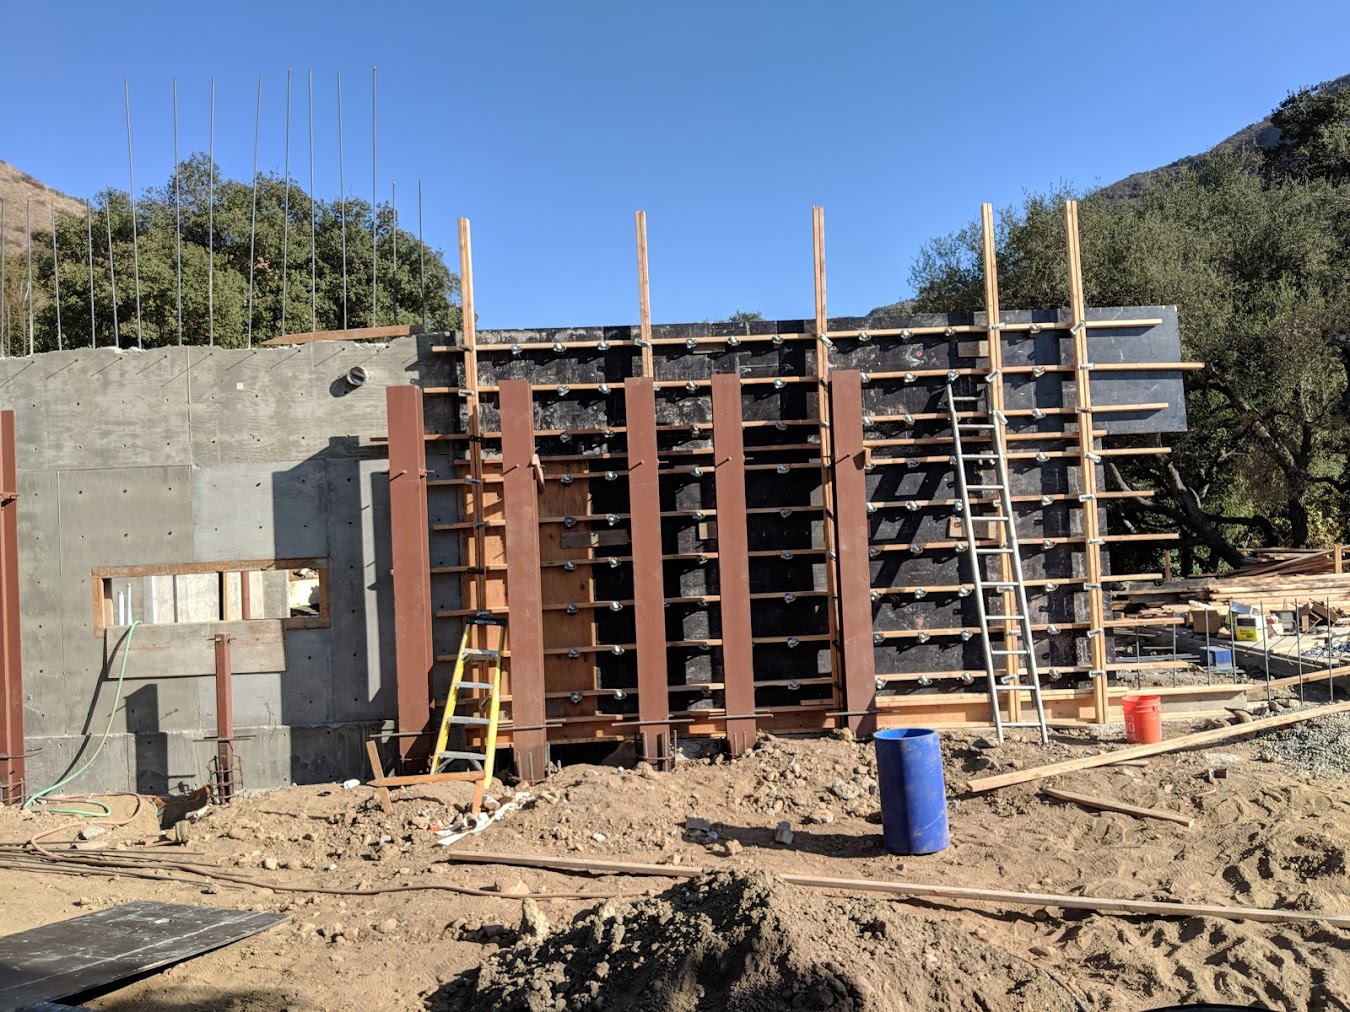
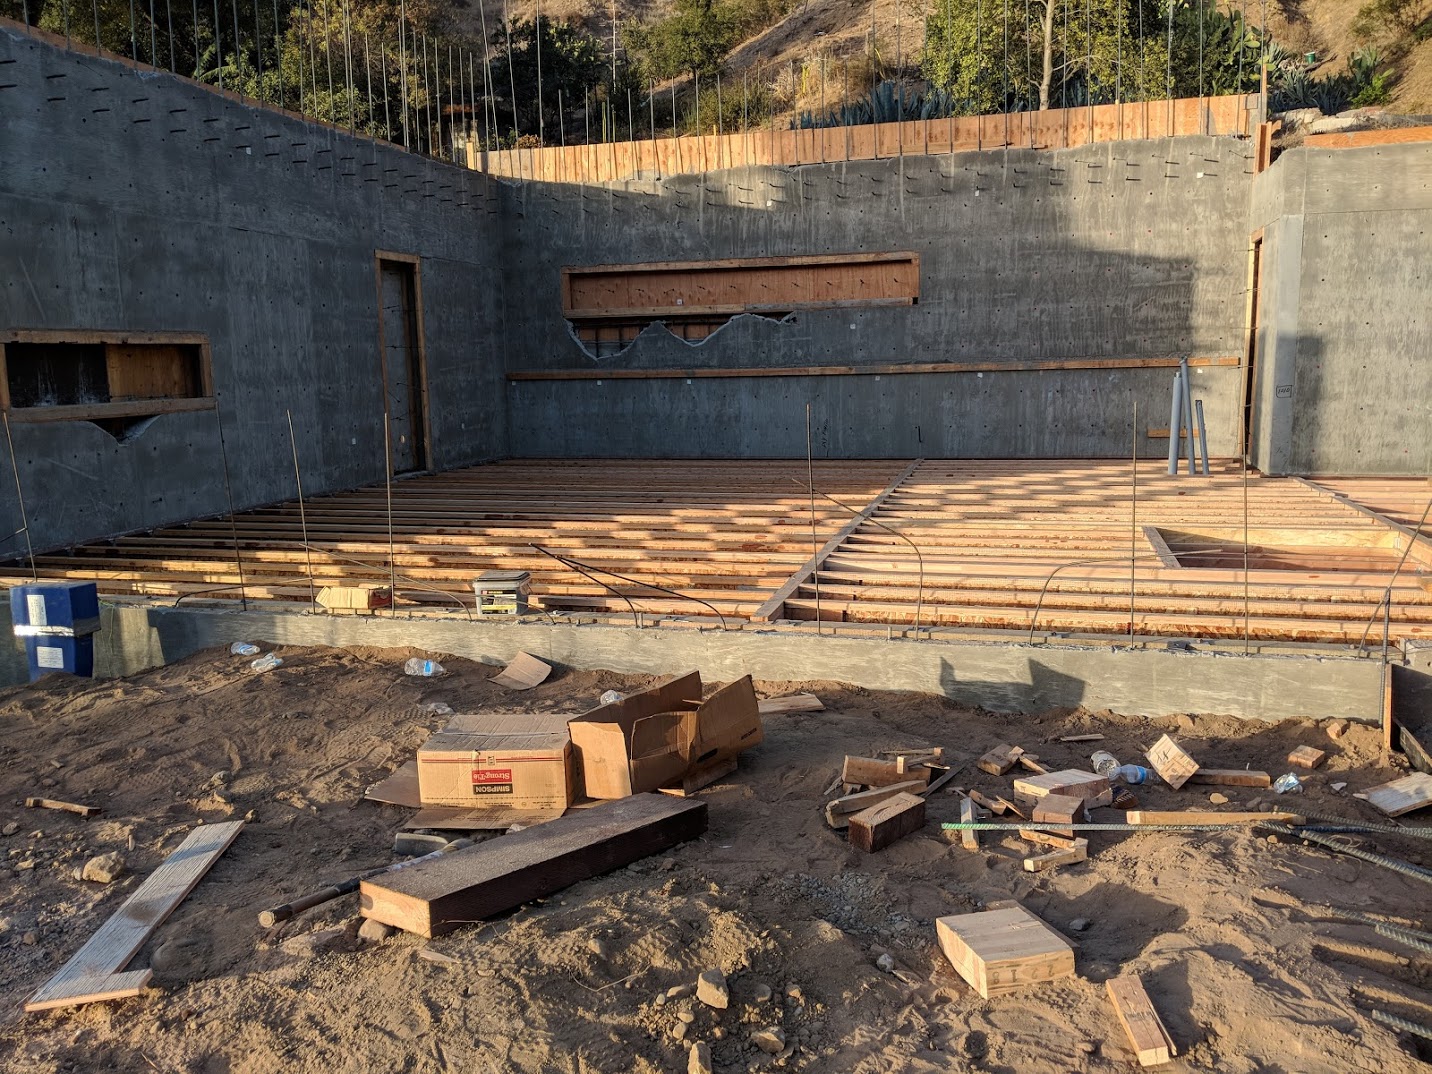
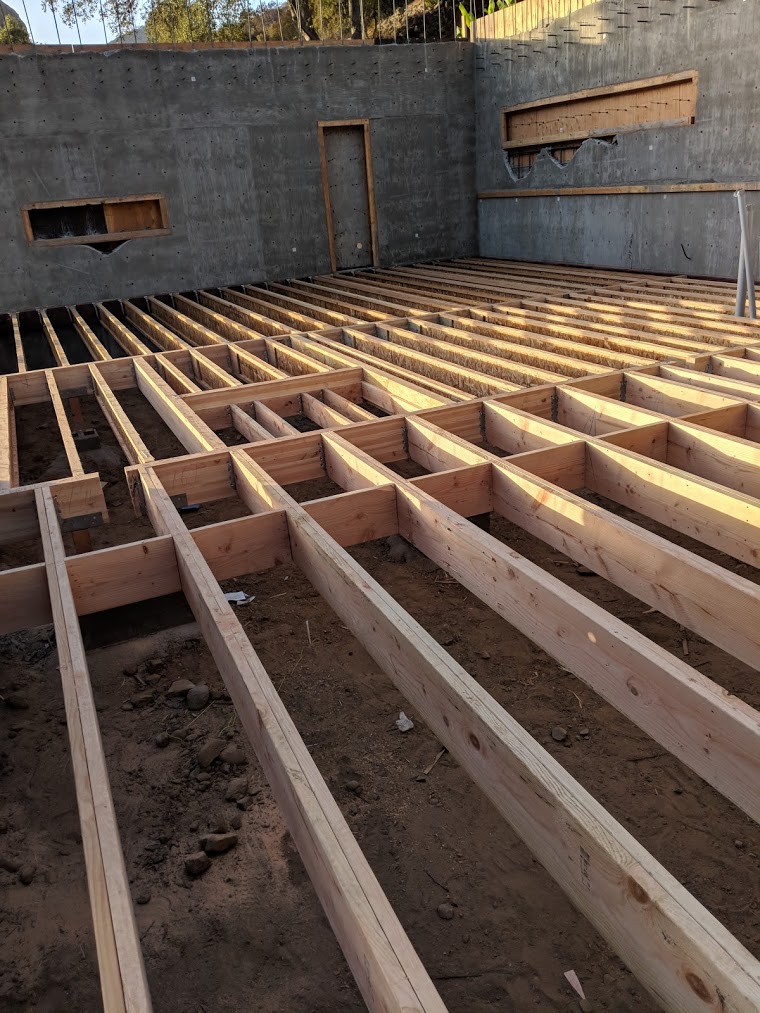
Next week the framers will come to build the interior walls of the first floor and the floor for the second floor. Before they can floor the second floor, however, they need to install a steel beam that will support one side of the second floor. Picture 5 shows the posts for that beam and the newly installed brackets to hold the ends of it. Yesterday, the fabricator came out to make precise measurements for the beam, which should be delivered Monday.

Picture 5 – Posts and, on the right and left, end connectors for the steel beam that will support part of the second floor.

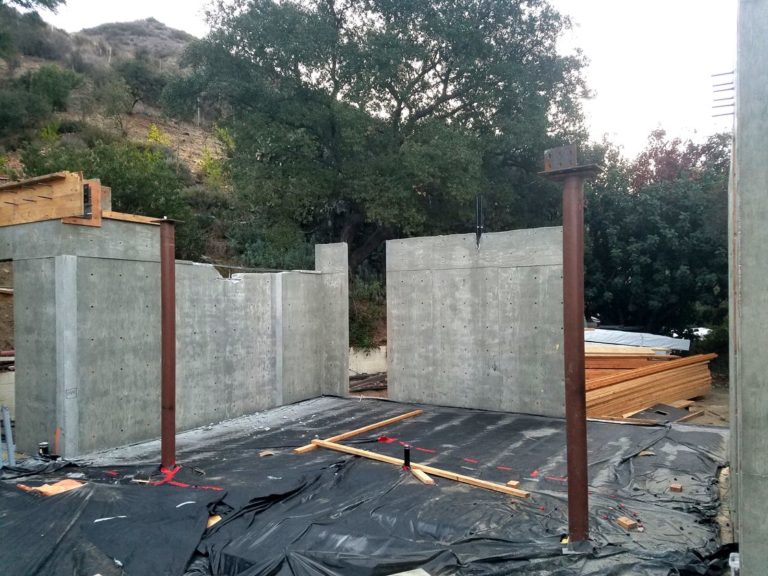
Once the framing is in place, the concrete guys can use the second floor, instead of scaffolding, while they build the forms for the concrete for the second floor walls. They should also begin working on the rebar for the floor slab in the great room and in the garage so that they can pour those along with the final wall.

Posted in house | Leave a comment

Saturday, Monday-Tuesday, October 6 & 8-9, 2018

You would think that since the movers came and took everything away on Thursday, there would be nothing left to do at the Irvine house. But we spent much of Saturday and Sunday afternoon there  finding stuff hidden in back corners or cabinets and trying to freecycle furniture we no longer need. Although we weren’t at the new house, the steel guys were there on Saturday.  They got a lot of the rebar for the board-formed wall up.

Front wall of the house with are in the center for the front door and all rebar done on the left and started on the right.

Today on Monday, they finished the rebar on the right, and got the form up on the left to form the cement. The architect is going to come out tomorrow for the first time to consult on what colors we should choose for the board form concrete and the stucco, which will cover all the rest of the house. Given that we have 2 choices for the finish of the windows and doors (except for the front door), there are not many choices for the stucco color.

Same wall as above with the end wall showing as well.
This picture shows the other side of the same wall, ready for the concrete, except that the corner is a different corner on the opposite side.

On Tuesday, they finished up the framing over the board-formed wood, and passed inspection.  Wednesday, the concrete will be poured for these walls. Our architect came out for the first time to consult about coloring the concrete.  In the end, we decided to leave it untinted.  We more or less chose the anodized color of the window frames and the stucco color, although we will order more stucco samples to make sure. The insulation and stucco will cover all of the outside of the house except for this board-formed wall at the front door. The insulation for this wall will be on the inside of the house.

Completely framed in inside board-formed wall.
Simple framing around the two windows which were missing some concrete under them from the last pour.
Posted in house | Leave a comment

Friday, October 5, 2018

I see that there have been no blog entries for almost a week. Partly this is just because the construction of concrete forms for walls is finally beginning to seem somewhat routine. Another reason that we have not been posting much is that we have been in Irvine most of this week working frantically to sort through 17 years of accumulated stuff in preparation for moving everything from our Handel house to storage. Although we packed over 100 boxes ourselves, it still required the help of crew of 3 packers all day Wednesday to finish most of the packing. Then 6 movers spent all day Thursday loading three 24′ trucks to move everything to storage. Even with all of this help Thursday was an absolutely brutal day for both of us.

As Picture 1 shows our Handel Ct. house is now really just a shell. This seems more than a little sad, since it has been a great house for us. I keep thinking that, emotionally, this would have been easier if the movers were taking everything to our new house rather than just to storage, but it has been so difficult arranging a “trade” within University Hills, so that, having done so, we did not want to let it slip away. In 5 or 6 weeks we should have access to the small condo in University Hills that we traded for. And then, of course, next May or June (certainly not July!) we will be able to move into the new house.

A final reason that progress has been slow is that we got 0.7″ of much needed rain Wednesday night. Because rain was forecast for Wednesday and everything was wet on Thursday, little or no work happened on the construction. Picture 2 shows one of the workman removing some of the accumulated water from the plastic that is keeping the subfloor over the crawl space dry.

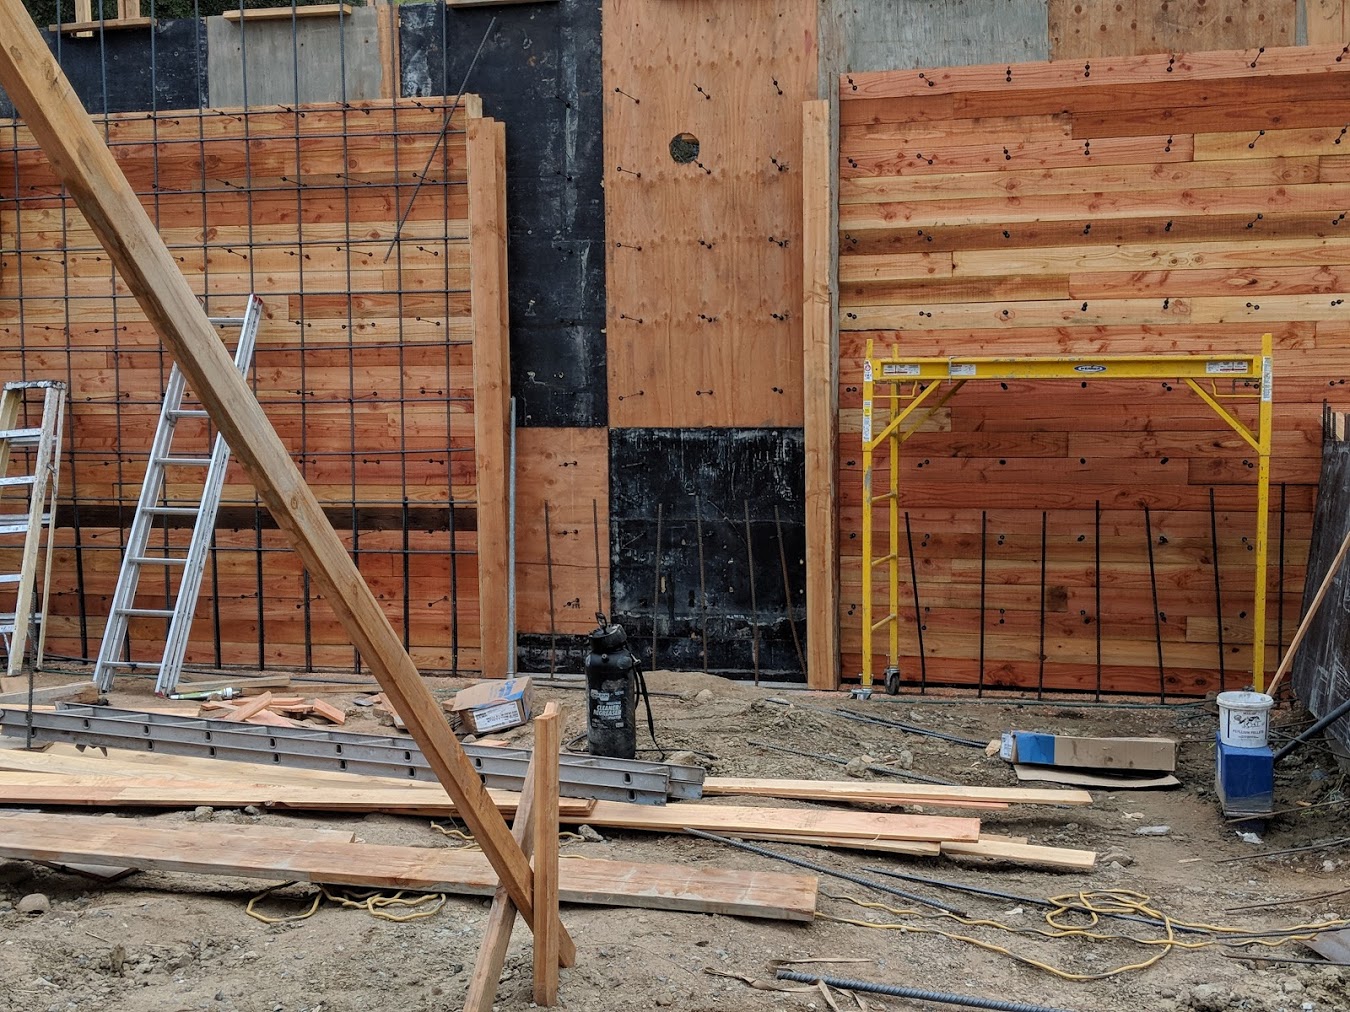
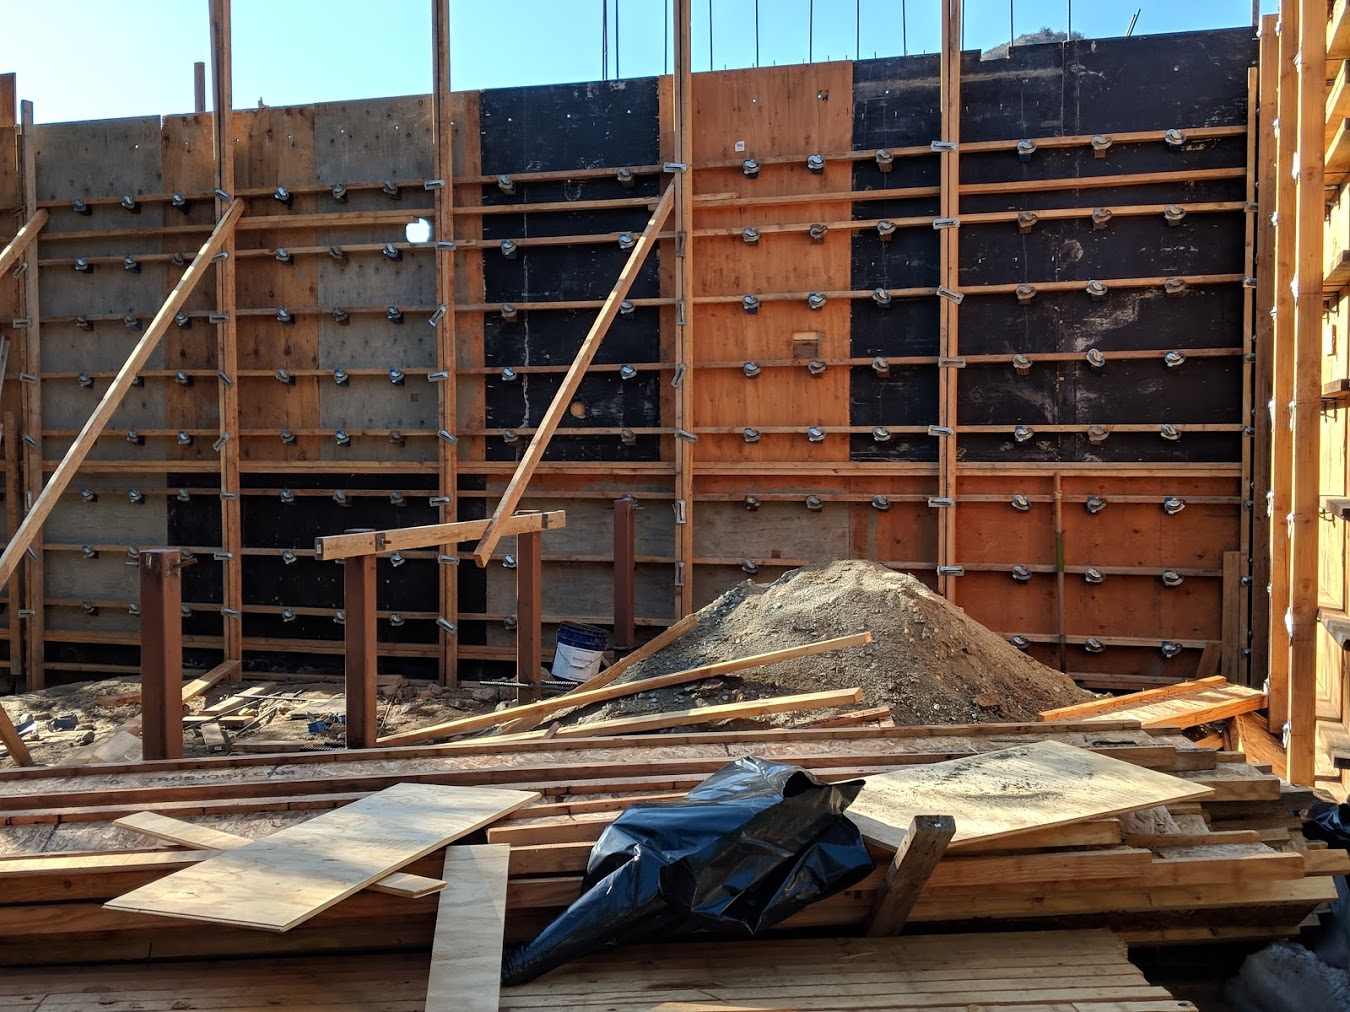
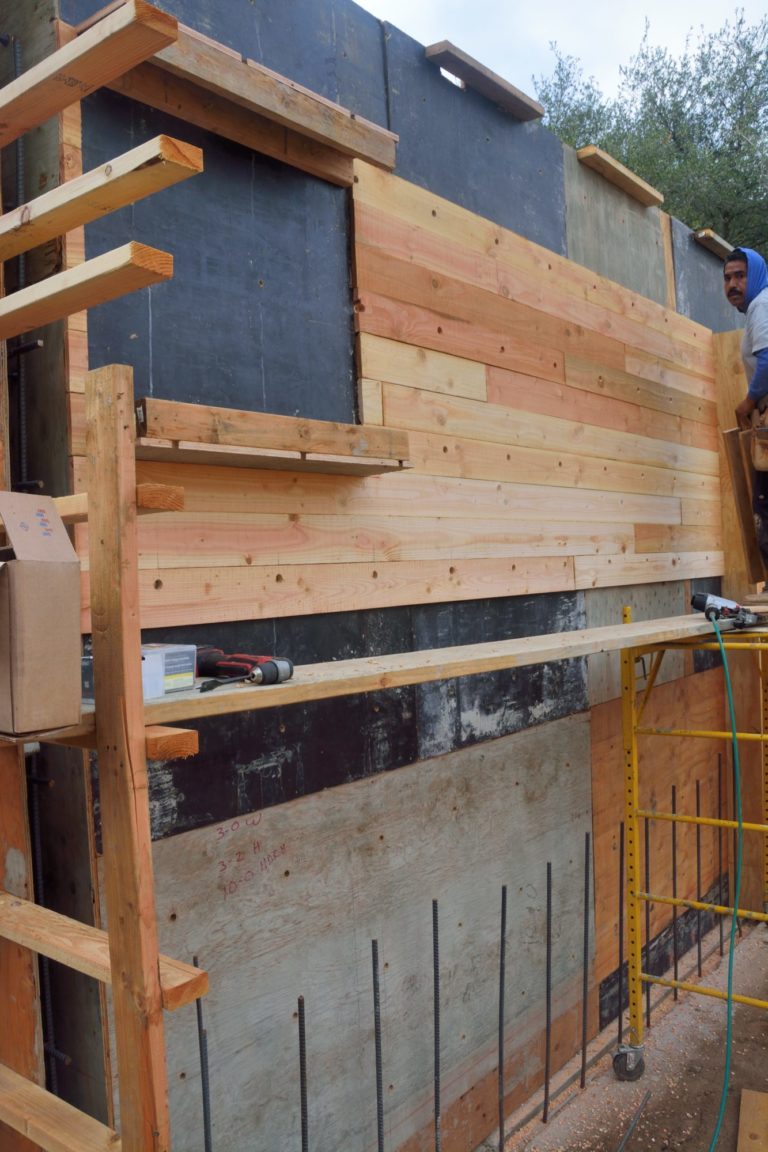
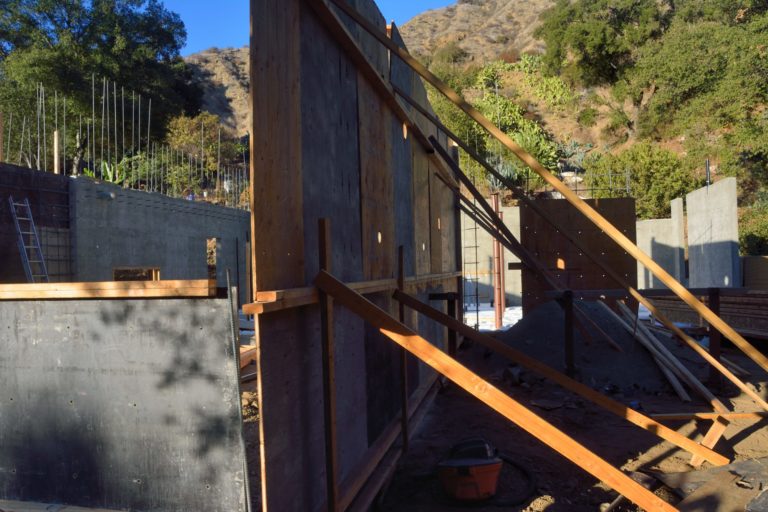
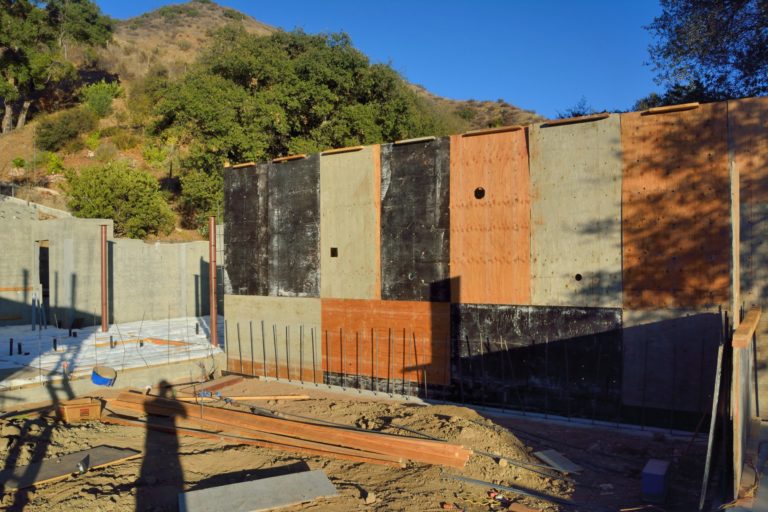
If we have gotten a little jaded watching the concrete forms go up, today we got to see something new since they were working on the forms for the “board-formed” wall by the front door. The concrete on the outside of this wall will be exposed and will look like it was constructed using a form made of individual boards. Picture 3 is a photo from this morning as Javi is working on that wall. Picture 4 is one taken later in the day showing the board-formed side of the wall completed.

Picture 3 – Javi is nailing the individual boards of the board-formed wall to the plywood outer wall of the form. He is also building the blocking for a window.
Picture 4 – At the end of the day the outside form for the board-formed wall is complete and some of the rebar is in place. On the left is the blocking for the bottom part of  a window. The actual window, which is on the landing of the stairs to the second floor, will extend up, from what you can see here, all the way to the second floor ceiling. The opening toward the right is for the front door. This will be made of steel and will have windows to one side and above.

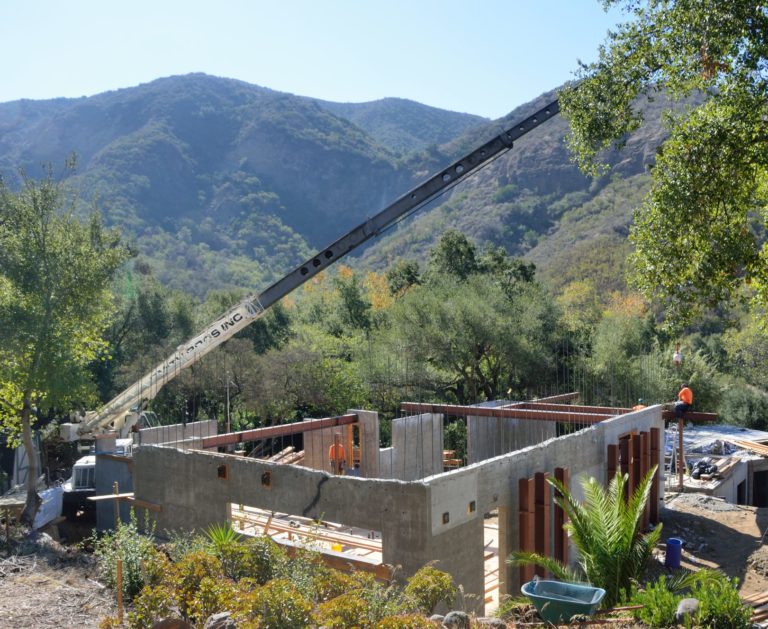
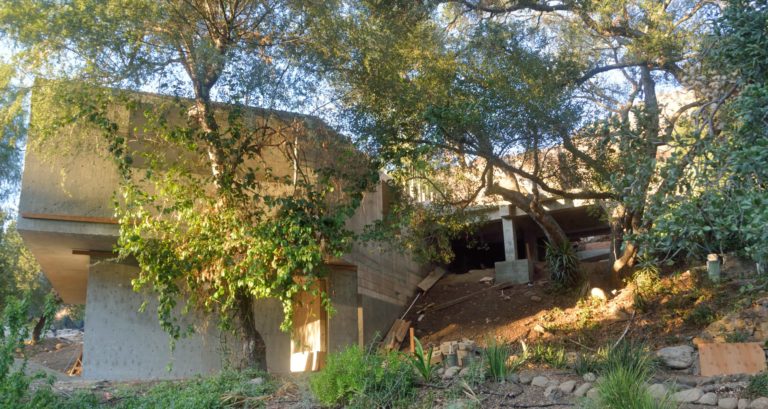
We will leave you with Picture 5 that is of the garage/apartment structure and one of the decks taken from our orchard at the base of our property.

Picture 5 – Garage/apartment and one of the decks seen from below.
Posted in house | Leave a comment

Saturday, September 29, 2018

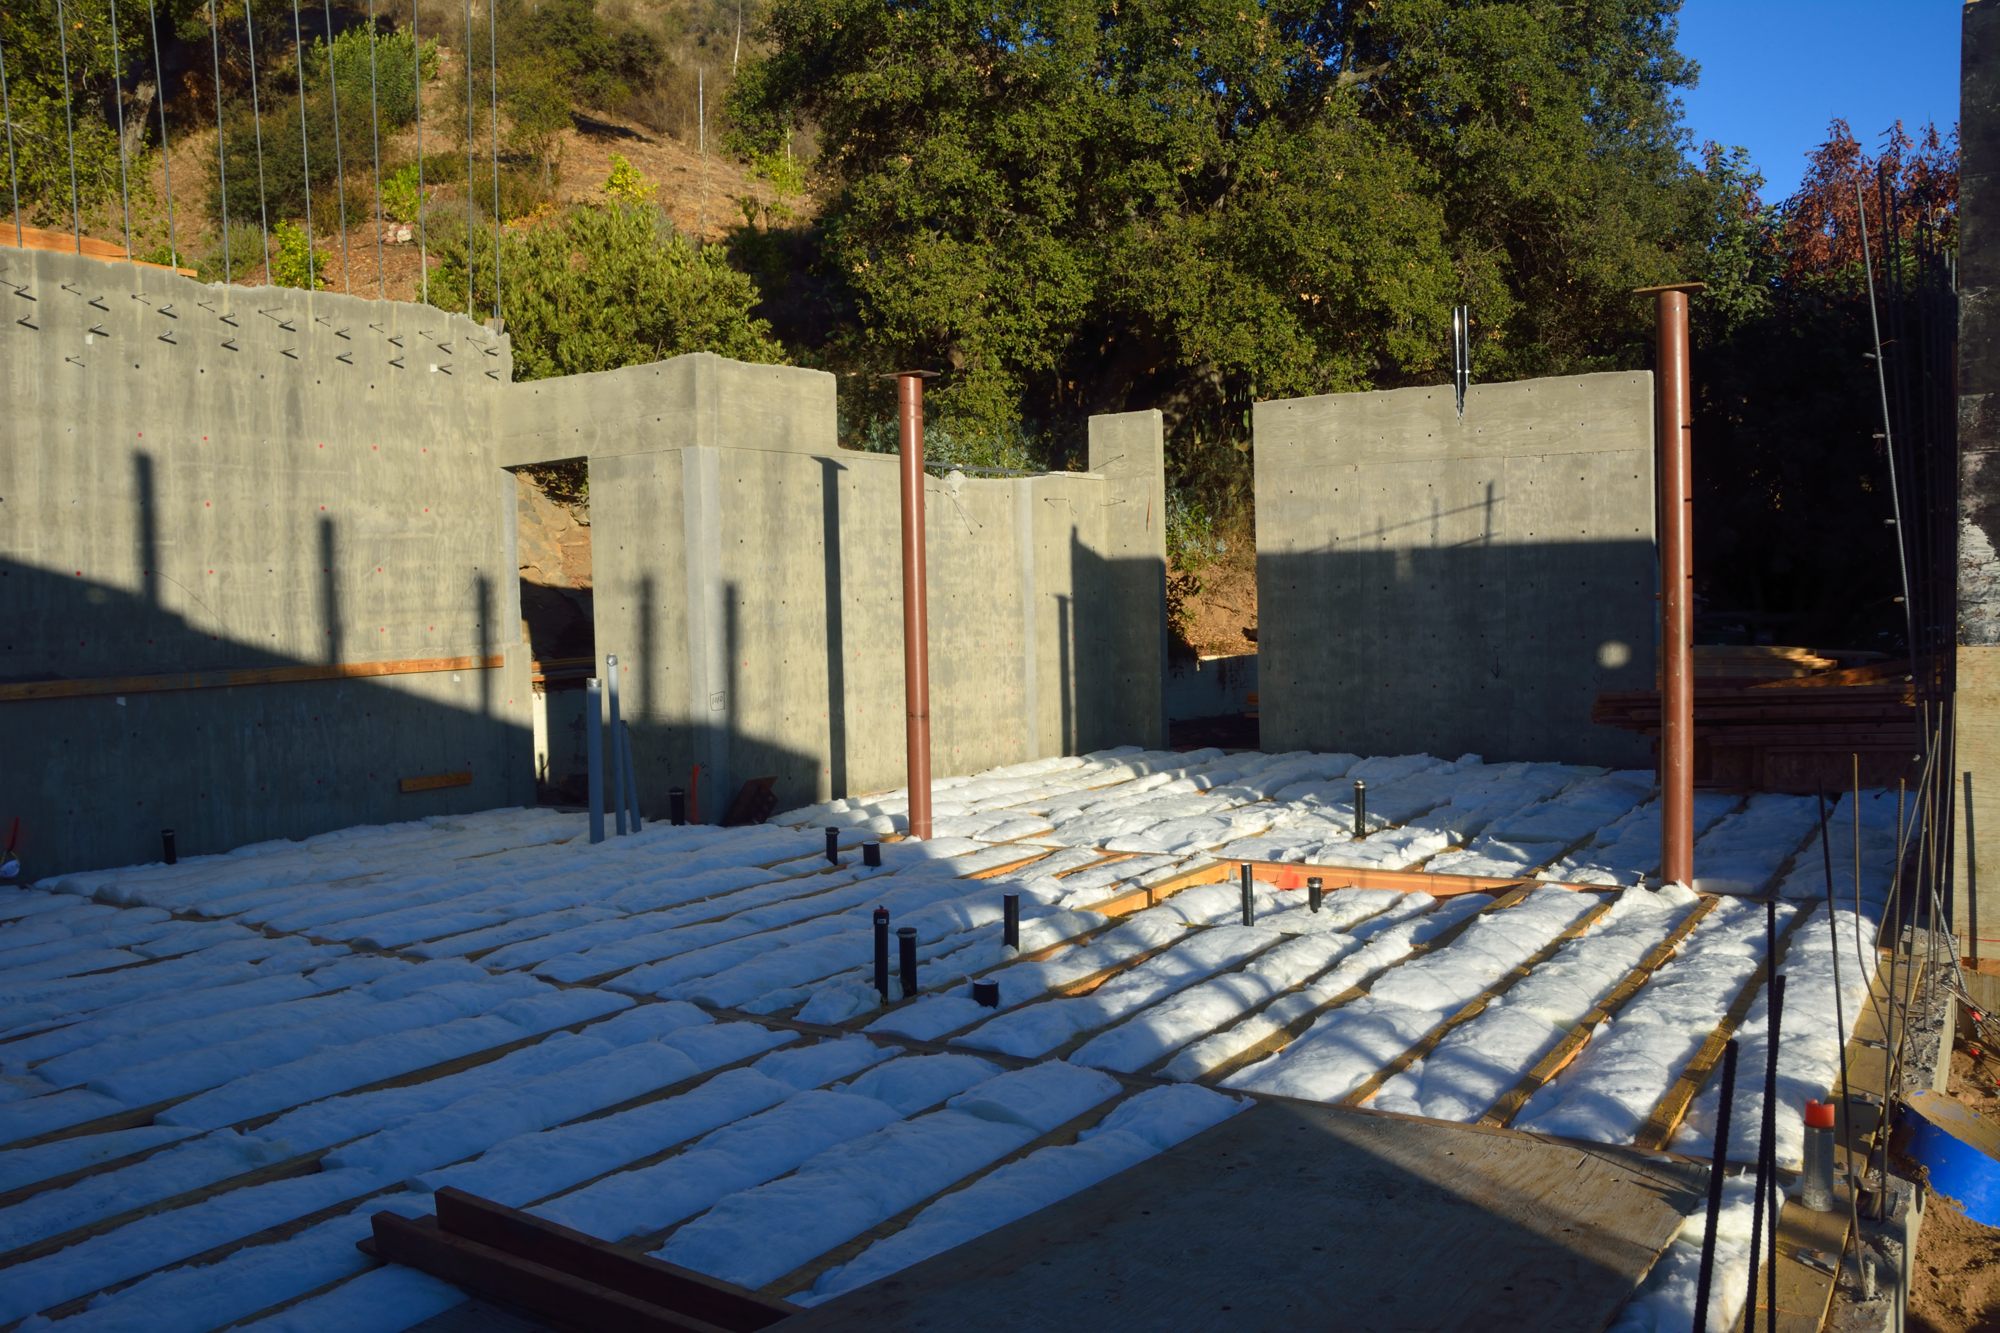
The framers were meant to come on Friday to cover the insulation with sheathing.  They showed up on Saturday, as we are under the threat of rain from hurricane Rosa. On Friday, the rain was forecast to start as early as Sunday night, but now we will be lucky to get much, if any rain, on Tuesday or Wednesday.  You can see tubes of caulk, which I believe they used to seal the edges where the plywood meets the concrete. The entire crawlspace and insulation is now covered with plywood. Tomorrow they’re meant to cover the plywood with a very heavy plastic for a vapor barrior.

Posted in house | Leave a comment

Friday, September 28, 2018

We have been busy packing up our house in Irvine that we are selling now, even though the new house will not be done until next summer, so we have missed a few days of blog entries.

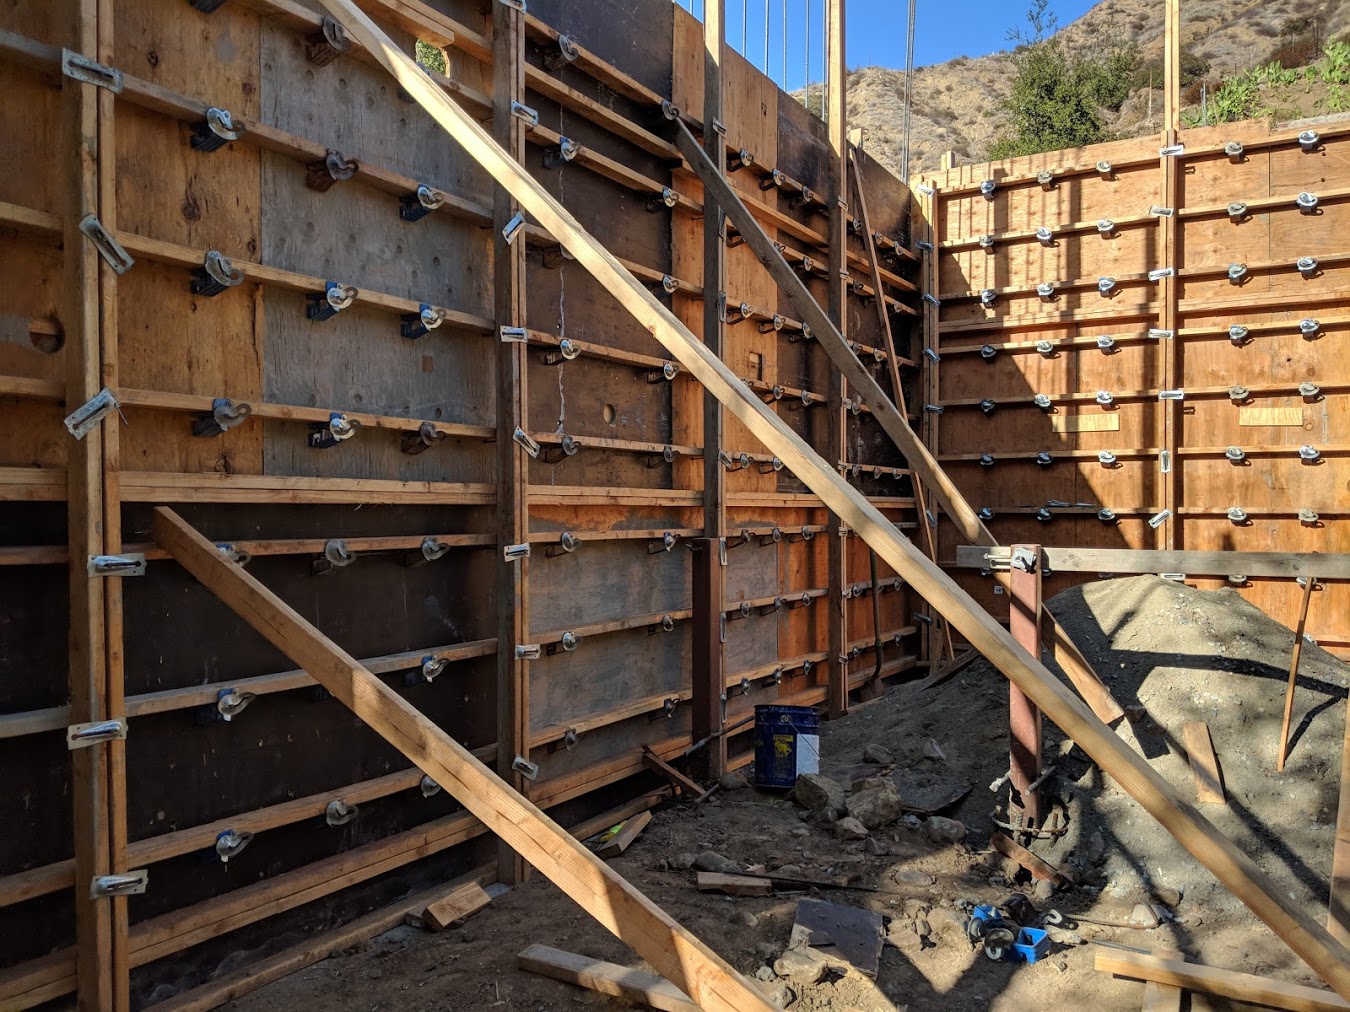
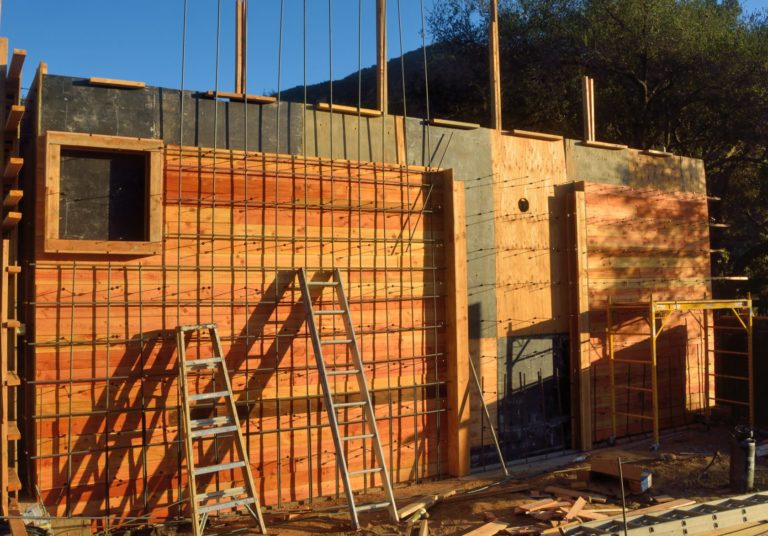
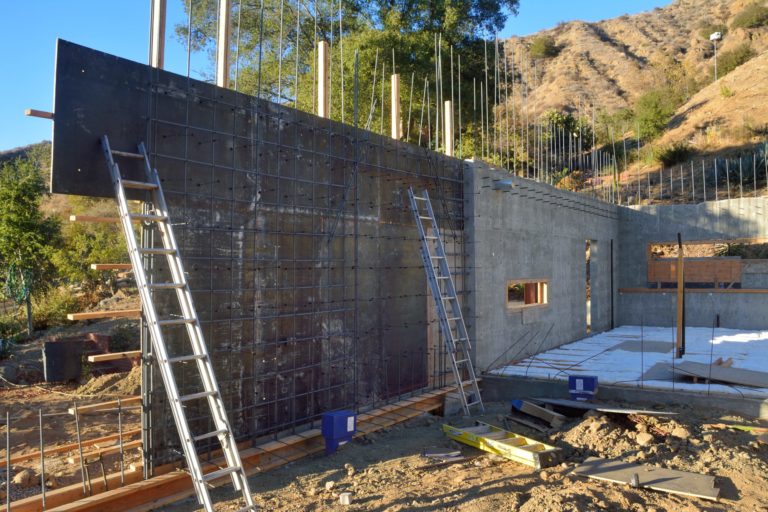
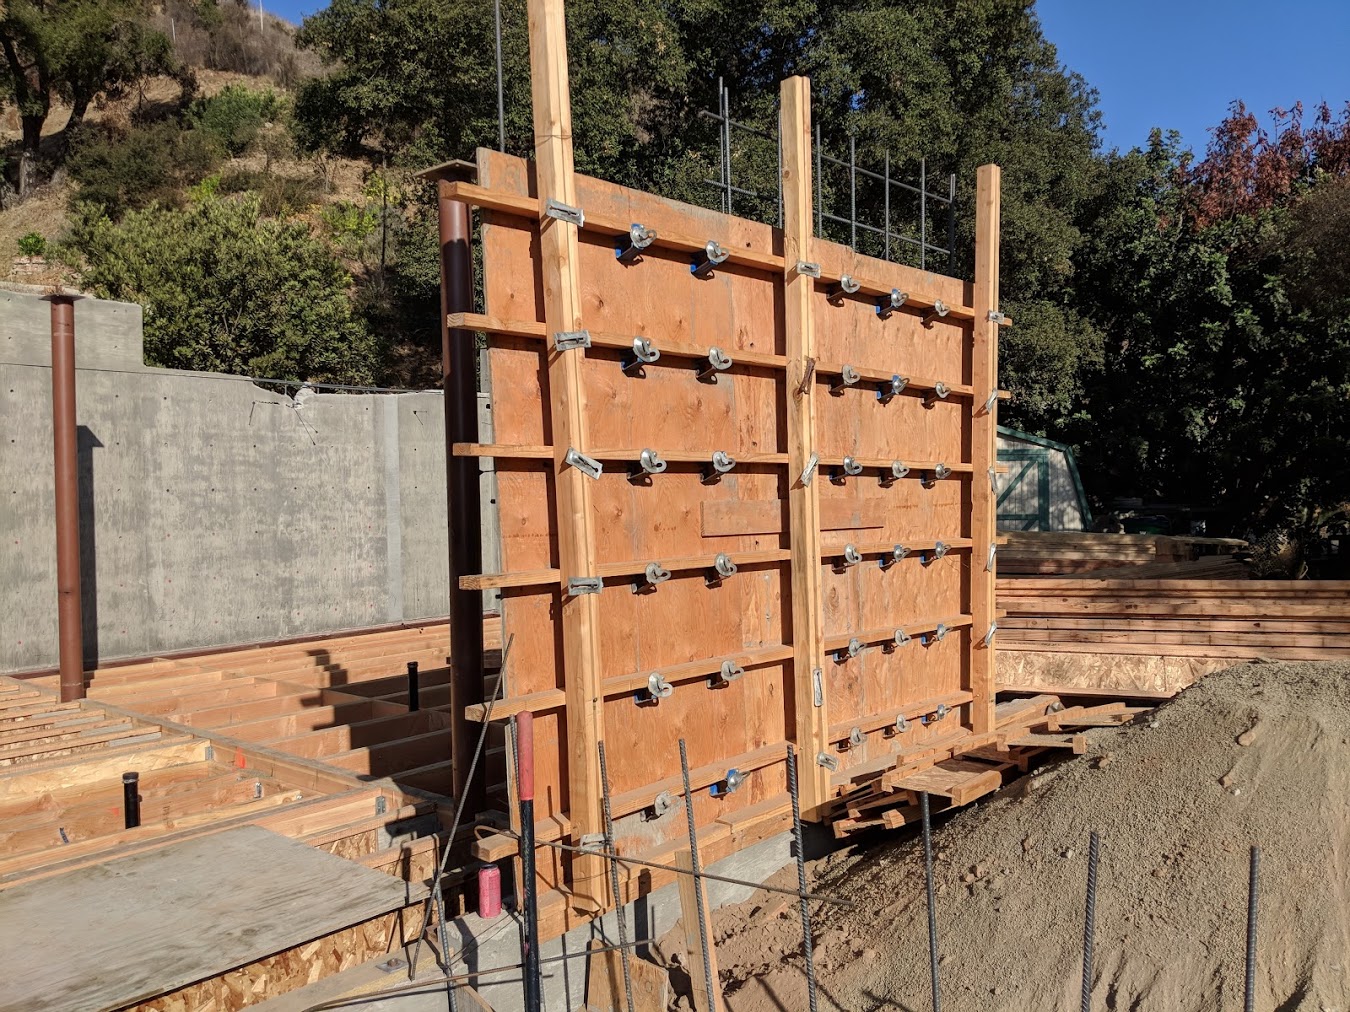
In addition to working on the wall on the west side of the great room, they have also been putting up the forms for the wall on the east side of the great room. This is the wall that will have the front door in it. Picture 1 shows those forms from the outside; Picture 2 shows it from the inside. The inside of the plywood form for this wall will be lined with strips of heavily grained wood so that the outside of this wall will have a “board-formed” look.

Picture 3 shows the rebar that they have been putting up for the wall on the west side of the great room.

Picture 4 shows the fiberglass insulation that they installed today between the joists in the floor over the crawl space.

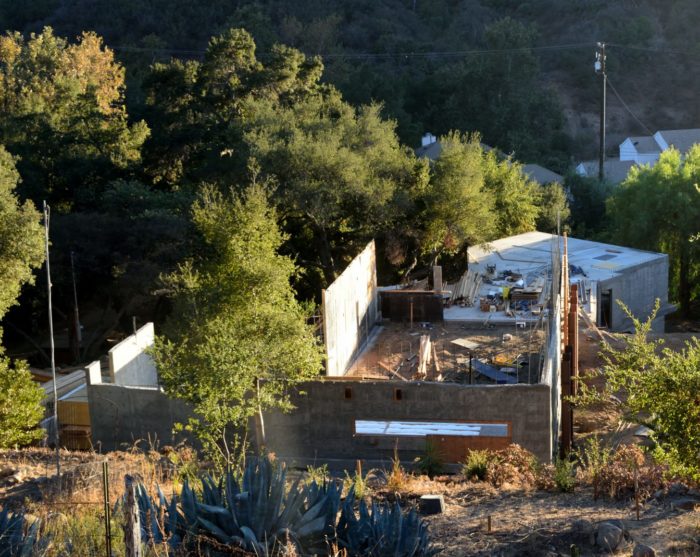
Finally, Picture 5 provides a bird’s eye view of the construction taken from the hillside above the house. The wall that you can see in the middle of this picture is the one on the east side of the great room.

Picture 1 – The outer forms on the east side of the great room from the outside.
The outer forms on the east side of the great room from the inside. This side of these forms will be lined with wooden planks to make a “board formed” look.
Picture 3 – the rebar that they have been putting up for the wall on the west side of the great room.
Picture 4 – The newly installed fiberglass insulation between the joints in the floor over the crawl space.
Posted in house | Leave a comment

Monday-Tuesday, September 24-25, 2018

Over the last two days they finished removing the outside forms from the walls that they poured 10 days ago, they have started putting up the rest of the forms for the first floor walls, and the plumbers have begun running the waste lines in the crawl space.

Picture 1 – This shows the west wall of the house. On the left is the outside of the kitchen wall that they poured 10 days ago. Yesterday they took down the outside forms from this wall. On the right, the black material is newly erected, outside forms for the western wall of the great room.
Picture 2 – This is a view from the inside of the same wall shown in Picture 1. Now that the exterior forms are in place, they will weave the rebar for this wall.
Picture 3 – This shows the exterior forms for another of the first-floor, outside walls. This one is along a hallway that will run from the great room to our bedroom. The most exciting elements of this picture are the two brown, steel posts. One of these is on the far left of the photo, the other is in the middle almost hidden by the near edge of the wall forms. Once this section of wall has been poured, a steel beam will run from it, across these two new posts, to the concrete wall at the back of the house.
Picture 4 – The black tubing in this photo are waste lines for a toilet and sink.
Posted in house | Leave a comment

Thursday, September 19, 2018

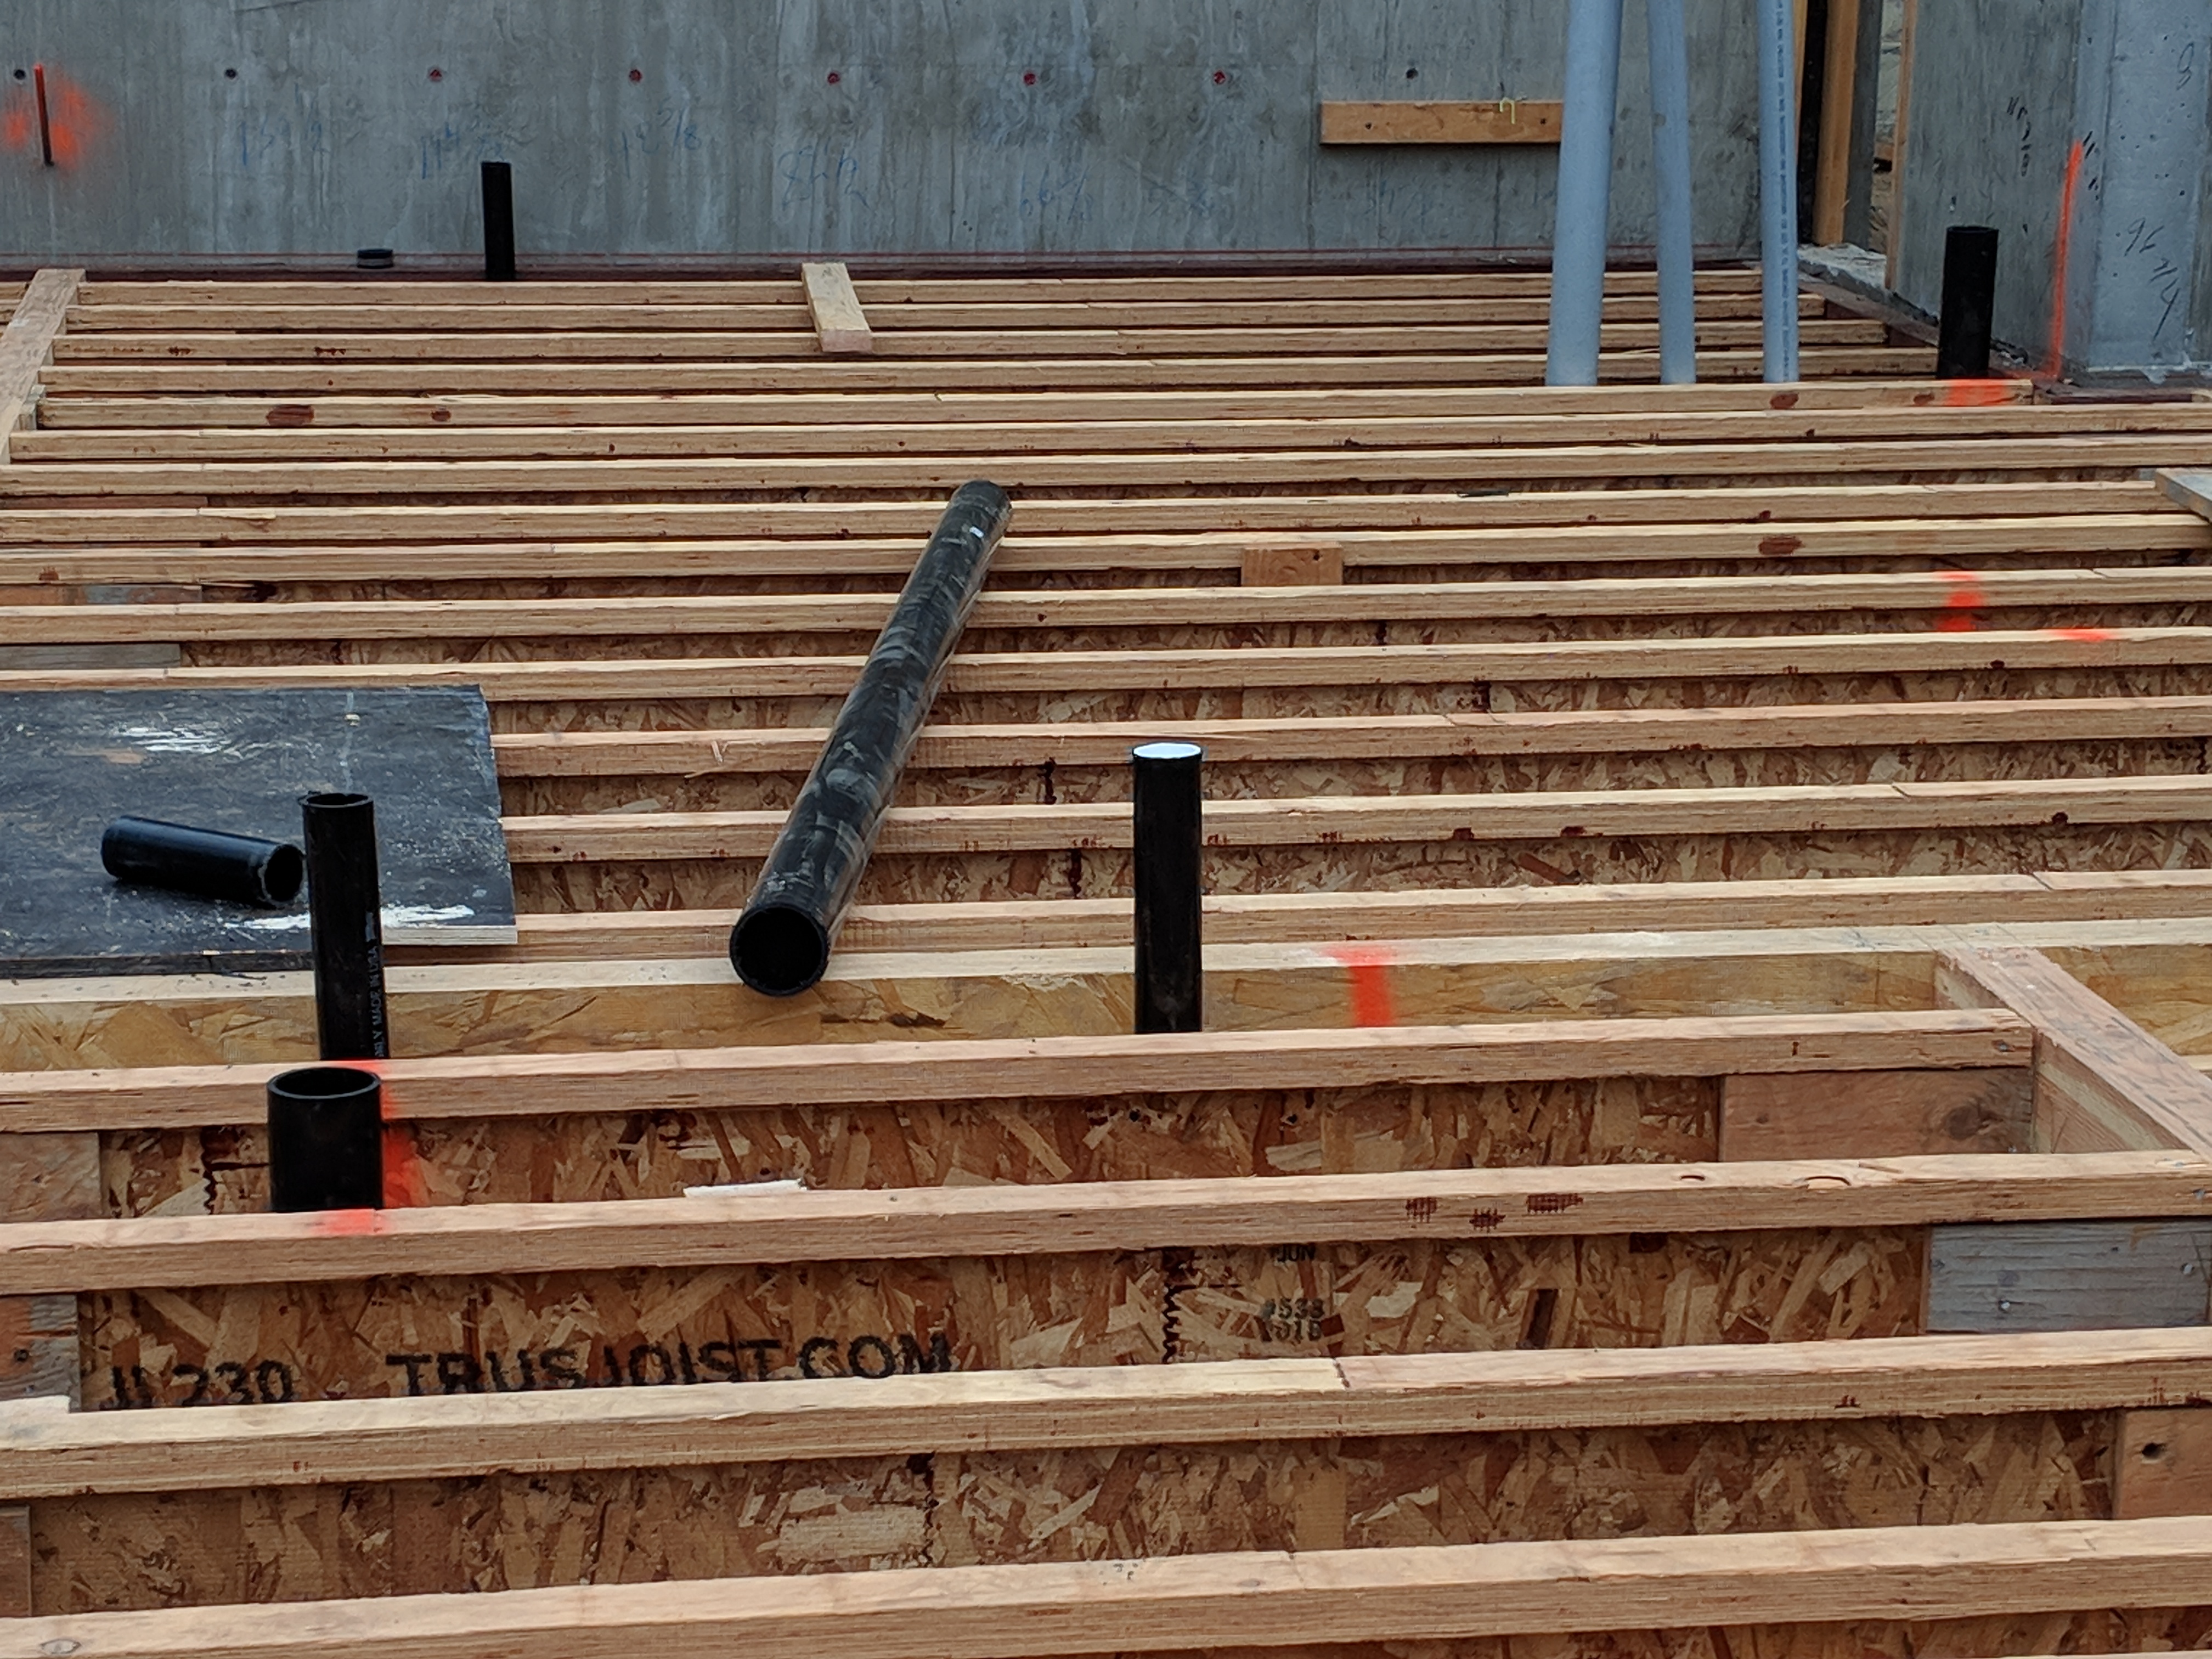
Today the framers came back and put up all the joists for the part of the house that has the crawlspace under it.

The near part of the image (the dirt) is the great room, which will have a concrete floor to retain heat from the sun in the winter. The back left is the kitchen and laundry area and the right is closets, powder room and to the far right, outside of view, the master bedroom. 
The near joists are under the bedroom.  You can see down into the crawlspace, which is a decent height. Note the cut out in the beam at the left of the photo, towards the back, that was discussed in yesterday’s post. This is where the metal post to support the second floor will go.
Posted in house | Leave a comment

Wednesday, September 19, 2018

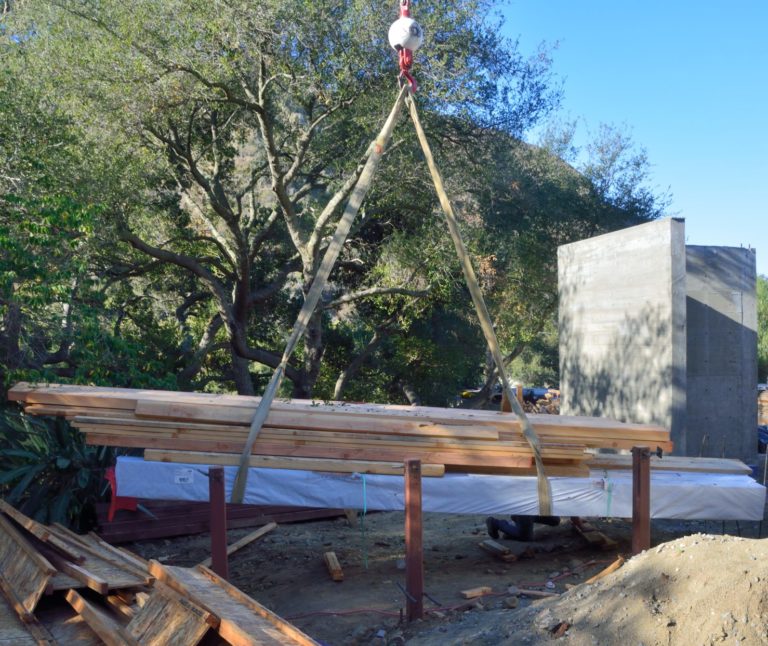
Nina was at yoga this morning when several of the neighbors told her that “a lot of lumber was delivered to your house this morning.” It was true. There is hardly room by the house for it all.

Picture 1 – Some of the just delivered lumber. Most of this pile are floor joists. The darker brown planks on top will be used as ledger boards on the second floor.
Picture 2 – More of the lumber: dimensional lumber and plywood.

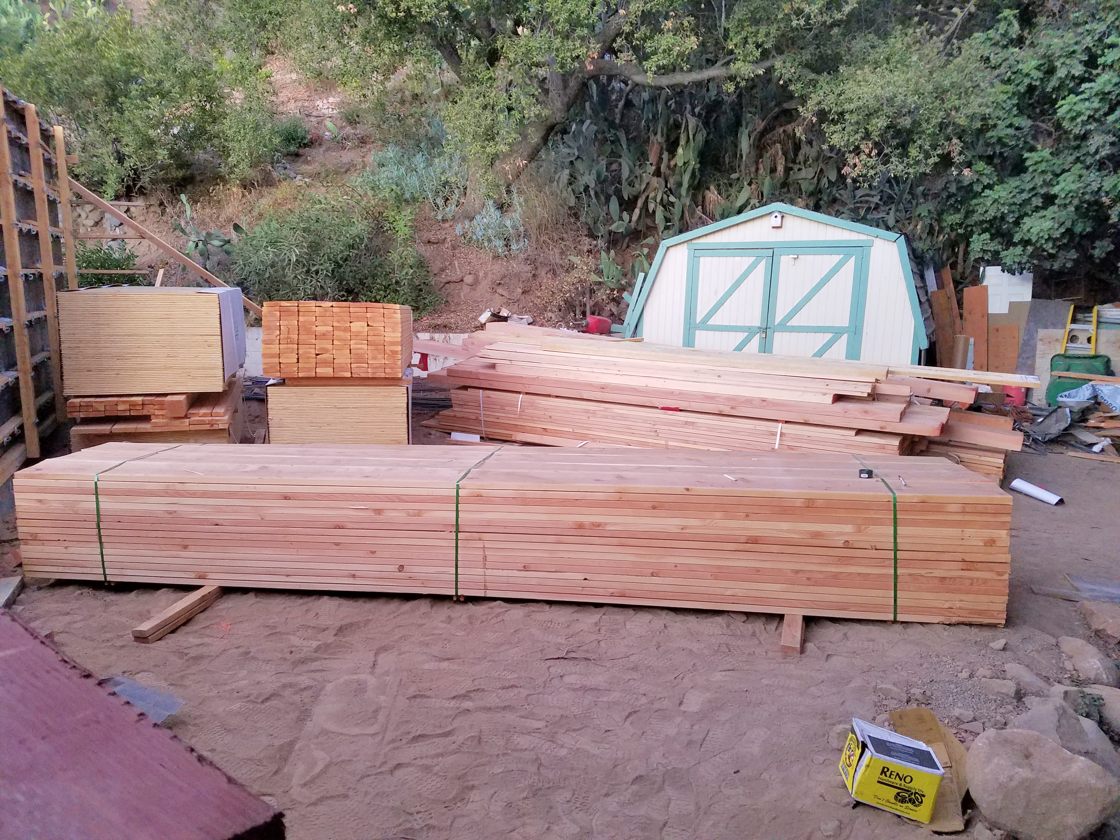
But they didn’t just get lumber delivered. Picture 3 shows that they put up all of the ledger boards for the first floor on the outside walls of the crawl space. A ledger board is a large piece of lumber — I believe that these are 4×12’s — attached to the walls with bolts embedded in the concrete wall. Once the ledger boards are up, the beams and joists can be attached to them. In Picture 3, the ledger boards are the dark lumber (since it is mounted on the concrete, it must be treated).  Picture 3 also shows the first of the beams in place.

Picture 3 – Ledger boards for the first floor have been mounted around the concrete wall and the first beams have been put up.

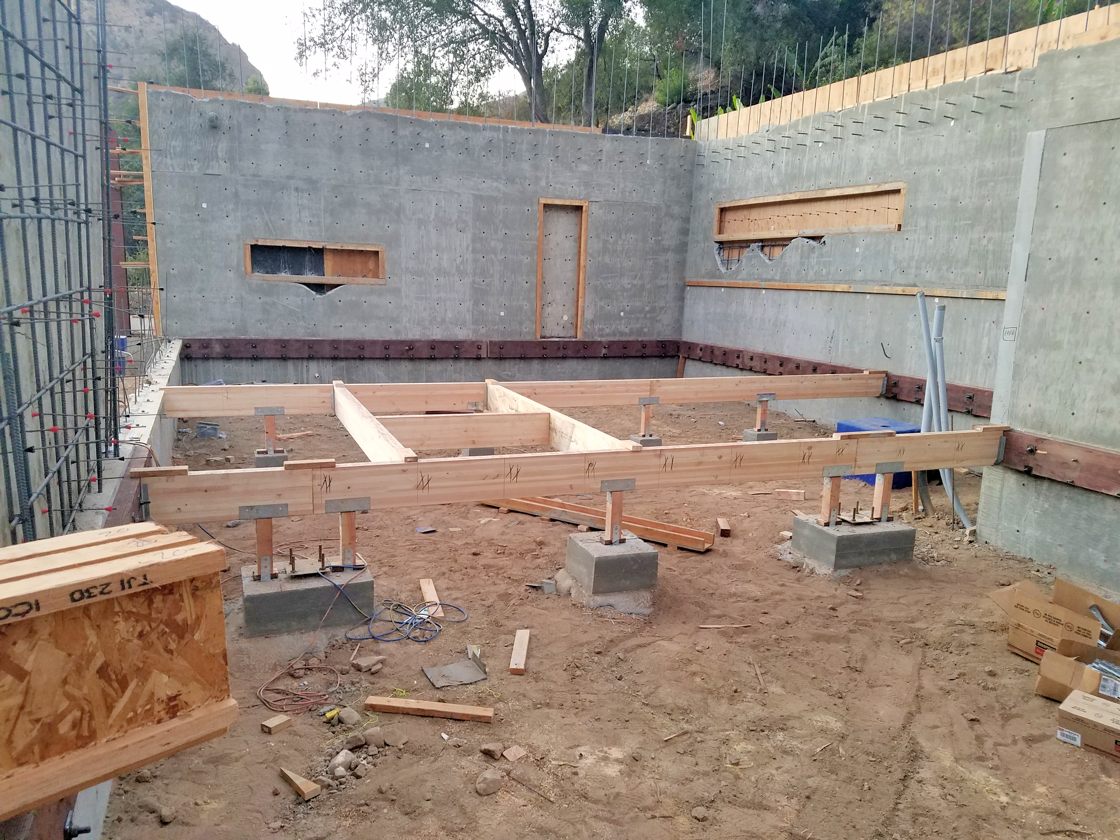
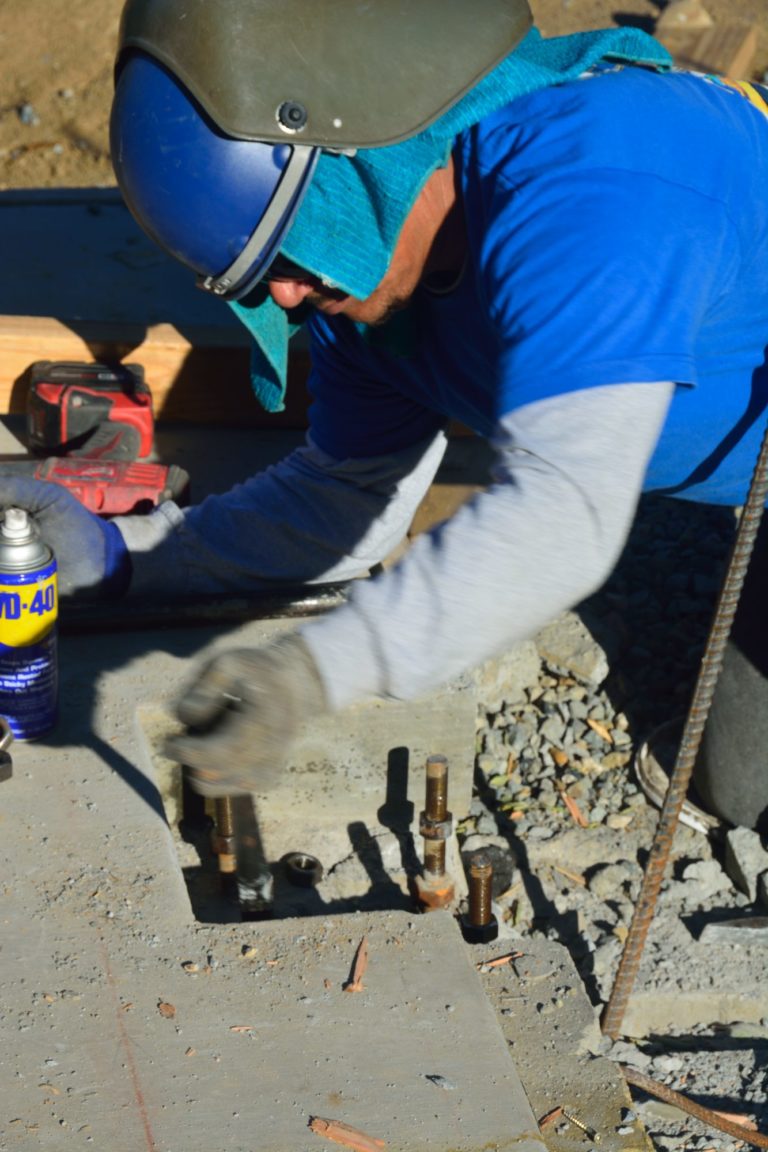
This next is for those of you who like wonky details. Picture 4 is an enlargement of the concrete pier in the foreground on the left in Picture 3. The beam is cut and there are supports and brackets supporting the beam on each side of the cut. Notice that, below the cut is a metal bracket with four bolts coming up from it. Eventually, a 4×4 steel post will be bolted to this bracket. The beam will be cut out above it to allow it to pass through. This beam will hold up one of the outside walls of the second floor since the second floor is not as large as the first floor.

Picture 4 – Detail of one of the concrete piers in Picture 3.
Posted in house | Leave a comment