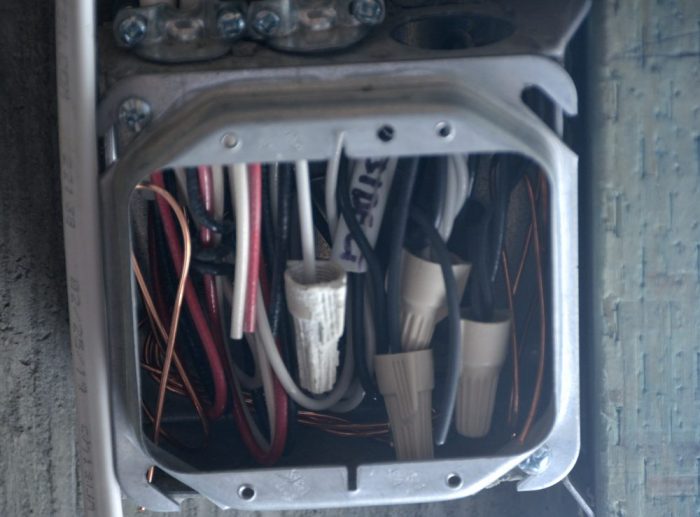
Picture 2 – A very crowded box; how will they fit the switches in?
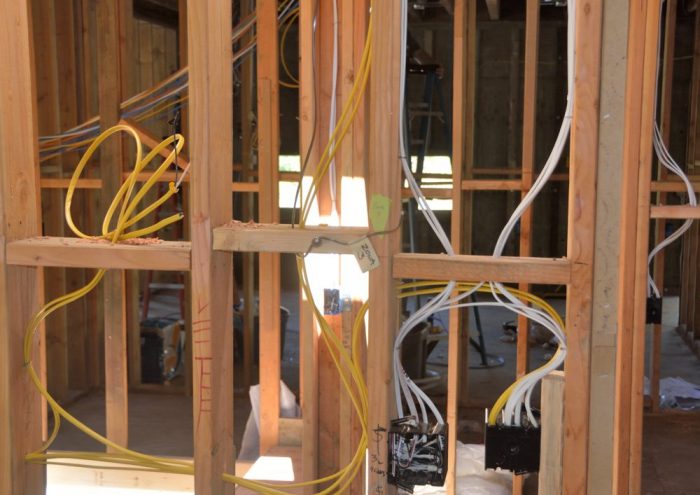
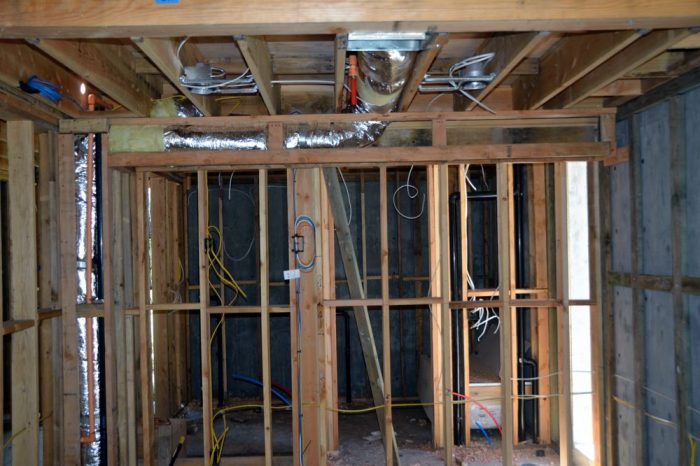
With the delivery date of the windows and doors approaching, there has been some increased urgency to finish the work on the rough plumbing, wiring, and HVAC that can be done in a structure without doors and windows. Picture 1 shows how the electricians have made progress connecting the wiring into the utility boxes. Having done some electrical wiring himself, Ted looks at boxes like those in Picture 2 and just shudders. Because this is on one of the outside concrete walls, the box is only 1.5″ deep not the usual 3″. With all of these wires (and their associated wire nuts) it is hard to see how the actual switches can be shoehorned into this box! I guess that is why we have pros on the job.
Picture 1 – The electricians have started wiring up the boxes. The yellow wire seems to be used for unswitched connections, such as those for receptacles and to carry power to switches, the white for switched connections such as go to light fixtures.
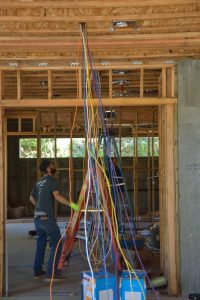
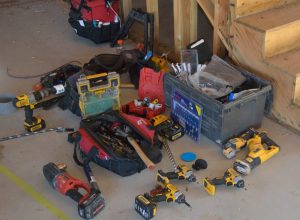
A separate crew does the low-voltage wiring that will be used for the Internet, speakers, TV, and panels to control these things as well as some of the lights. Picture 3 shows them pulling a spaghetti like mass of these wires that are just for the great room. Picture 4 shows the plethora of tools that they use — this doesn’t include the ones they were using at the time.
Picture 3 – Pulling the AV wiring for the great room.
Picture 4 – Some of the selection of tools that the AV crew was using.
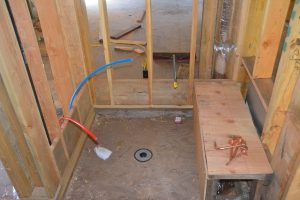
Picture 5 – Supply and waste plumbing lines for the master bathroom.
Picture 5 shows the supply (red and blue) and waste lines for the two sinks in the master bathroom. The supply lines are made of PEX, which we have not used before in a house. However, PEX (or crosslinked polyethylene) has several advantages for water supply piping over metal pipe (copper, iron) or rigid plastic pipe (PVC, CPVC, ABS) systems. It is flexible, resistant to scale and chlorine, doesn’t corrode or develop pinholes, is faster to install than metal or rigid plastic, and has fewer connections and fittings. It can also be color coded. Notice however, where the pipes come out of the wall into what will be the under-counter cabinet, they are changed to copper.
Picture 6 shows the piping entering the utility room where there will be a filter system as well as the water heater. The supply from the street will eventually also be run into this space. Because all the domestic water must goes through the filter that will be here, these PEX pipes are much larger. Notice also the gauge and shutoff for the interior, fire-sprinkler system in the wall at the back.
Picture 6 – Piping coming into the utility room.
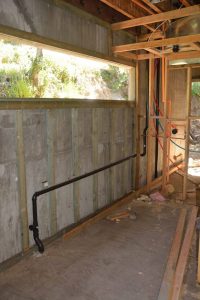
Picture 7 – Vent pipe for the clothes washer in the laundry room making a long run to where it can connect to a vertical vent.
Probably the biggest challenge that the plumbers faced was finding ways to connect and route the vent pipes required for all of the drain lines. Picture 7 shows one example of these contortions for the clothes washer drain in the laundry room. The drain itself can simply go straight down into the crawl space below the floor, but the vent had to be run across the wall under the window until it reached a place where it could run up to join other vents going to the roof.
Pictures 8 and 9 show the shower and tub in the upstairs guest bath.
Picture 8 – Shower in the guest bathroom with the wood frame for a seat in the shower.
Picture 9 – Bathtub in the guest room bath. Nina wanted this bathtub for her and any future grandchildren.
The framers seem to return every several days to rearrange or add framing. This probably reflects the status of this as a “custom” house, where much of the detailed design is getting done as the house is built. Of course one of the big challenges is that, originally, we were not going to have duct work for vents, because the heating and cooling was to have been done by hydronic panels in the ceiling using water (running through PEX piping) rather than forced air.
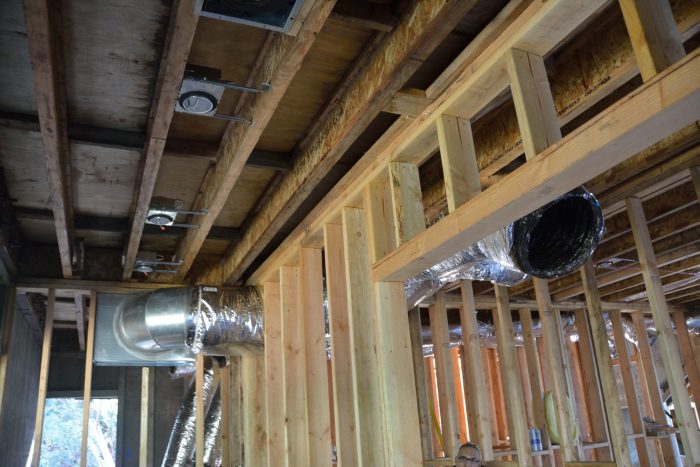
Picture 10 shows the soffit that the framers constructed to enclose the return air vent in the ceiling of the laundry room. Picture 11 shows another soffit that was needed in the upstairs TV/storage room to accommodate the supply duct.
Picture 10 – New soffit for the return air duct in the laundry room. This will be the return for the air handler serving the lower floor of the house.Picture 11 – A soffit added in the upstairs TV/storage room to accommodate the supply air duct. The plan is to build a matching vertical chase along the wall on the right side of this wall to accommodate the exhaust ducts from the four exhaust fans on the first floor of the house.
Picture 12 shows that, even with the newly dropped ceiling in our master closet, it is not quite clear where all the ducts that need to get to the utility room are going to fit.
Picture 12 – Duct work in the new dropped ceiling in our closet. But there still seem to be a lot of ducts with nowhere to go!
Last but not least, there is finally starting to be progress on the retaining wall that needs to go at the back of the house and the debris-diversion wall that is needed in the backyard above the house. After Ted had been urging the start of this work all fall, they were ready to start work in January when the rains started in what would be one of our wettest winters in a long time. Now, however, they need to get this work done before they can put in the scaffolding that needs to go up before the installation of the windows and doors, so there is a new urgency.
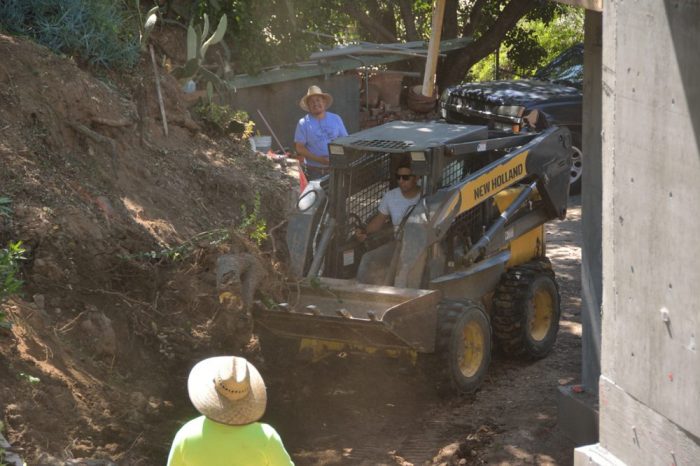
Picture 13, shows Bruce, the surveyor, laying out the line for the debris wall. Ted would love to be able to use his fancy surveying equipment for a day or two. Using GPS it allows one person to do things that it used to take at least 2 people much longer to do. Picture 14 shows the earth mover clearing the area for the retaining wall behind the house.
Picture 13 – The surveyor with the receiver for his GPS based surveying equipment laying out the line of the debris wall in the back yard.
Picture 14 – Clearing the area for the footing of the retaining wall at the back of the house.
This is the second (of, probably, three) blogs in our catching-up series. Although there was not a lot of new work on the house in the last month while we wait for the windows and doors, there was some.
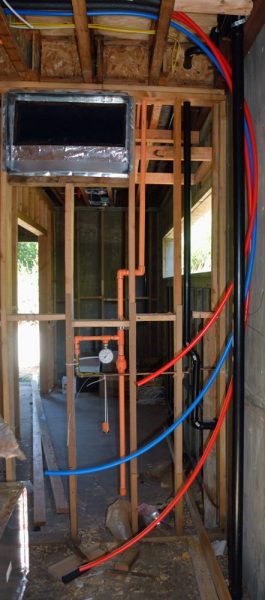
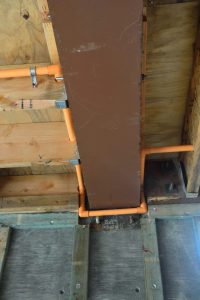
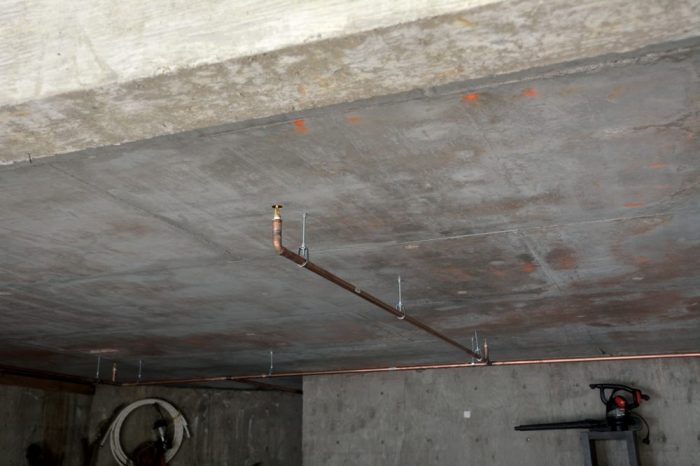
In some ways, the most interesting, because I had never seen it before, was the rough plumbing for the interior, fire-sprinkler system. In the house, they used a special, high-temperature PVC pipe — the orange pipe in Picture 1. As picture 2, shows, all of the trades are having to find creative ways to get past the steel, structural beams. In the garage, where the piping will not be covered by drywall, the piping was copper; shown in Picture 3.
Picture 1- A run of the piping for the interior, fire-sprinkler system. Near the top of the picture, is a stub where an actual sprinkler will be attached.
Picture 2 – Getting around the steel structural beams posed a challenge.
Picture 3 – Because it will be exposed, copper piping was used in the garage. This already has the sprinkler attached.
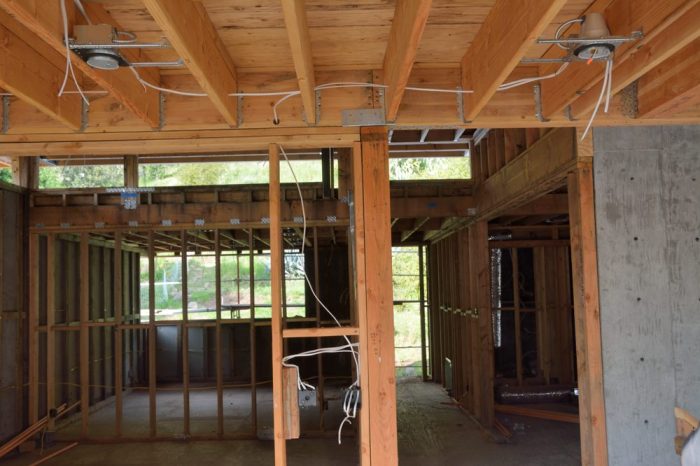
Having put up most of the boxes and can light fixtures before we left, the electricians also began work on the rough wiring. Some of this is shown in Pictures 4 and 5.
Picture 4 – Wiring of the can lights in the sitting area outside of the study.
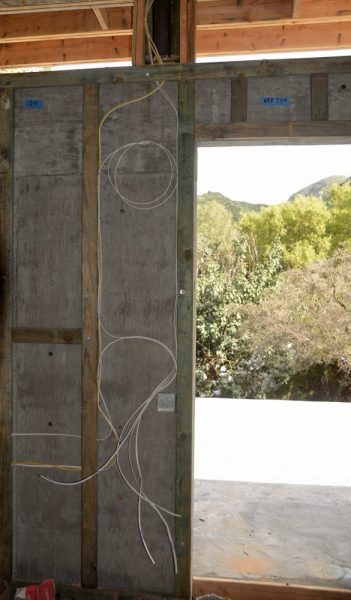
Picture 5 – Wiring to a switch box in the second floor TV/storage room. Boxes on concrete walls like these will be especially challenging because they will be less deep than those in a normal stud wall, so there is less room for connections.
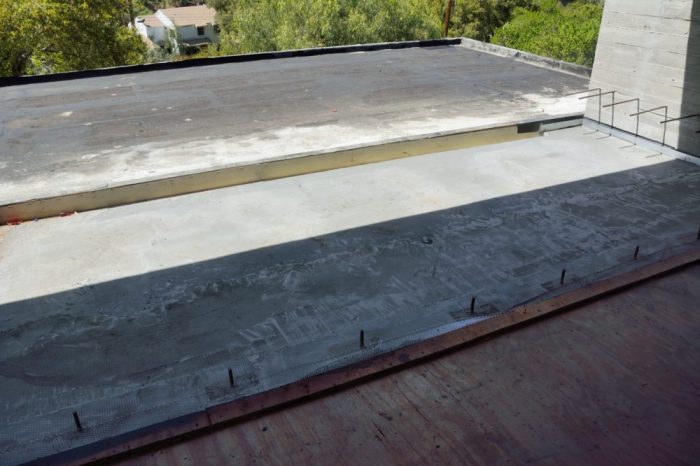
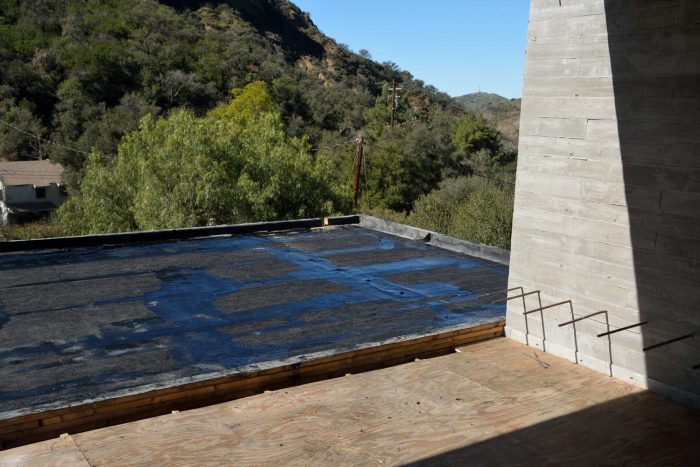
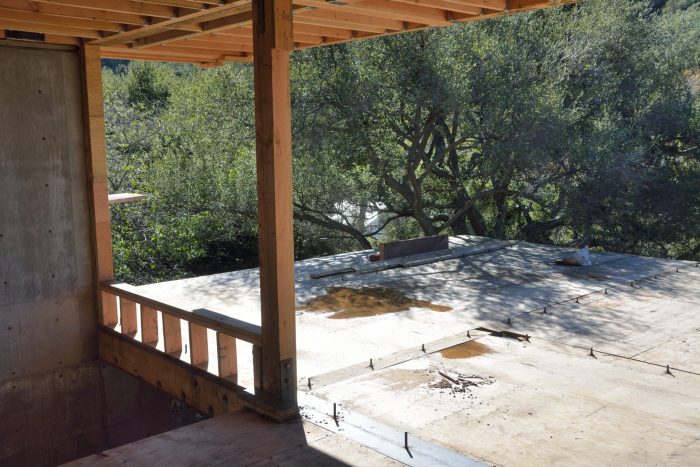
The roofers have also been busy adding layers of lightweight concrete to the deck roofs, to build them up so that they will shed water. This is, however, somewhat hard to see in pictures. Picture 7 below, shows the completed small deck out side of the office with what will be the green (growing) roof beyond it. Running across the middle of the photo is a drain to get water off of the deck. We have also signed a contract with a local company to provide the LiveRoof (https://www.liveroof.com/) modules for the green roofs. Picture 8 shows how the color palette of sedums that we have chosen will change from spring into summer.
Picture 7 – Finished concrete surface of the deck outside of the office, with the base of the green roof for the house behind it. In between is a drainage channel.Figure 8 – Color palette of the sedums that we have chosen for the green roof as they will look in Spring and Summer.
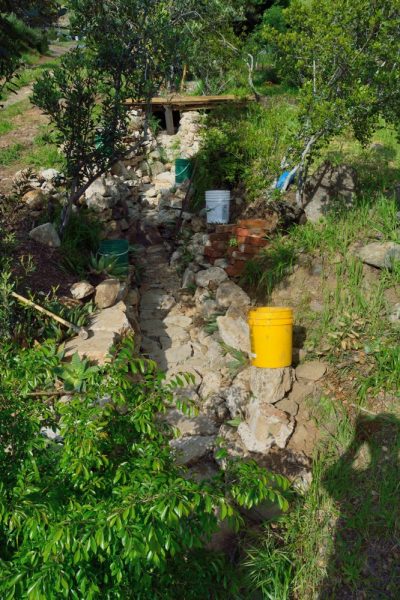
And of course, Pete was busy while we were gone. Picture 9 shows one of these projects, his continued work lining the gully west of the house with recycled concrete. In the area just below this picture, we are planning to build a new bridge across the gully.
Picture 9 – Extension of the recycled concrete of the gully that Pete has been doing.
It has been over a month since our last blog post. This reflects in part that work has been proceeding more slowly because the doors and windows will not be delivered until the second week in May — later than we had hoped. Although the rough wiring, plumbing, mechanical and related things can be done without the walls and doors, there is not that much of this work. So these things have been proceeding slowly. A bigger issue, however, is that we have been traveling and just busy. So this will the the first of several posts in which we try to catch up.
Just after the last blog, we left Australia where we had a great visit with Taylor and Matt. Nina and I both needed a rest and recovery period, so we really did not try to do much other than see them. They both seem happy, settled, and productive. The picture below shows them on the balcony of their 6th floor condo with its great views of the Varsity Lakes region where they live.
Figure 1 – Matt and Taylor on the balcony of their condo in Varsity Lakes.
On the way back home from Australia, we stopped off in Fiji, where we spent 3 days on the island of Kuata in the Yasawa island group that is 2+ hours by ferry northwest of Nadi, where the international airport is on the main island of Fiji.
The only thing on Kuata is the Barefoot Kuata resort. As its name implies, the resort is not a grand affair; in Figure 2 below it hard to make out the structures that make it up that hug the right half of the beach. But the lush island, which is otherwise uninhabited, is quite hikable — one afternoon we went up to the high part of the island, just to the right of the double rocky outcropping on the left side of the picture — and surrounded by exquisitely clear, turquoise waters and coral reefs.
Figure 2 – The Barefoot Kuata resort on the island of Kuata.
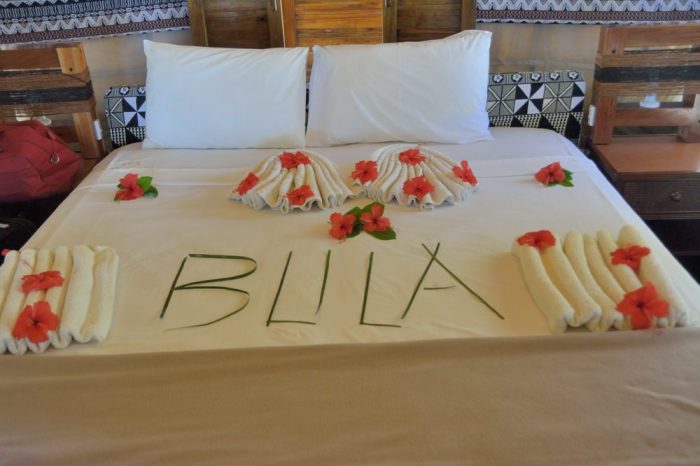
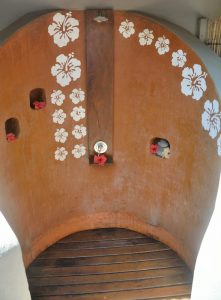
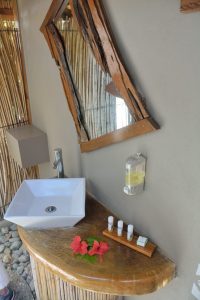
Barefoot Kuata can house 70-80 guests. Most of the staff come from villages on a large island back behind the vantage point of Figure 2. Most of the accommodations are dormitory style but there are also 8 bures — in Fijian a wood-and-straw hut — although these were permanent tents, under straw roofs, just off the beach. Each contained a king-sized bed (Figure 3) and had an attached private bathroom (Figures 4 and 5).
Figure 3 – The decorated bed in our bure when we arrived. “Bula” is the standard greeting in Fijian.
Figure 4 – Shower
Figure 5 – The rest of the bathroom.
It was initially a little disconcerting that we were by far the oldest guests. However, we found it relatively easy to engage these 20-30 year olds — mostly Australian and European — in conversations at meals.
We enjoyed snorkeling on the coral reefs. Kuata is also one of two places in the world where you can, using scuba gear, be present for the feeding of sharks so, of course, we tried that also. It was fascinating having these 8-10 foot bull sharks swimming up to within four or five feet of us.
So, this is the end of installment 1. The next installment will include some details about the house.
We are about to leave for a two week trip to the Pacific. We will spend most of a week with Taylor on the Gold Coast of Australia, southeast of Brisbane, and then, on the way back, we will stop for three days on the beach in Fiji.
Although not much has work on the house has happened in the last few days, we are leaving on a positive note. In the last blog entry, I noted that we were trying to determine whether the insulation for most of the walls would be placed on the inside of the house or the outside, where it would be between the concrete wall and the stucco. It turns out that it would not only be easier but substantially less expensive to put the insulation on the inside. As you may recall from previous posts, they mounted studs on the inside so the spaces between them could simply be filled with insulation as in a standard wood-frame house. If we did this, stucco could then be applied directly to the concrete on the outside of all but the board-formed walls. So why not simply do this? This is a question our contractor has asked repeatedly. As he notes, correctly, the R-value (resistance to heat transfer) of the walls is almost identical whether the insulation is on the inside or the outside.
However, the house was designed with the insulation on the outside to make the most of the thermal heat mass of the concrete walls. Thermal mass acts as a thermal battery. During summer it absorbs heat during the day and releases it by night to cooling breezes or clear night skies, keeping the house comfortable. In winter the same thermal mass can store the heat from the sun or heaters to release it at night, helping the home stay warm. Thermal mass is not a substitute for insulation — thermal mass stores and re-releases heat; insulation stops heat flowing into or out of the building – but it can provide a useful tool for keeping a house comfortable. It is particularly beneficial where there is a big difference between day and night outdoor temperatures, as there is in the canyons here – typically 25 to 30 degrees.
Unfortunately, insulation on the inside of the house basically blocks the thermal mass effects – even the drywall that we will be putting on the walls reduces the benefits somewhat – and that is why I have been looking long and hard for a solution that avoids the inside the wall insulation. So what is the problem?
It turns out that in the 1980s and 90s, many houses were built with concrete or block walls and the insulation on the outside. Unfortunately, the construction techniques used did not consider the long-term effects of moisture trapped between the inside of the insulation and the outside of the wall. In some cases, this led to serious moisture problems and even mold issues. These problems led to lawsuits and insurance claims. As a result, even though new construction techniques have been developed that eliminate these issues, and these techniques are widely used in commercial construction, insurance to use these techniques on residential construction has been hard to get or usually quite expensive.
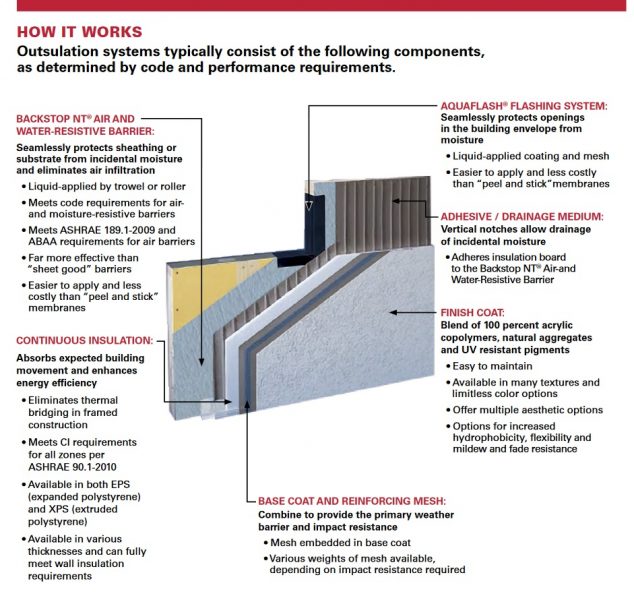
After many disappointments and just before we were going to give up and go with the insulation on the inside, we found an excellent local company that specializes in this work and provided a bid that seemed reasonable for one of the best of the new systems, DryVit Outsulation. It will cost us a little more money, but we are pleased to have found a solution that will let us go ahead with doing this the way we had planned. The figure below is from the DryVit literature and shows, in schematic form, how this system works.
There are three key innovations to this (and other similar) systems. (1) A liquid-applied air and water barrier that goes directly on the concrete walls and provides a base for (2) an adhesive system that holds the rigid-panel insulation to the walls while also creating channels to the ground that allows any moisture that gets behind the panel to escape. (3) A thin, but very strong stucco system that can be applied directly to the insulating panels. Because this stucco system is lightweight, it is not necessary to penetrate the vapor barrier with nails or screws in order to hold the stucco and insulation in place.
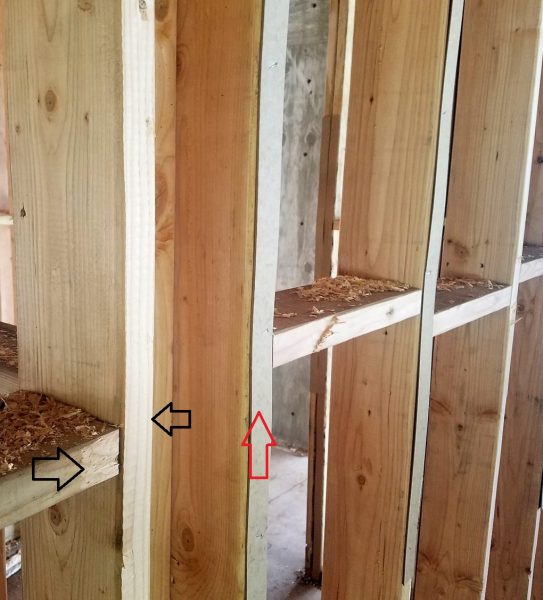
Inside the house, last week they also leveled all of the wall studs and the ceiling joists. They do this by planing the wood down in places where it is high and applying thin strips of cardboard or fiberboard where the wood is too low. The goal is that, when the drywall panels are put up, they will be reasonably flat without bulges or depressed spots. The photo below is of a place where you can see both techniques.
The black arrows point to parts of the studs that were planned away to make the wall flat. The red arrow points to a layer of cardboard-like material applied to another stud to raise up its surface. Together, these changes should help to make the wall flat.
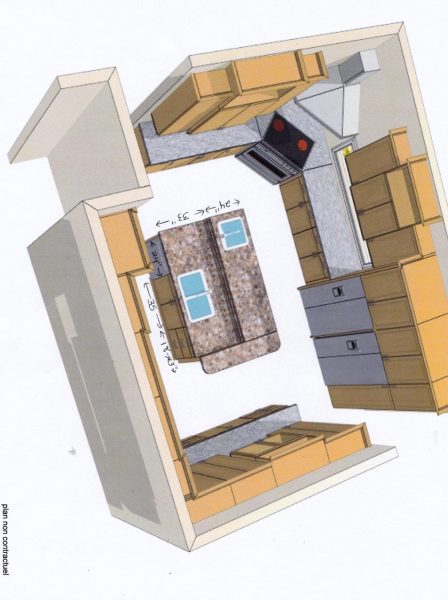
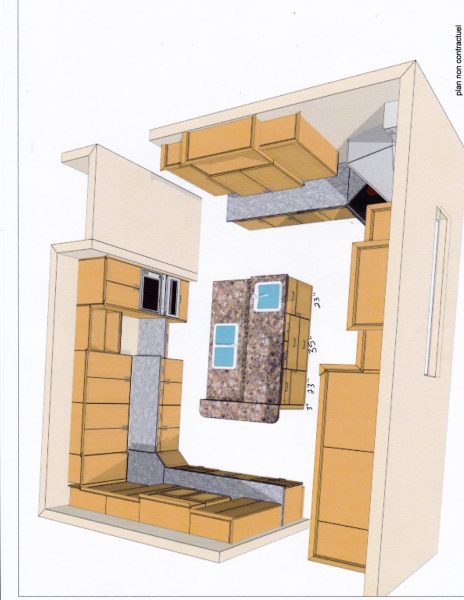
Also exciting were the newest iteration of the kitchen cabinet plans that we received back this week from the cabinet fabricator. The two birds-eye images below should provide some sense of what the resulting kitchen will be like (keep in mind that none of the finishes in these photos are accurate — these are really just meant to convey what cabinets go in various places. As you can see, it has separate areas for food preparation and cooking on one side of the island and for cleaning on the other side. It will also have lots of space to store sets of china, glassware, and crystal, so that more of what we have will be easily accessible — and thus more usable — and some of it will be displayed.
We should hear Monday about the delivery schedule for the doors and windows — probably another 6 weeks or so. In the interim, the contractor will be trying to finish everything that does not depend on them: the rough wiring and plumbing, the HVAC system, the interior fire sprinkler system, more of the roofing, and several retaining walls. As soon as the doors and windows are in, they can put up the drywall and start work on the insulation and stucco.
Gentle readers, in your concern you have been inquiring: “Why no blog entries for almost a month?” Here are some possible answers
(a) The big one happened and SoCal finally fell into the ocean. (b) It has rained for most of 30 days and 30 nights. (c) The work on the house has mostly been behind the scenes. (d) Ted has been busy, Nina has been sick, and we have hardly been to Modjeska much less had time to write about it.
If your answer was anything other than (a), you’re are partially correct — sorry Texans and New Yorkers you can’t gloat about that yet.
We have had an unusually wet/cold February and this has definitely slowed progress. However, two other factors may, in the long run, prove to have been more important limiting factors. Although, with the walls up and the roofs on, much of the rough electrical, plumbing, and HVAC work can move forward, a lot of the most time consuming work requires the house to be closed in, that is for the windows and doors to be in place. However, the windows and doors need to be ordered and they take about 8 weeks to be manufactured and shipped (this is down from the 12-16 weeks for the custom anodized finish that we originally wanted!) and they could not be ordered until the exact sizes of the openings could be measured — i.e., not until after all the walls and roofs were in place. However, somehow it took almost 6 weeks to finalize the door and window order even after all the openings were done. (The January 14th post talks about our first meeting with Angie, the Fleetwood representative who was working to get all of the specifications correct. Ted or Nina have met with her three more times and there have been numerous emails, but the order finally went in late last week!) It is true that the doors and windows are a large, expensive part of the overall house, and, if what we receive is wrong, it will take another 8 weeks to fix it, but this does seem excessive. And while this has been dragging on there has not been much incentive to press to get the rough work done, since it can all be finished in several more weeks.
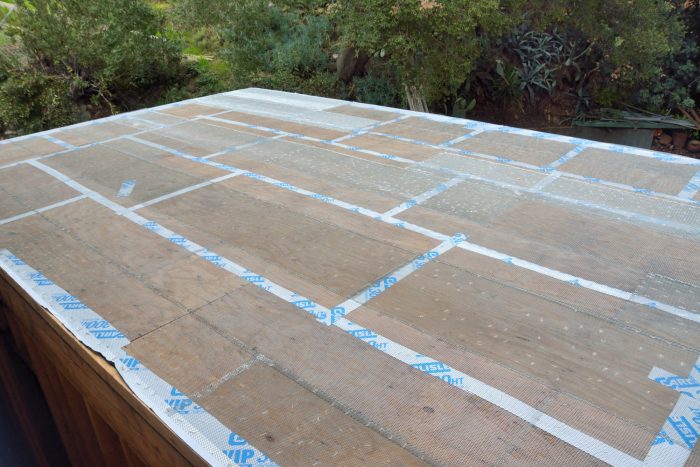
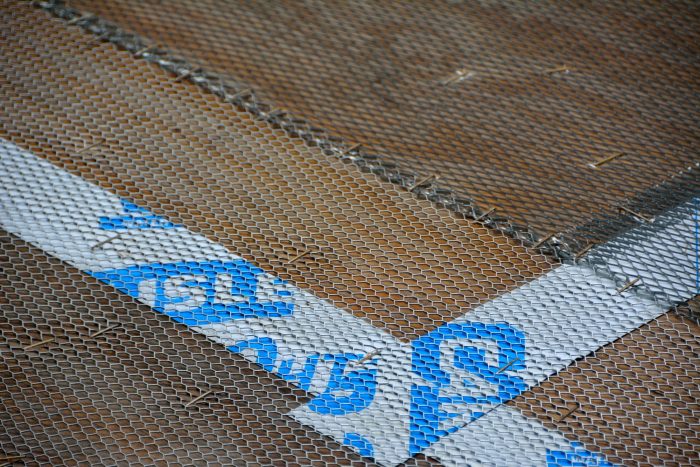
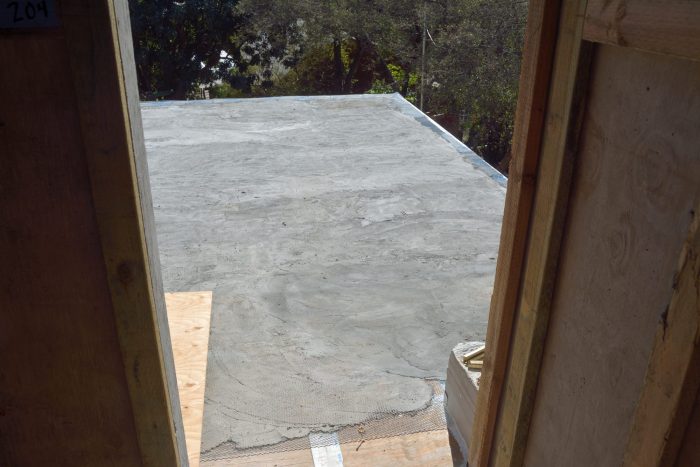
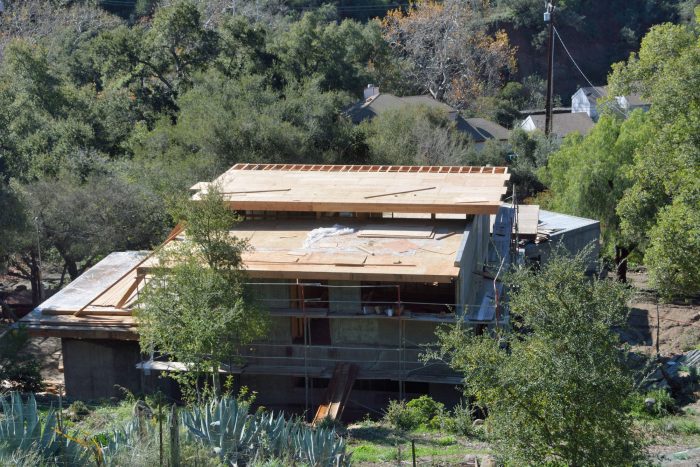
This is not to say that nothing has happened on the house. There has, for example been some more work on the roofs, mostly so that they can begin functioning like roofs rather than sieves. Pictures 1 and 2 show the metal lathe that was applied to the east roof during the first week in February. Picture 3 shows this metal lathe covered with the first coat of a lightweight cement that will help to waterproof it.
Picture 1 – Seam covers and metal lathe for the east roof of the house.Picture 2 – Close up of the metal lathe.Picture 3 – The east roof with the first coat of lightweight cement over the metal lathe.
Picture 4 shows the south roof of the house. This will eventually be covered with a “green roof” — a system with growing plants. We are not quite sure why, but hot-mopped tar was used for the first layer of this waterproofing.
Unfortunately, the roofing work has now stopped waiting for clarity about whether the insulation for the walls will be on the outside of the concrete walls, under the stucco, as we planned, or on the inside of the concrete walls under the drywall. However, this is another long story that we will save until we know — I hope soon — whether it ends well or not.
Picture 4 – Hot-mopped tar roofing on the south roof — the roof that will eventually be a green roof.
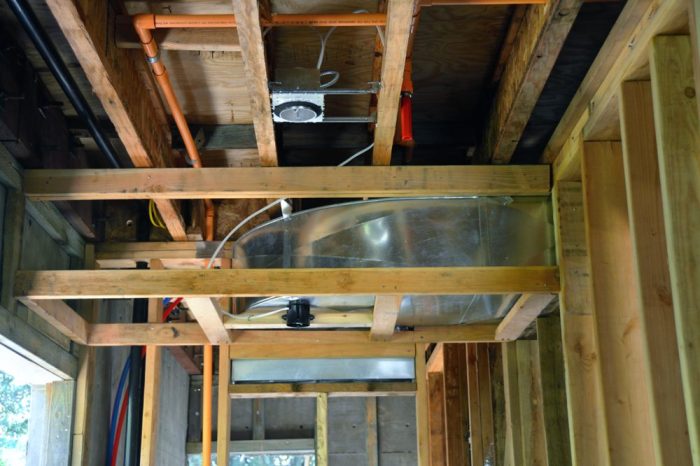
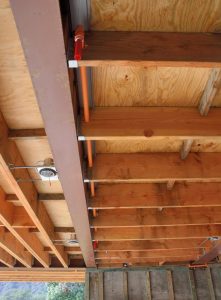
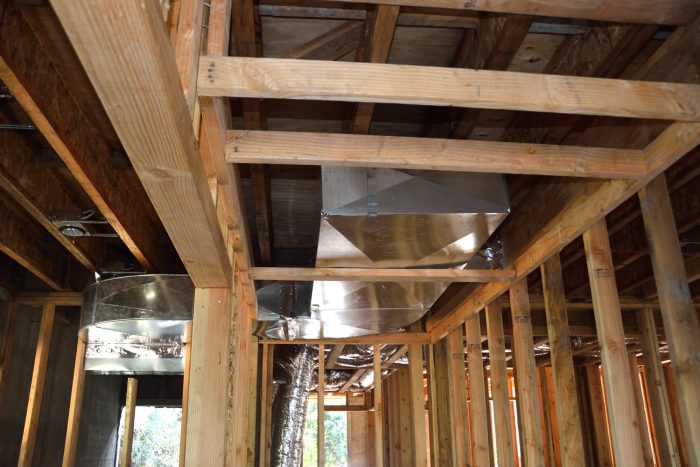
The HVAC installers also came back and replaced the return air duct for the first floor with the rigid metal duct work shown in Picture 5. Picture 6, duplicated from the February 7th blog, shows the large, round duct that this replaces. With this new duct, the dropped ceiling in the laundry room will not have to come down to the level of the window.
Picture 5 – Rigid metal, return air duct for the first floor in the ceiling of the laundry room (on the left) and the pantry (on the right).Picture 6 – Vent that needed to be replaced in the laundry room.
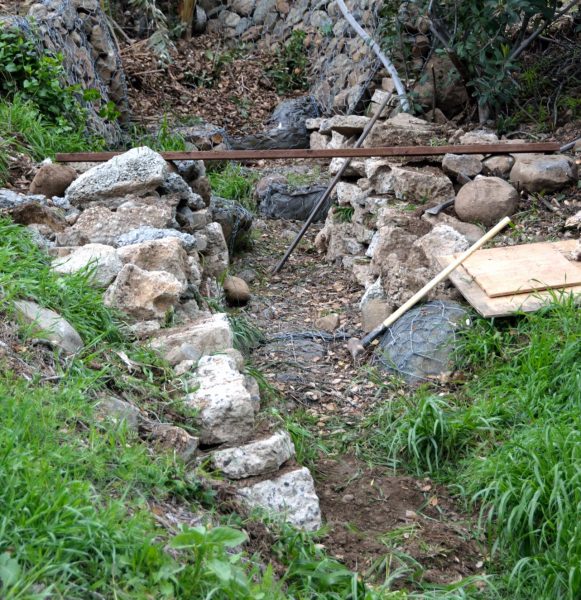
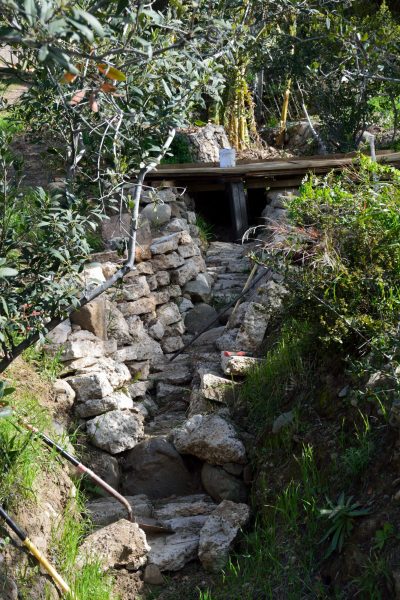
Even if not all that much has been done on the house, Pete has been working on the yard. Last year, when the old house was being demolished, Pete convinced us to save much of the concrete from the foundation for landscaping projects. He has been hard at work on one of these — hardening the sides and bottom of the gully below the bridge at the chicken coop. This part of the gully is less steep and deep than the gully higher up, so it really didn’t need the full gabion treatment. Picture 6 shows the beginning on this project. Picture 7 is the same area, largely complete. In this photo you can see a new, temporary bridge the Pete constructed so that we can drive materials and small earth moving equipment to the backyard, which is to be regraded.
Picture 6 – Pete has begun work using the salvaged concrete from the house to shore up the lower part of the western gully. The piece of wood across the gully is close to where a new bridge is to go.Picture 7 – More of the gully is complete, and the new, temporary bridge that will allow us to drive to the backyard is in place.
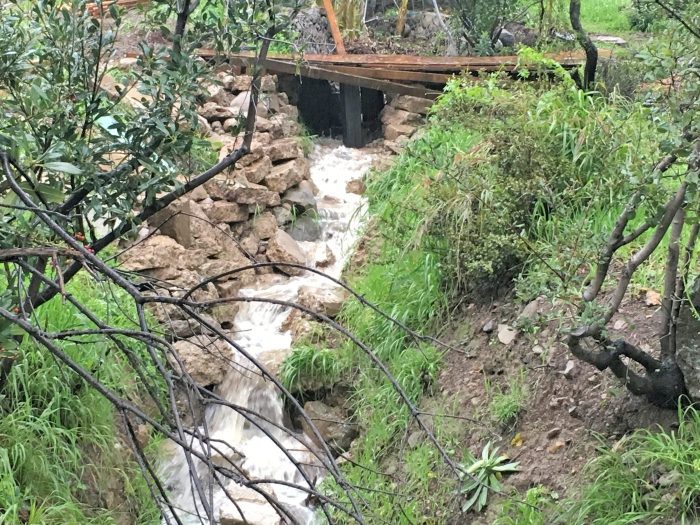
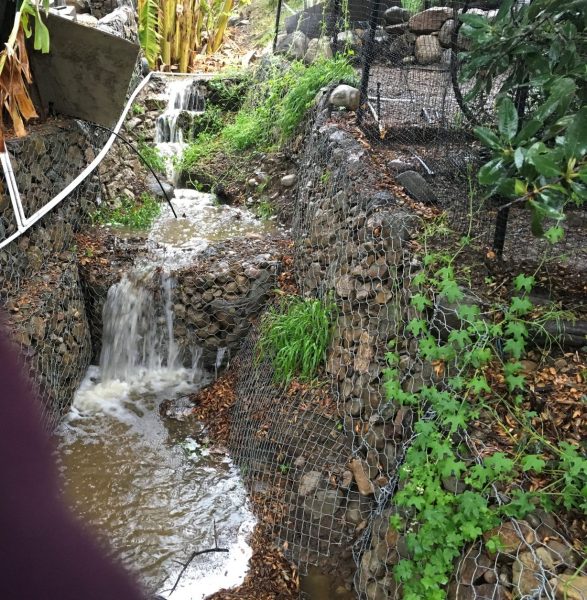
During the construction (before Picture 7 was taken), we had a period of particularly heavy rain. Pete took Picture 8 of the water in the newly channelized gully. This is the most water we have seen in this part of the gully since we put in the gabions. What is nice about the broken concrete construction is that it protects the bottom and sides of the gully from erosion, while the uneven surfaces, created by the stacked concrete, creates turbulence that slows the water down, and the joints between the loose laid sections of uneven concrete allows much of the water to sink into the soil, reducing the flow down hill. Pete also took Picture 9 at the same time. This shows the water flow higher up the gully, by the chicken coop. This is an area where we used gabions to harden the gully.
Picture 8 – Water flowing through the newly hardened gully and under the almost completed new bridge.Picture 9 – Water flowing, during the same storm, higher up the gully in an area where we had previously built gabions.
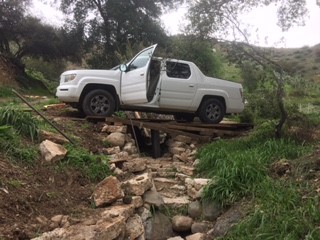
Picture 10 shows a test of the new bridge that Pete conducted. (I think
we were glad not to have known about this test until it turned out to
be successful.)
Picture 10 – Here is Pete testing the bridge by driving a load of material across it in the truck.
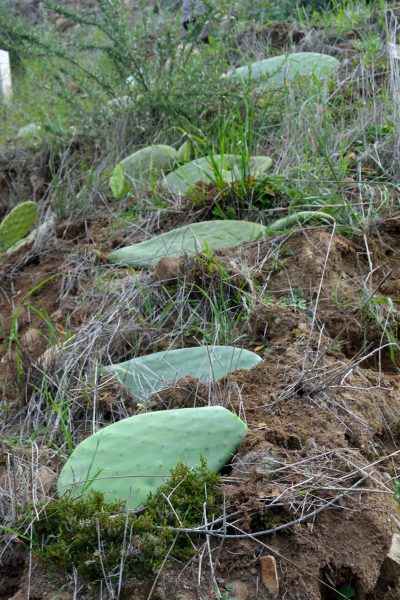
Pete and Ted also spent a large chunk of a day planting cactus on a part of the hillside above the house that is subject to heavy erosion. Cactus is great for this because it creates a dense network of stabilizing roots that hold the loose soil in place, while actually helping to slow wildfires both because their pads hold water and do not burn well and because grasses do not grow where cactus is established. We were interested, when we began exploring our Modjeska property, to discover that we had a wonderfully spineless variety of what would otherwise be what we would have called prickly pear cactus. These, it turns out were almost certainly the result of a project by the great plant hybridizer Luther Burbank. Between 1907 and 1925, Burbank introduced more that 60 varieties of spineless cacti. These were developed mostly from hybrids of varieties of the Indian fig (Opuntia ficus-indica) and the Mexican prickly pear (Opuntia tuna), and were offered in two main types: the fruiting varieties, grown for their variously colored and flavored prickly pears, and the forage varieties, grown for their edible pads (properly called thalli), which could be fed raw to livestock or cooked for human consumption.
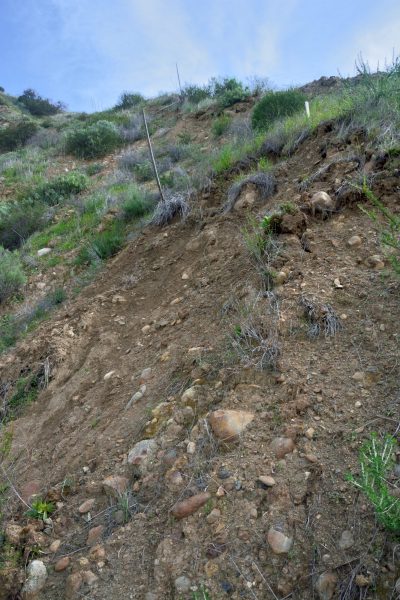
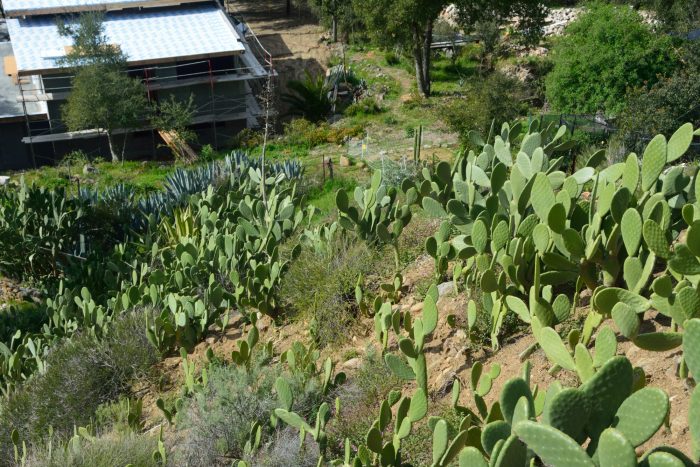
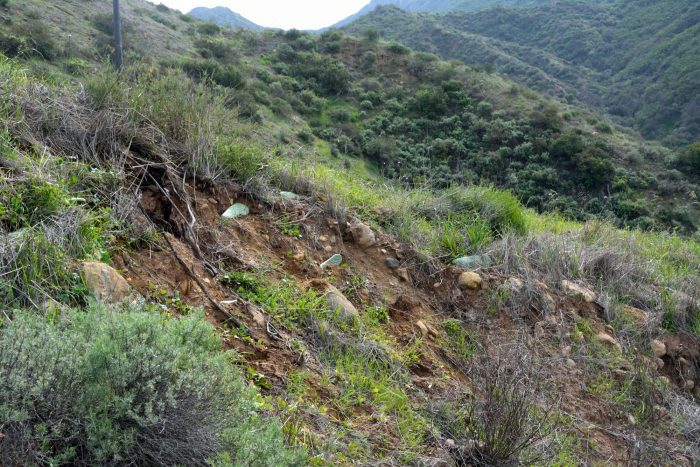
Picture 11 shows one of several areas that we worked on. This is an area where a section of the top foot of soil let go and slid down the hill in the recent rains. The topsoil in this upper part of our property is quite loose, held in place only by the roots of a shallow grass and an occasional shrub, and undermined by an array of gopher tunnels. Picture 12 shows an area, well below the area on which we were working, that Pete planted with cactus two years ago. You can see the house at the bottom, but also how well the cactus, with very little help from us, has established itself.
Picture 11 – Area of the upper ridge where the topsoil released from the hillside in last month’s rains.Picture 12 – Hillside where the cactus that Pete planted 2 years ago is now well established, stabilizing the hillside and acting as a fire break. The house below is at the bottom.
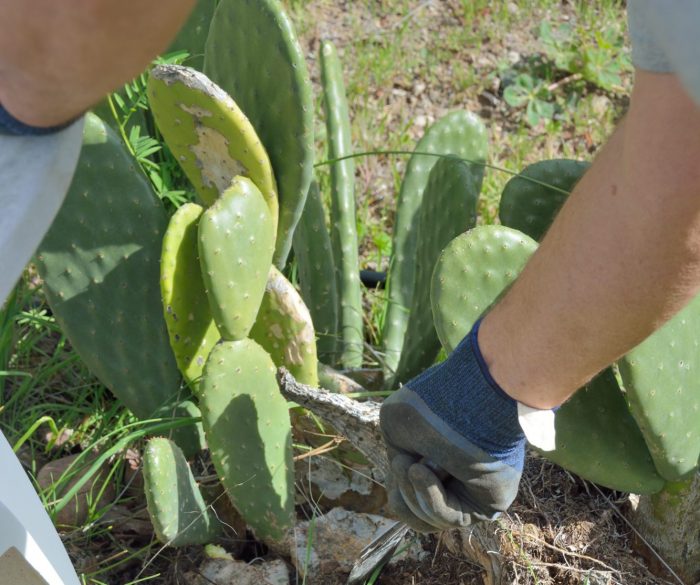
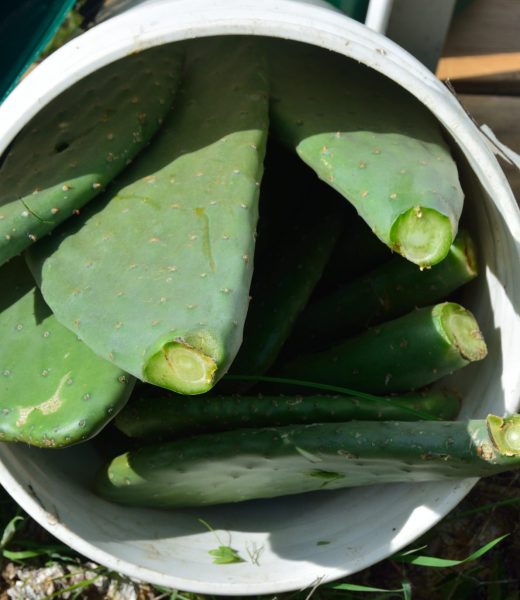
The following pictures show some of the process of planting these cacti.
Pete is cutting pads that we will transplant from an established plant. This is actually a plant that grew out of a pile of cactus pads that were cut previously but then not planted and simply left in a place where we had not intended to grow cactus. Although these cacti are spineless, they still have short, fine thorns and so good gloves are important.A bucket of pads ready to haul up the hill. These are nice, juicy pads, so a bucket full weighs 20+ pounds. (And the hillside is steep!)Literally, all that is necessary to “plant” this is to put them into contact with the soil. Even more amazingly, you can ignore them for 3 months and then successfully plant them. They are tough and resilient. These were placed close together to try to stabilize a tongue of soil where the soil on both sides had just fallen away.Here you can see pads planted on the edge of and just above the section that fell away. Once these are established, we can cut them back and use them to fill in the areas below. (It is so much easier to let the cut pads slide down the hillside to where they are needed than to haul them up!)
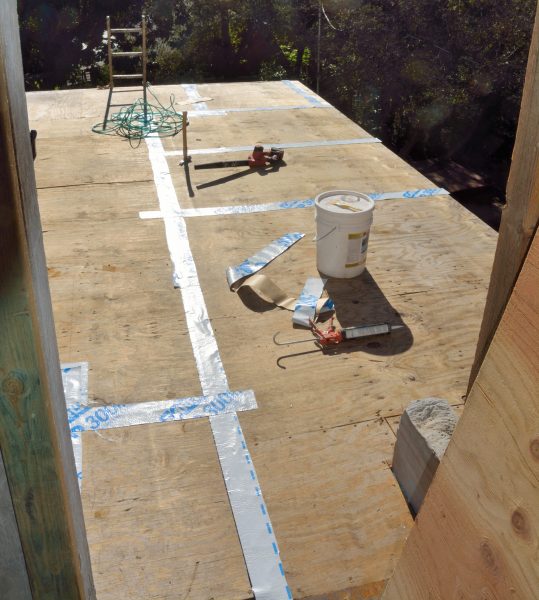
There have been a couple of nice days since Tuesday, but the rain is forecast to start again Saturday. In the mean time, they have begun sealing the joints of the lower roof (Picture 1). However, they also need to build framing to create a slope on top of this sheathing with a real water barrier above that.
Picture 1 – Sealing the sheathing joints of the lower roof.
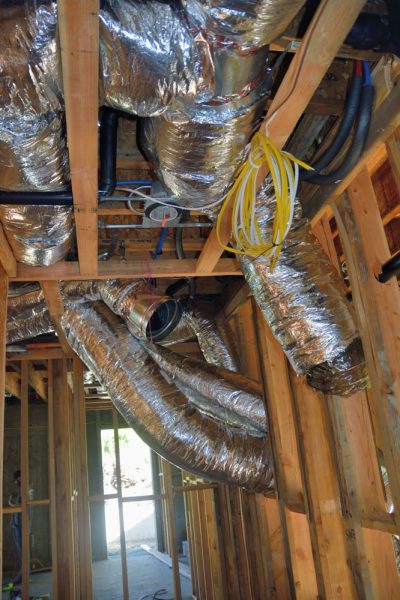
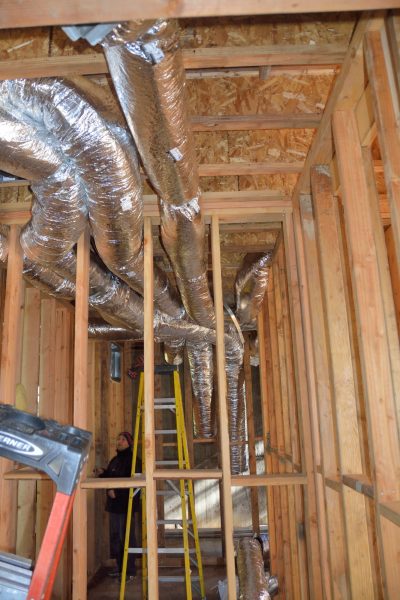
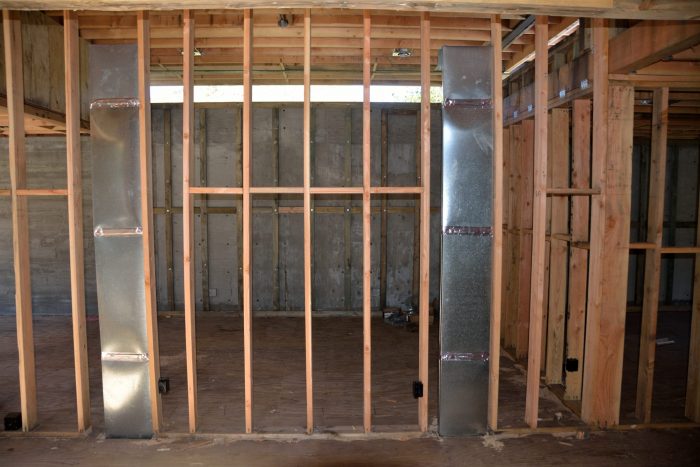
The HVAC crew has also been installing some of the ducting that was just sitting, wet from the rain earlier in the week. Picture 2, shows the spaghetti venting leaving the utility roof. Picture 3 shows sheet-metal ducts, run between the joists on the second floor. These will be vented into the office and the hallway.
Picture 2 – A tangle of vents leaving the utility room.
Picture 3 – Duct work between the studs upstirs.
Picture 4 is a vent that they put in that will need to be changed. This is in the laundry room. Because the round vent is so large, the ceiling would need to be dropped too much. To avoid this, Ted convinced them to replace this with a rectangular, sheet-metal vent. Ted was out there to meet with the representative of the Fleetwood, the company supplying the windows and doors, and with a representative from the company installing floor heating mats in the great room and the bathrooms.
Picture 4 – Vent that needs to be replaced in the laundry room.
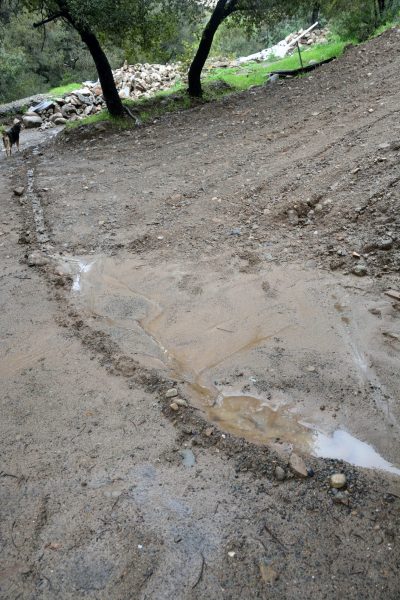
There has not been much to post lately because it has mostly been raining. We had another 4.5″ of rain over the last weekend. Fortunately, Pete was around for much of the time and by digging various strategic channels, like that in Figure 1, help minimize erosion of the slopes that have been graded and compacted, but not stabilized with plantings.
Picture 1 – One of the water channels that Pete dug to minimize erosion.
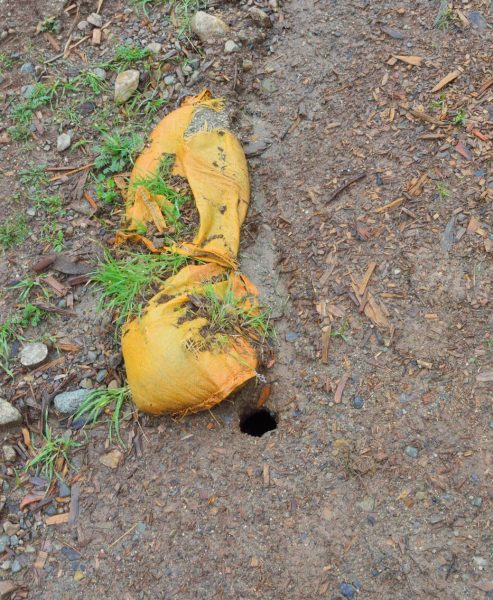
As shown in Picture 2, Pete is something of a opportunist in these matters. One of our constant struggles is against the gophers, whose tunnels honeycomb parts of our hillside. When one of these tunnels opened up, Pete simply channeled water into it to help inject the water into the ground — on these hillsides the mantra is to slow the water so it sinks into the ground.
Picture 2 – A gopher hole helps inject rain water into the ground.
Before the worst of the rain started last weekend, the roofers did get the Peel & Stick material down on the second floor roof — the white material in Picture 3. This is an adhesive coated, waterproof underlayment that will go under the metal roofing that eventually will be put down on these roofs. Unfortunately, the first floor roofs, although they have sheathing, still need additional structure and so were not covered.
Picture 3- Second floor roofs with the Peel & Stick roofing material on it.
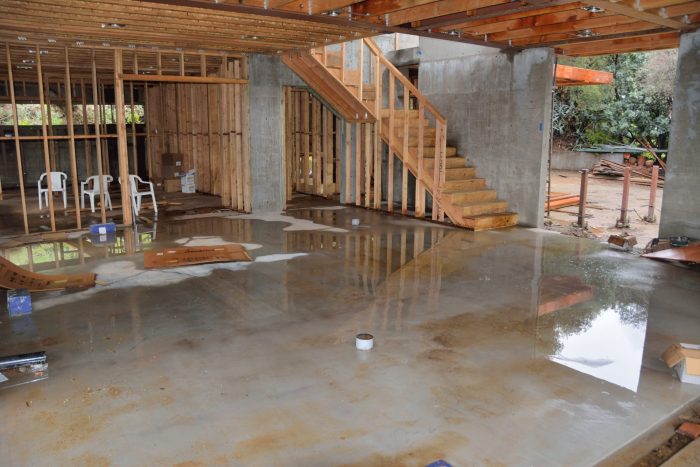
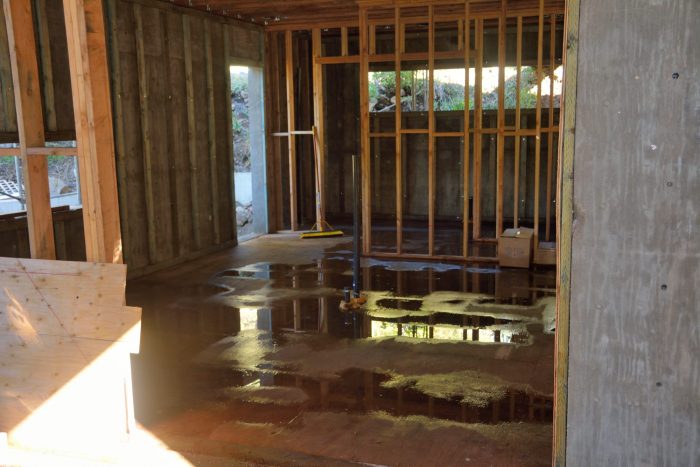
As Picture 5 shows, the areas without this roofing material — such as the foreground in this photo — got quite wet over the weekend. However, the areas covered by the roofing material — the area further back in the photo — stayed fairly dry.
Picture 5 – In the foreground, the parts of the Great Room that were under the first floor roof, with no roofing material were quite wet on Monday after a weekend of rain. The areas under the 2nd floor roof — the dining room where the cardboard is and the kitchen with the plastic chairs — stayed dryer.
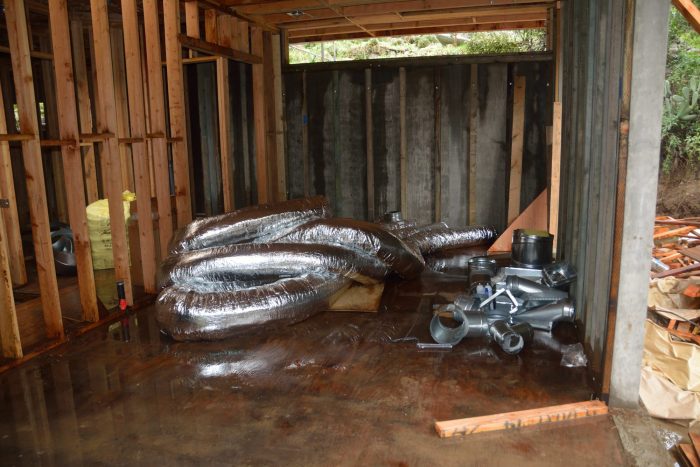
Before the rain started, the mechanical crew began work on the ducting. Picture 6 shows a return air vent in the hallway on the second floor. Unfortunately, as Picture 7 shows, much of the ducting simply got wet in the house.
Picture 6 – Opening for the return air duct on the second floor.Picture 7 – Wet ducting waiting for installation.
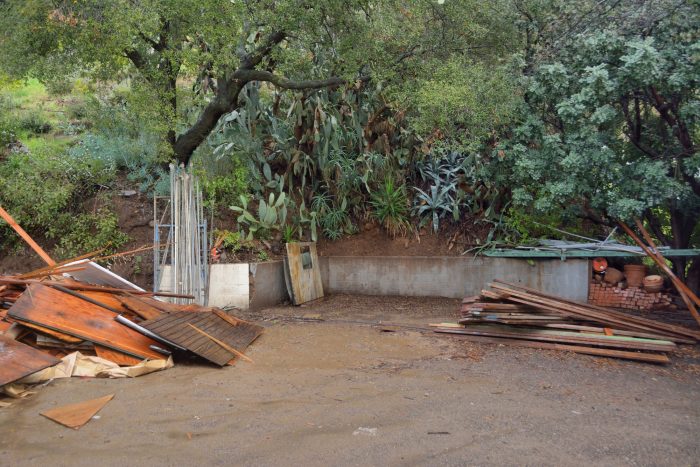
One thing that happened about 10 days ago, but that we forgot to document, was the removal of the old shed that used to sit at the top of the driveway. This needed to be demolished because it is in the way of the construction for the new retaining wall that will extend from the back of the house. However, it was an old wooden structure that was rotting away and would have been a fire hazard so close to the house.
Picture 8 – Spot where the old shed used to be.
Finally, we leave you with an image of one of the plants that are so wonderful in these hills.
Picture 9 – A ceanothus (sometimes called a California lilac) in bud on the hillside above the house. With its small leaves, this bush can survive our arid summers. Their small flowers light up the hillsides in the spring.
It might have been Martin Luther King, Jr. Day, but it this was not a holiday for the builders. Picture 1 shows that they completed the last missing piece of the replaced, high roof.
Picture 1 – Completed section of the replaced high roof.
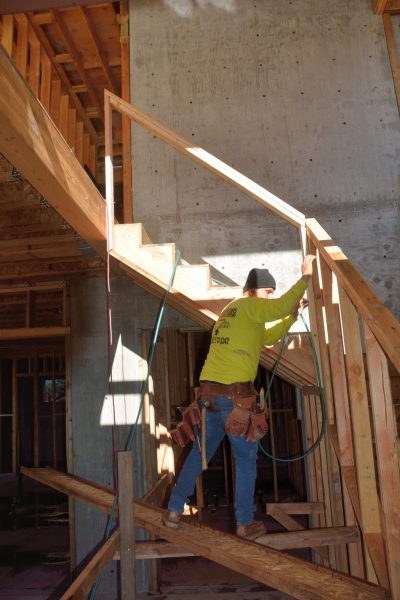
The framer in Picture 2 is getting set up to finish the framing for the railing for the stairway to the second floor in the house
Picture 2 – Working on the framing of the railing for the stairway to the second floor.
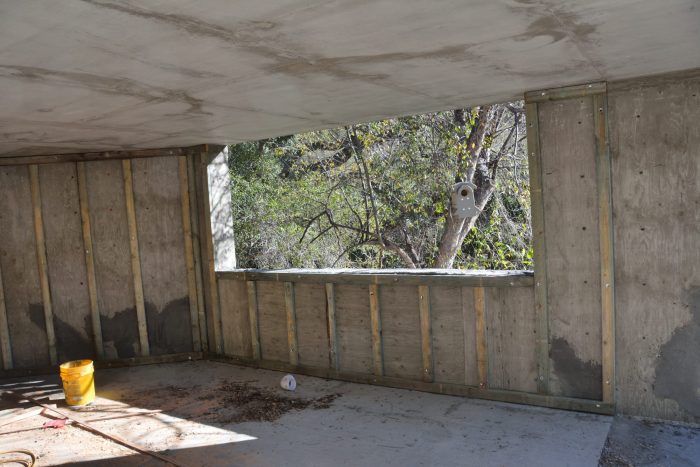
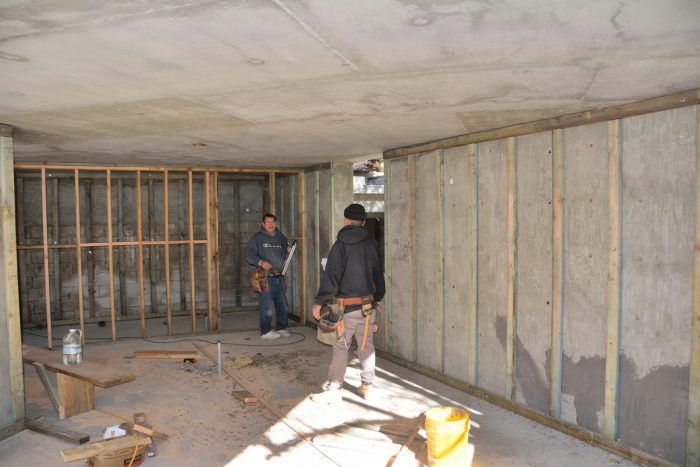
But the exciting development today was the start of the framing for the apartment. Picture 2 shows the green lumber attached to the concrete, exterior wall surrounding the living room window. This will both provide a nailer for the Sheetrock and space for wiring and electrical boxes. Picture 3 shows the framing for walls forming the bathroom and pantry.
Picture 3 – Green (treated) lumber attached to the outer walls in the apartment. Picture 4 – Framing for the walls of the bathroom and pantry in the apartment.
Pete and I have been working to clear the backyard in preparation for grading it. Pete then set up some portable fencing around a large grassy area next to the chicken coop, and you can see in Picture 5 that the chickens enjoy the insects and fresh grass brought on by all our rain.
Picture 5 – The chickens enjoy temporary access to an area filled with insects and new grass.
Nina and I spent all afternoon at the house today measuring elevations in the backyard in preparation for having it graded into terraces. It appears that Pete will bid for and do this job.
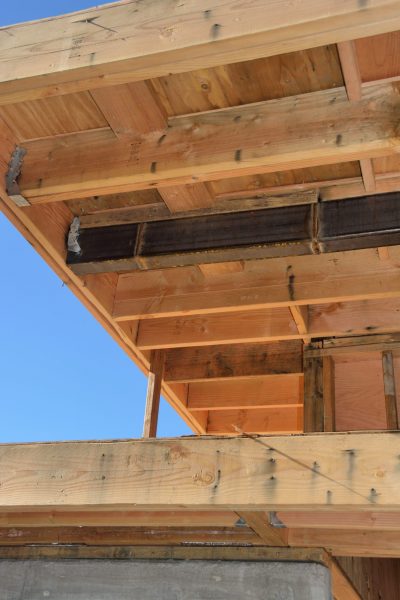
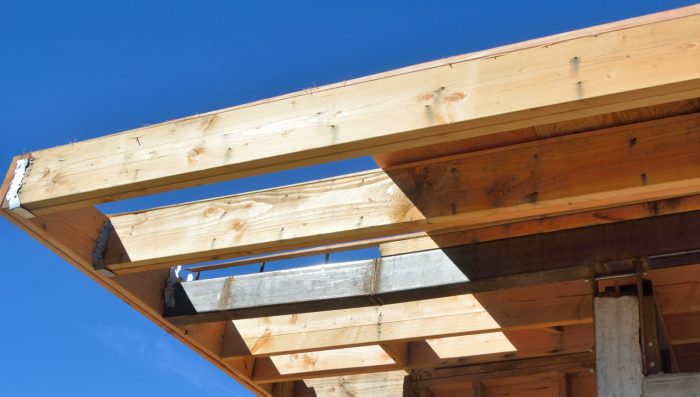
At some point, the missing section of steel beam in the high roof was welded into place (Picture 1). Everyone tells us that these welds, if done correctly, are stronger than the original beams. I hope so, because otherwise we would certainly be worried that the strength of this beam might be compromised.
Picture 1 – The missing section of the steel beam in the high roof welded into place.
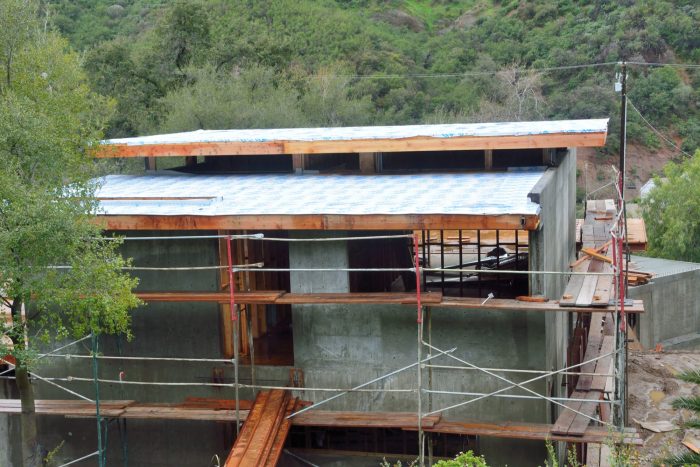
Friday the roofers returned and finally replaced most of the sheathing for the high roof — now all sloping toward the front (Picture 2). We just wish that they had gotten this in place before the 6+” of rain that we had this last week! Picture 3 is of the floor in the kitchen which clearly has been wet all week and still has large puddles two days after the last rain. This is all exterior grade plywood and so is meant to be able get wet without causing serious problems, but we don’t feel any need to test these claims.
Picture 2 – The house from above in the backyard, showing the new sheathing of the high roof.Picture 3 – Water standing on the kitchen floor 2 days after the last of the 6+” of rain this week.
Also sometime in the last week the framers built a short wall at the base of the window at the top of the stairs. This window opens onto the green roof. The sliding door to the right of this (closer to the camera) is floor-to-ceiling, because it opens onto a small deck. However, the deck will be surrounded by a green roof. The base for this is six inches high and, of course, the plants will grow up from there, so it makes sense to have this window start somewhat higher.
Picture 4 – Short wall at the base of the window above the stairs that opens to the green roof.
It rained on Monday; it rained over 1/2 an inch on Tuesday, and so far today, it has rained 1.68 inches. According to our neighbor Michael, it rained buckets for about an hour and a half, but it also rained a lot during the middle of the night. All this rain was enough to send the creek behind the houses across the street from us roaring. Everyone in the Canyon gets so excited when the creek starts to run. We just hope it keeps running. And tomorrow’s rain, which looks like it will be all day, should help that.
So, there wasn’t any work going on on the house, which is surrounded by a sea of mud.
Nina went out there today to check the chickens and the water diversion bars, to make sure they had not clogged up. Pete stayed in Laguna with his friend Bill.
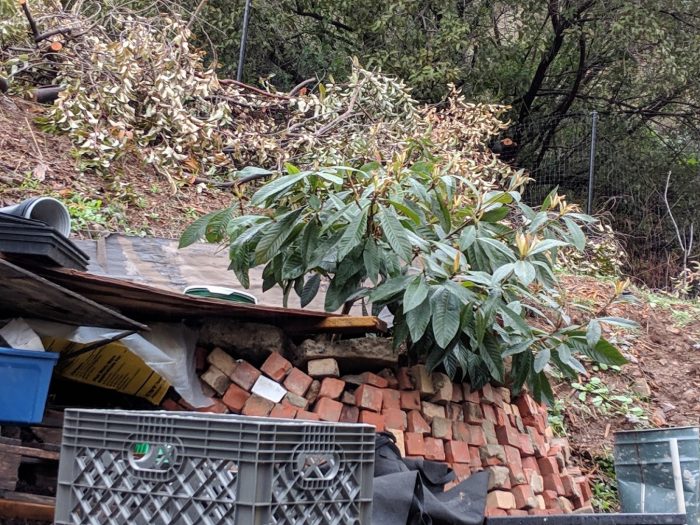
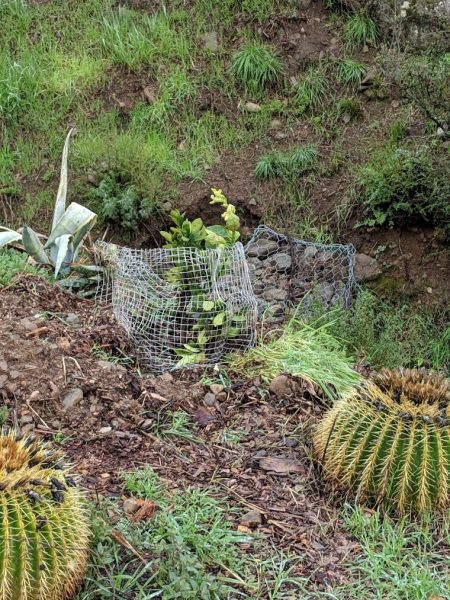
I thought I would add a few more photos of work Pete has been doing. Last week he helped us dig up two loquat trees and a citrus tree growing in the dirt beds in our patio at the condo. The entire patio is going to be jack hammered out at the end of the month, so we needed to remove the plants we wanted to keep. Pete planted the bigger loquat in a new bed he built out of old scrap bricks. Some of the bricks were from the chimney of the old house and some were from the original front walk. Behind the loquat, which seems happy, you can see a bunch of brush he cut down.
Larger loquat in brick hillside bed.
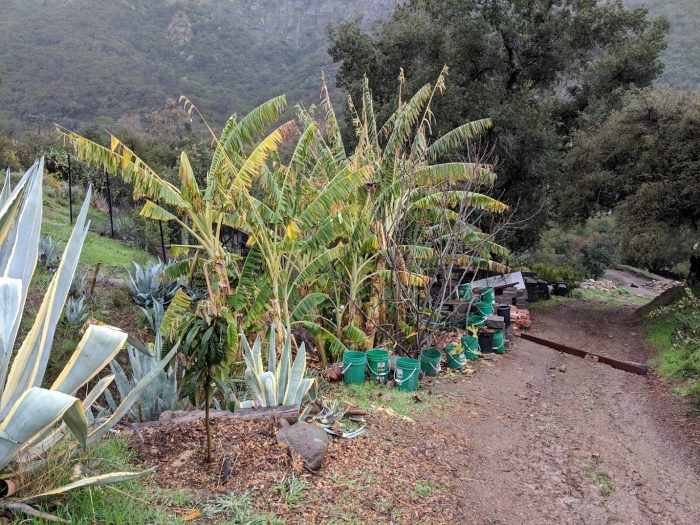
He has also recently moved one of our citrus trees and thinned the bananas.
Thinned bananas in the gully with a bare fig tree just behind the pails.Moved citrus tree.
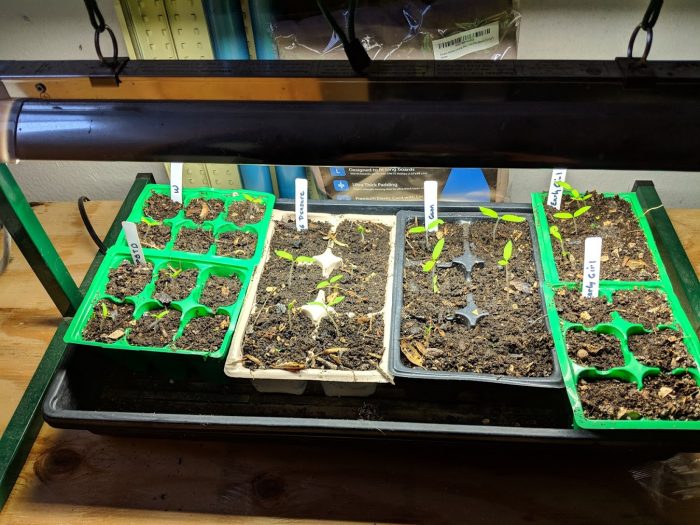
And back in Irvine, Nina’s tomato seedlings have started to come up. They were planted January 6th, 12 days ago. They are under a light and on top of a warming mat in the condo garage. The two six-packs on the left were much slower to germinate than the ones in the middle and are smaller right now. She just got some new cherry tomato seeds that her sister-in-law Cecily recommended. They are called BHN-968, a name that just rolls off the tongue. She will plant them in the last 6 spots on the far right tomorrow.