August 1 – August 8

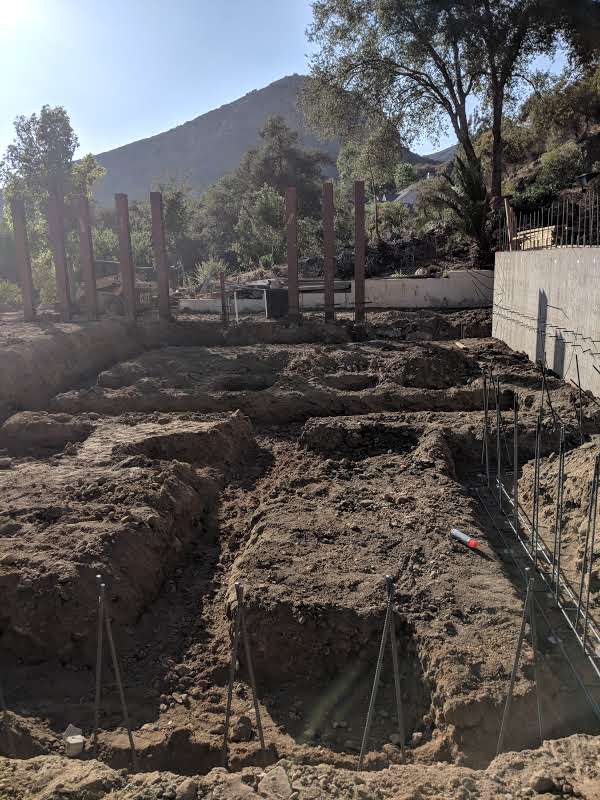
We have been away from Modjeska at Haywood’s wedding — it was amazing, but that is another story — and then on vacation with Haywood, Curtis, Taylor, and Matt at Jackson Hole — this has been lots of fun, but also another story. While we have been away, the builders did the sixth concrete pour of the house. The same week a deranged moron intentionally set a fire in Trabuco Canyon, 6 miles to the south and east of us. As the map below shows, fortunately, the winds have been pushing the fire away from us and it is on the other side of the 5000 foot, main divide. Although Modjeska has been spared the worst, the Holy Jim fire has now grown to 20,000 acres, has destroyed houses and is threatening Lake Elsinore. This is why we are building a concrete house and clearing a defensible area around it. We are actually glad to be away this week since our neighbors report that the smoke and the soot from the fire have been quite unpleasant in the canyon.

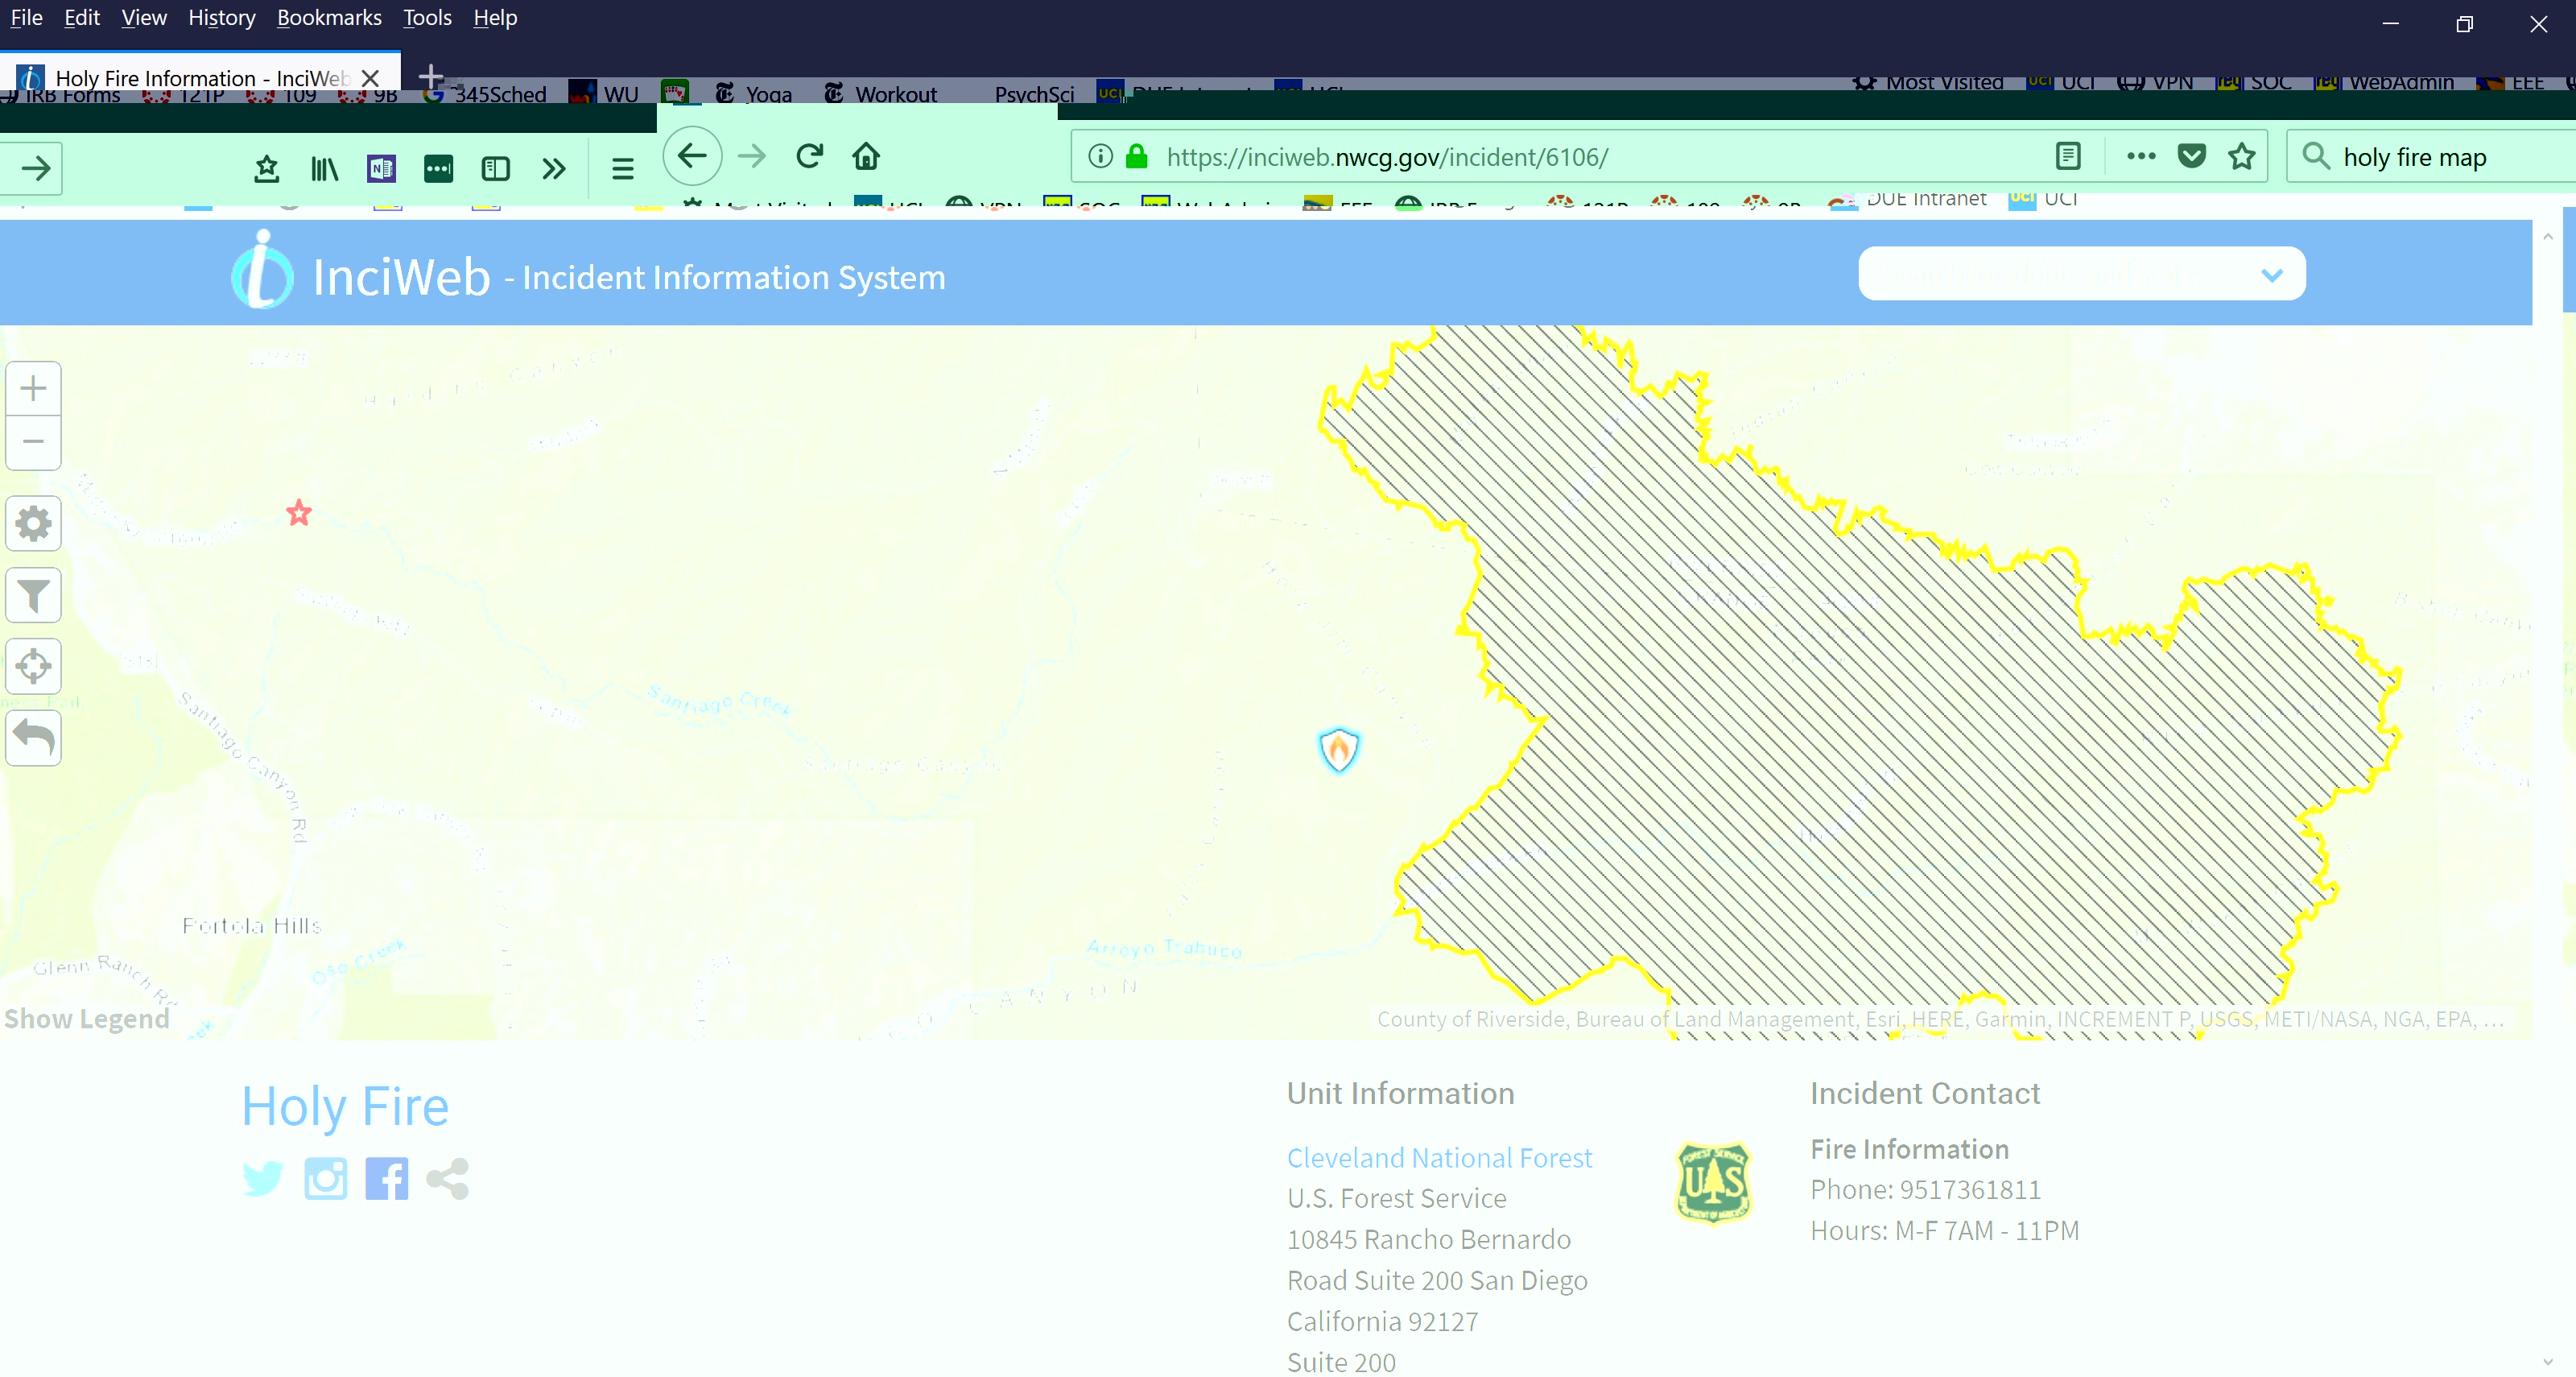
Picture 1 – Yesterday’s map of the Holy Jim fire. The location of our house is shown by the red star.

Below are two other pictures that give some sense of the power of this fire. Picture 2 is taken from the mouth of the canyon looking up to Modjeska Peak. There is actually no fire on the peak, what you are seeing is smoke and flames rising up from the area below it. Picture 3 was taken from a plane at 30,000 feet looking down on the clouds above the fire.

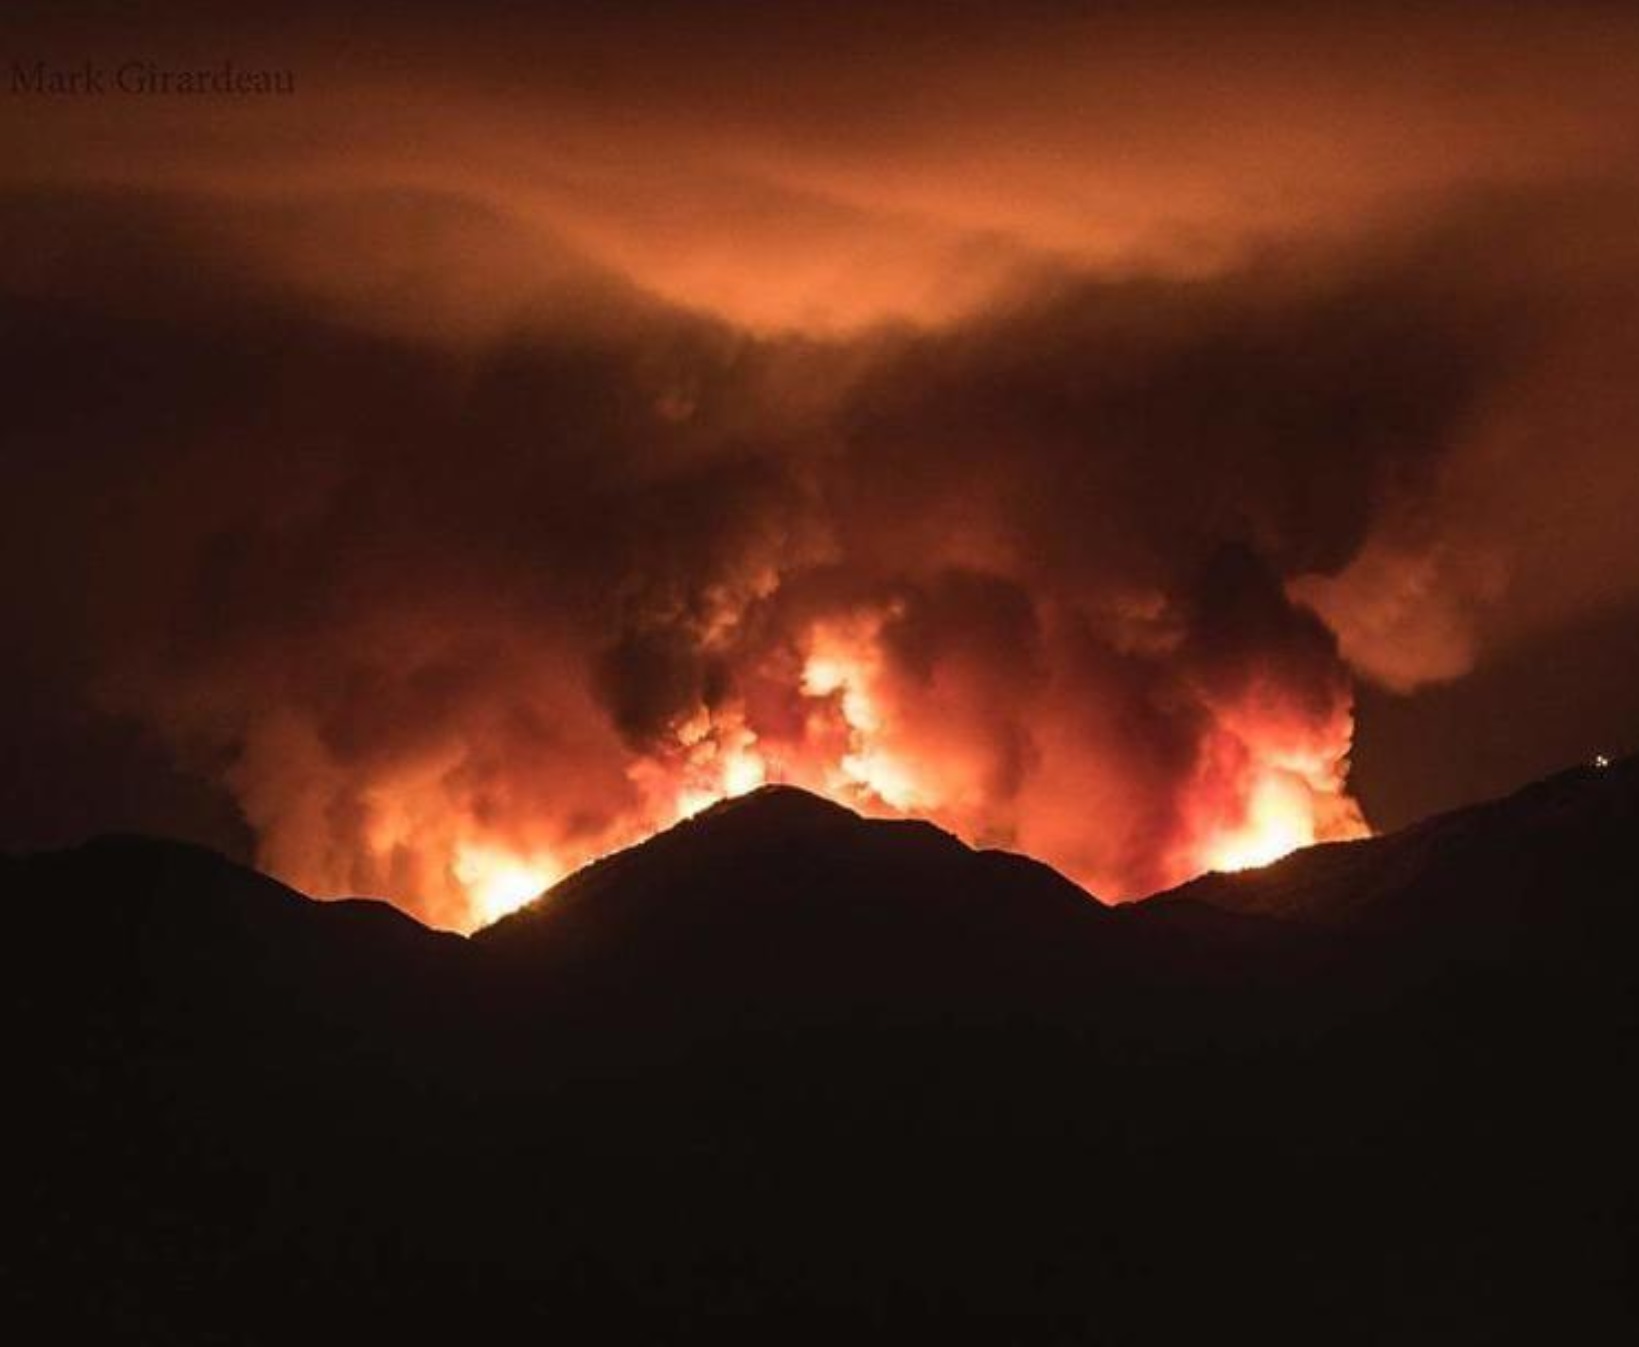
Picture 2 – This was taken from the mouth of the canyon looking up it to Modjeska Peak. There is actually no fire on the peak, what you are seeing is smoke and flames rising up from the area below it.

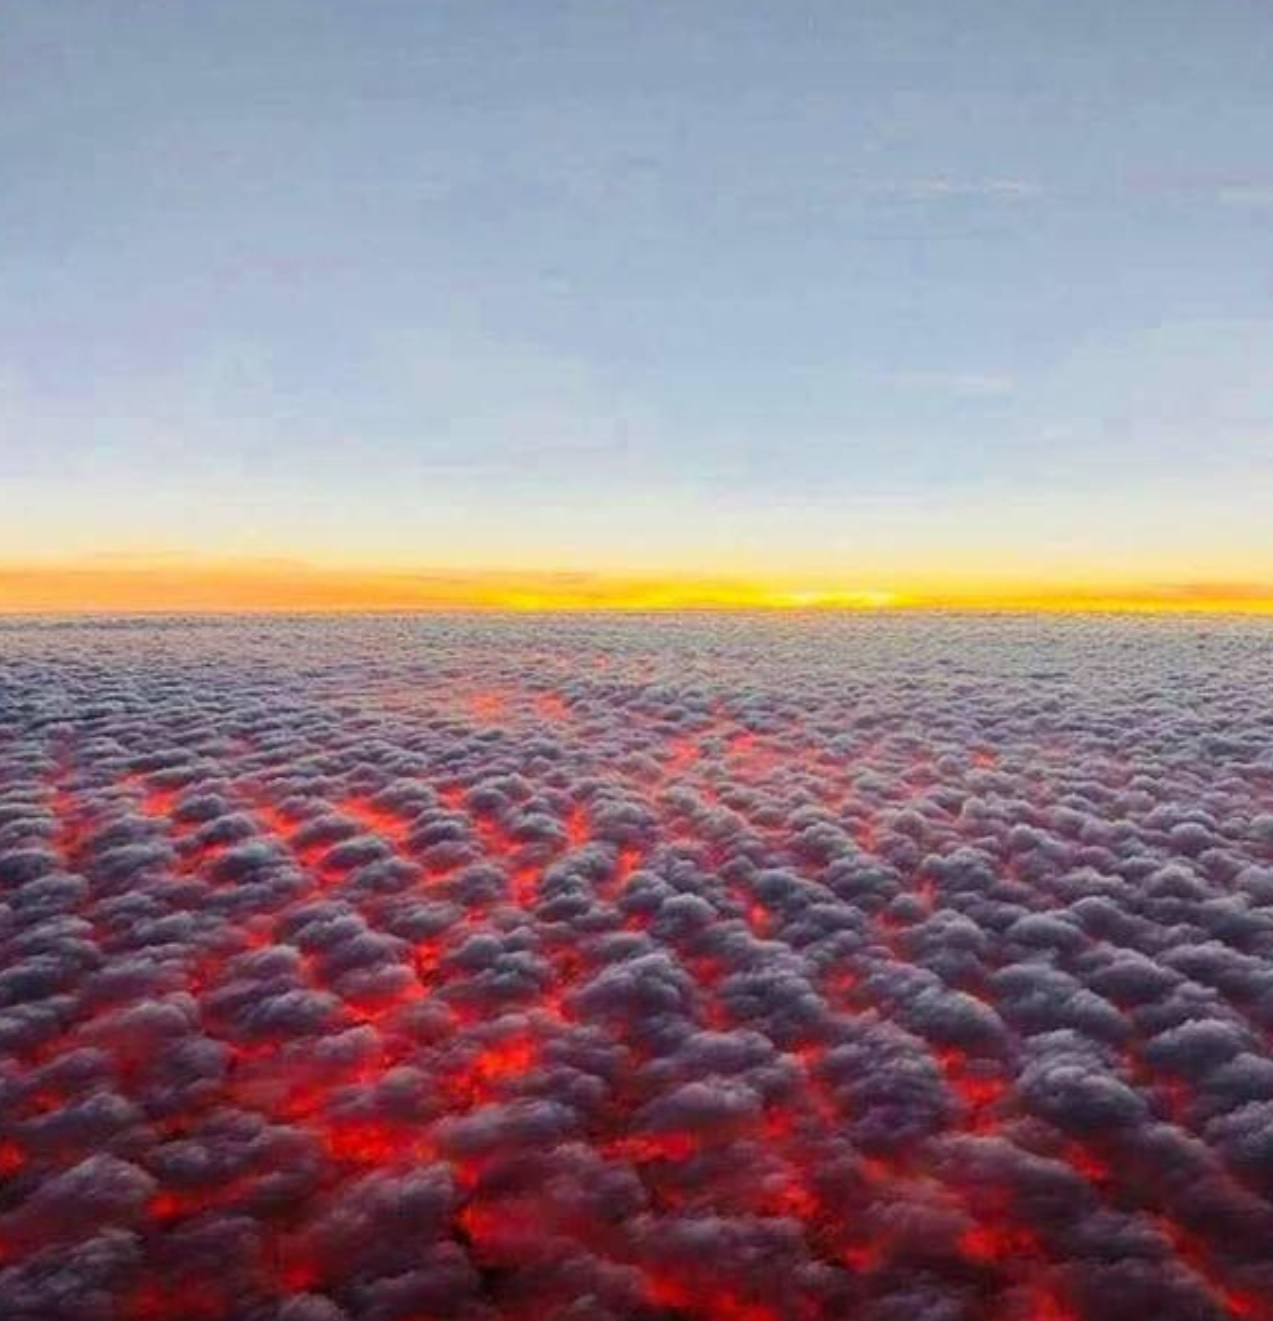
Picture 3 – This was taken from a plane at 30,000 feet looking down on the clouds above the fire.

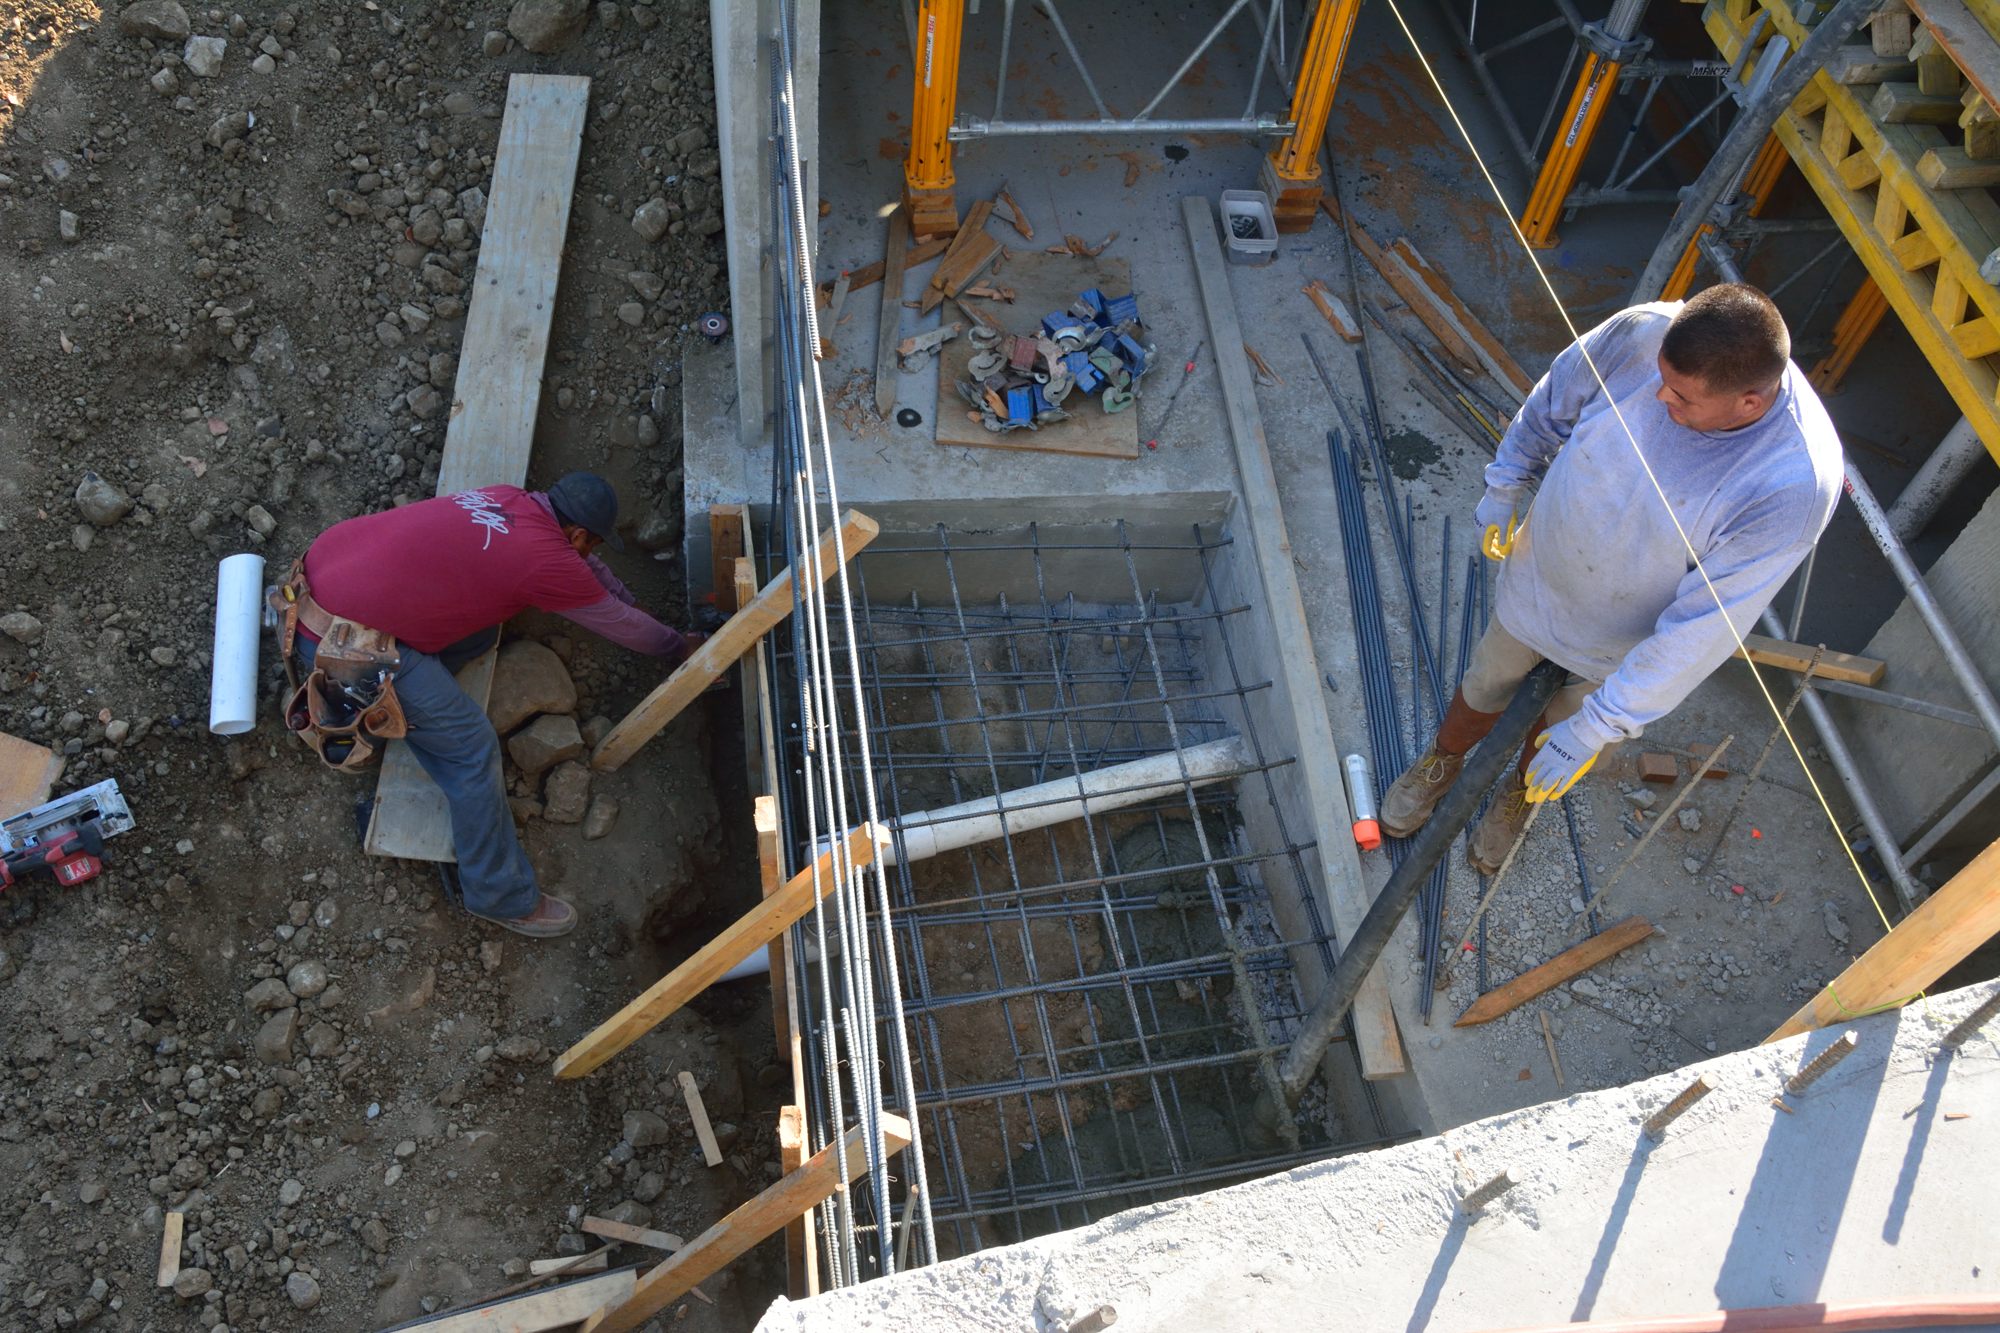
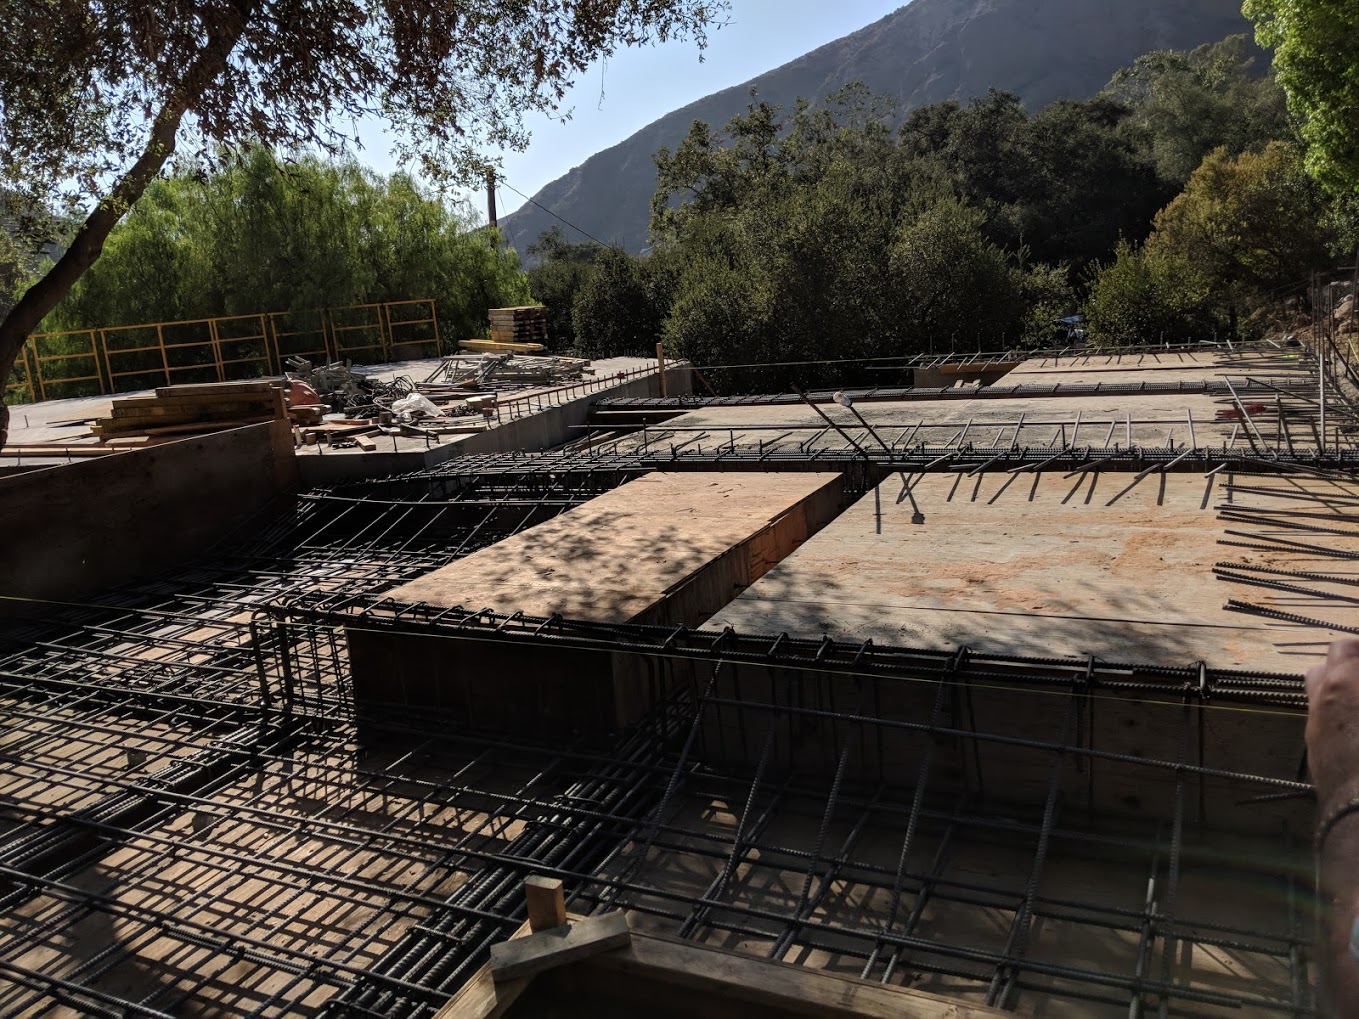
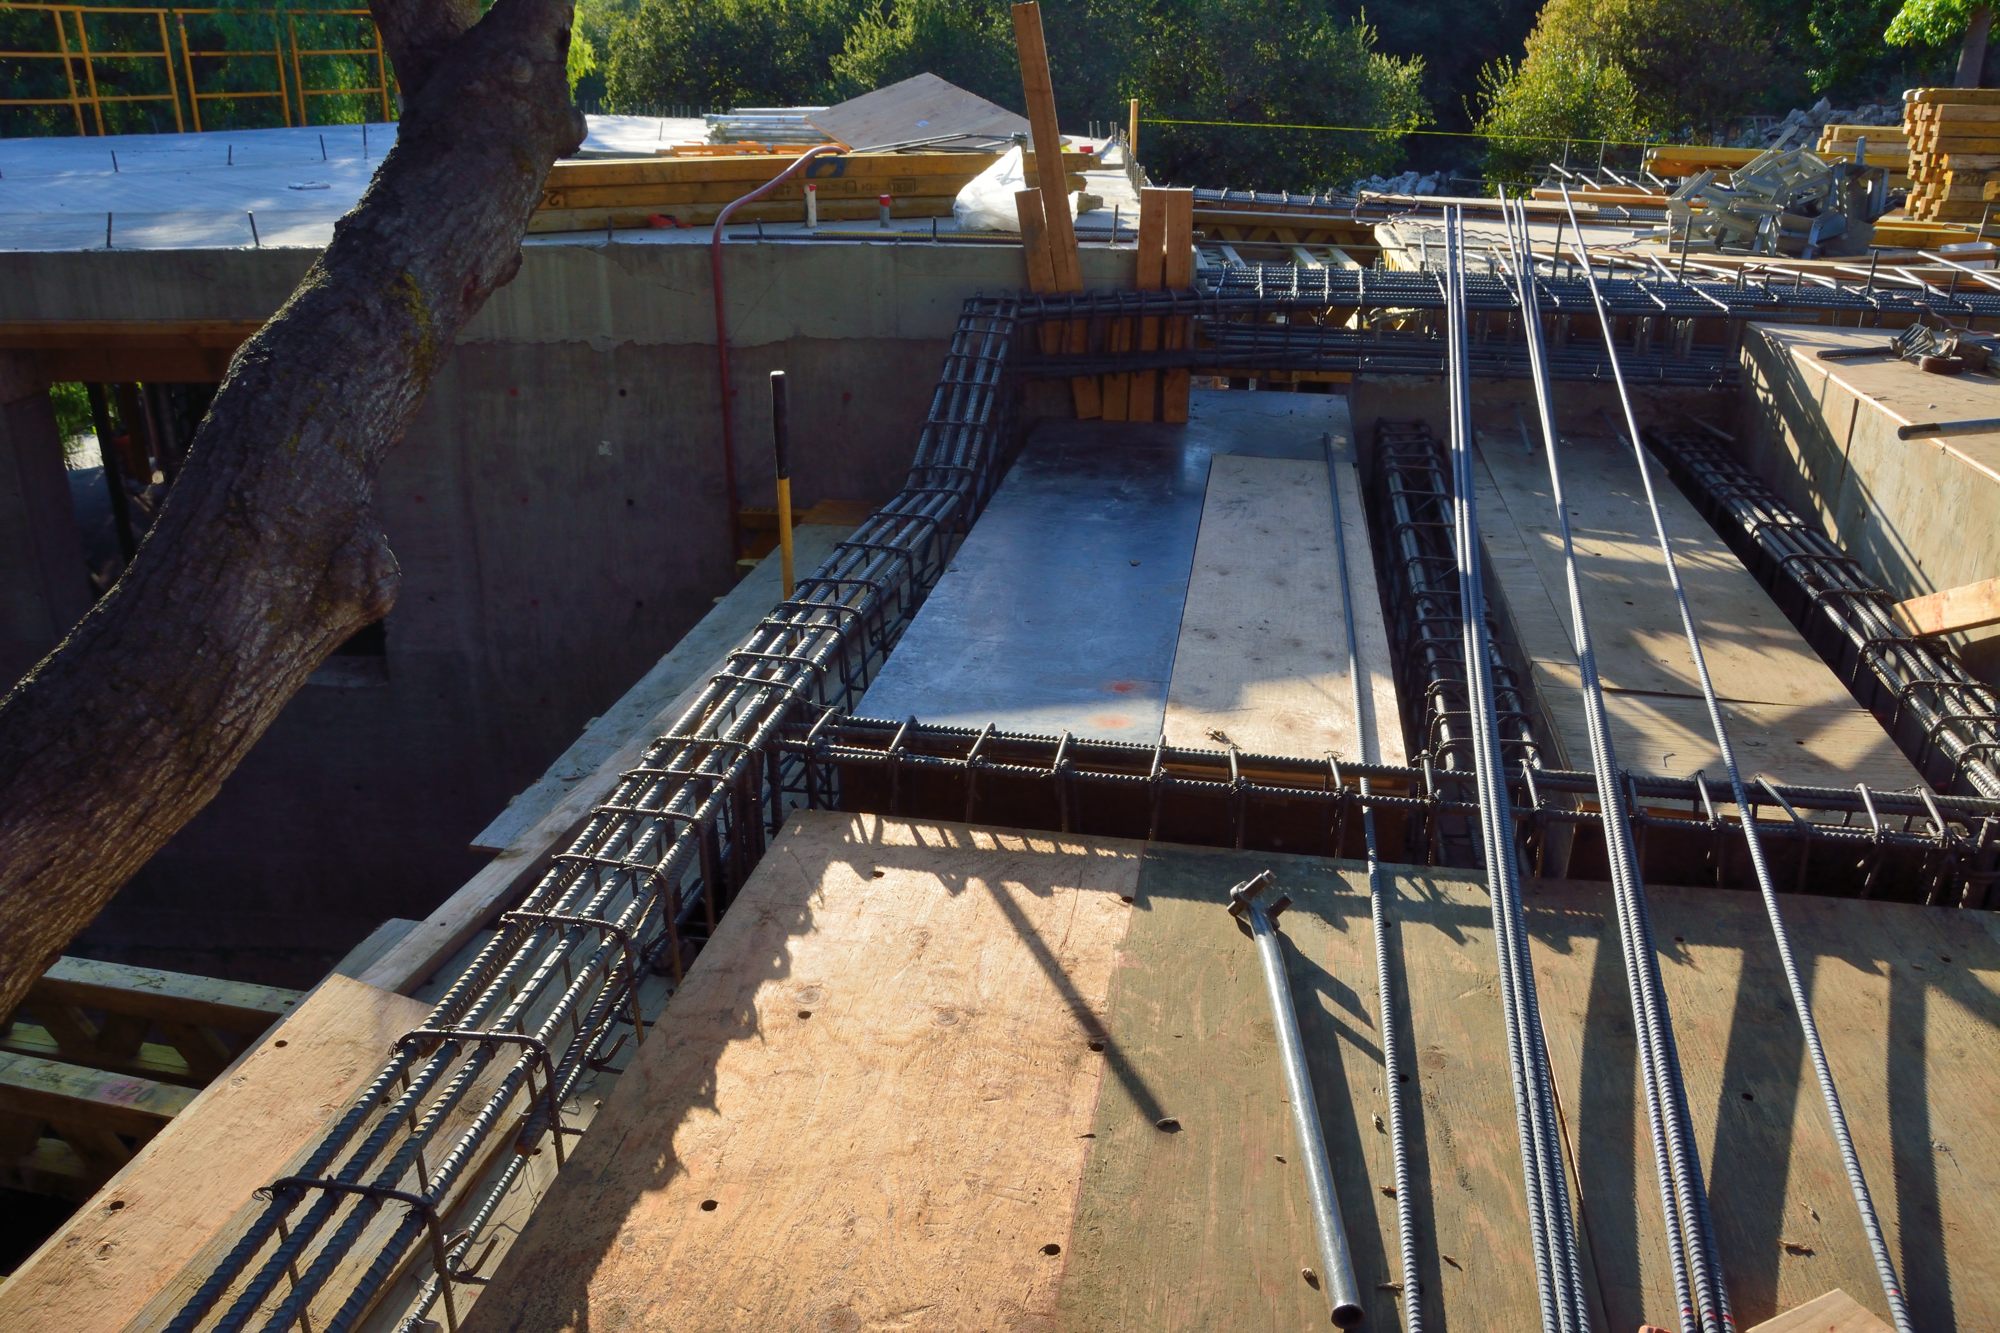
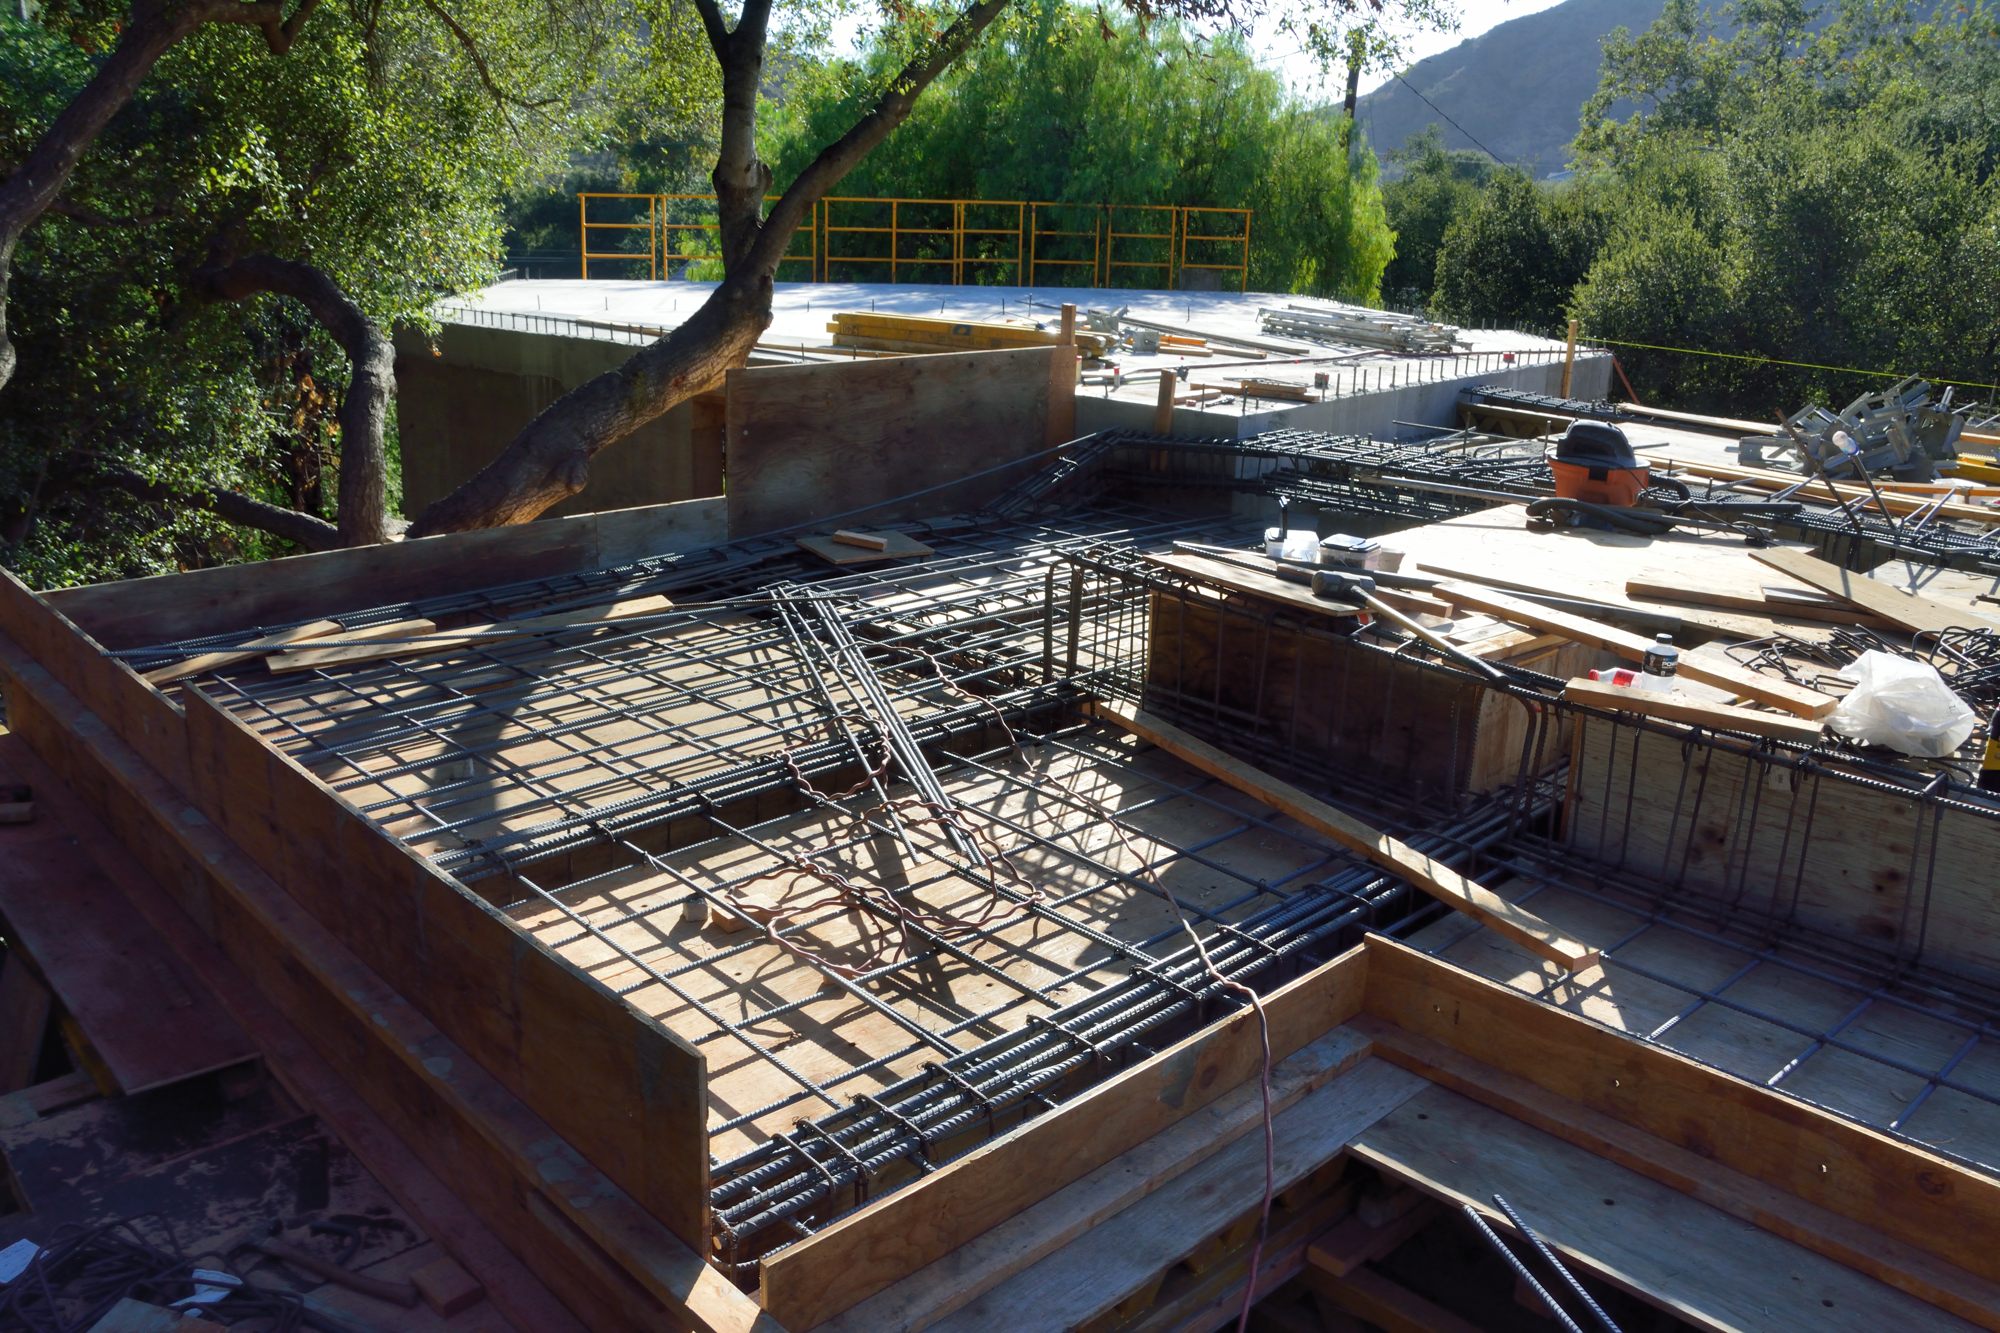
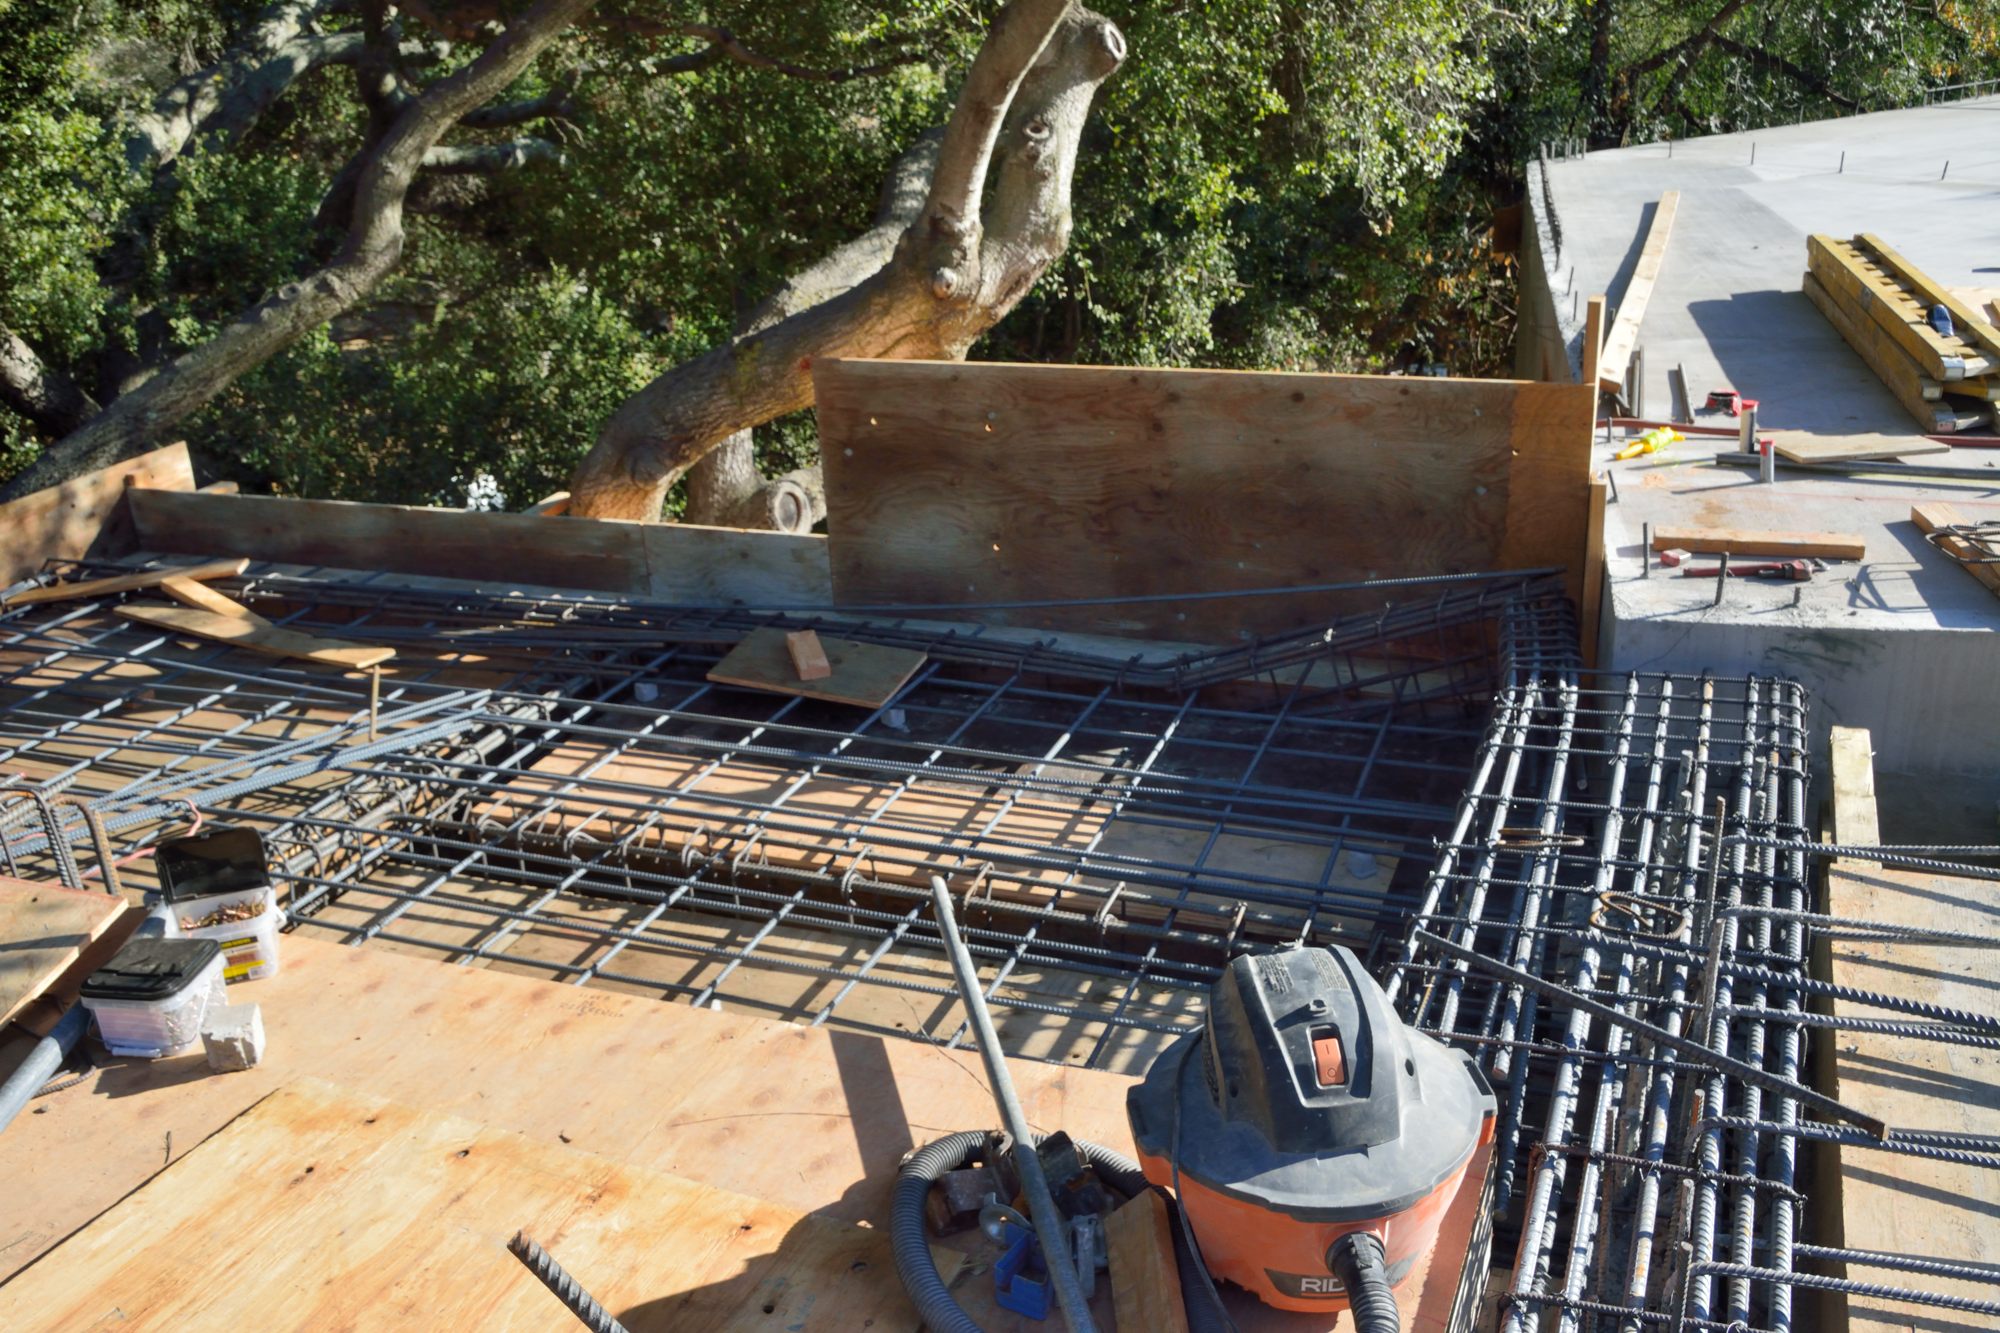
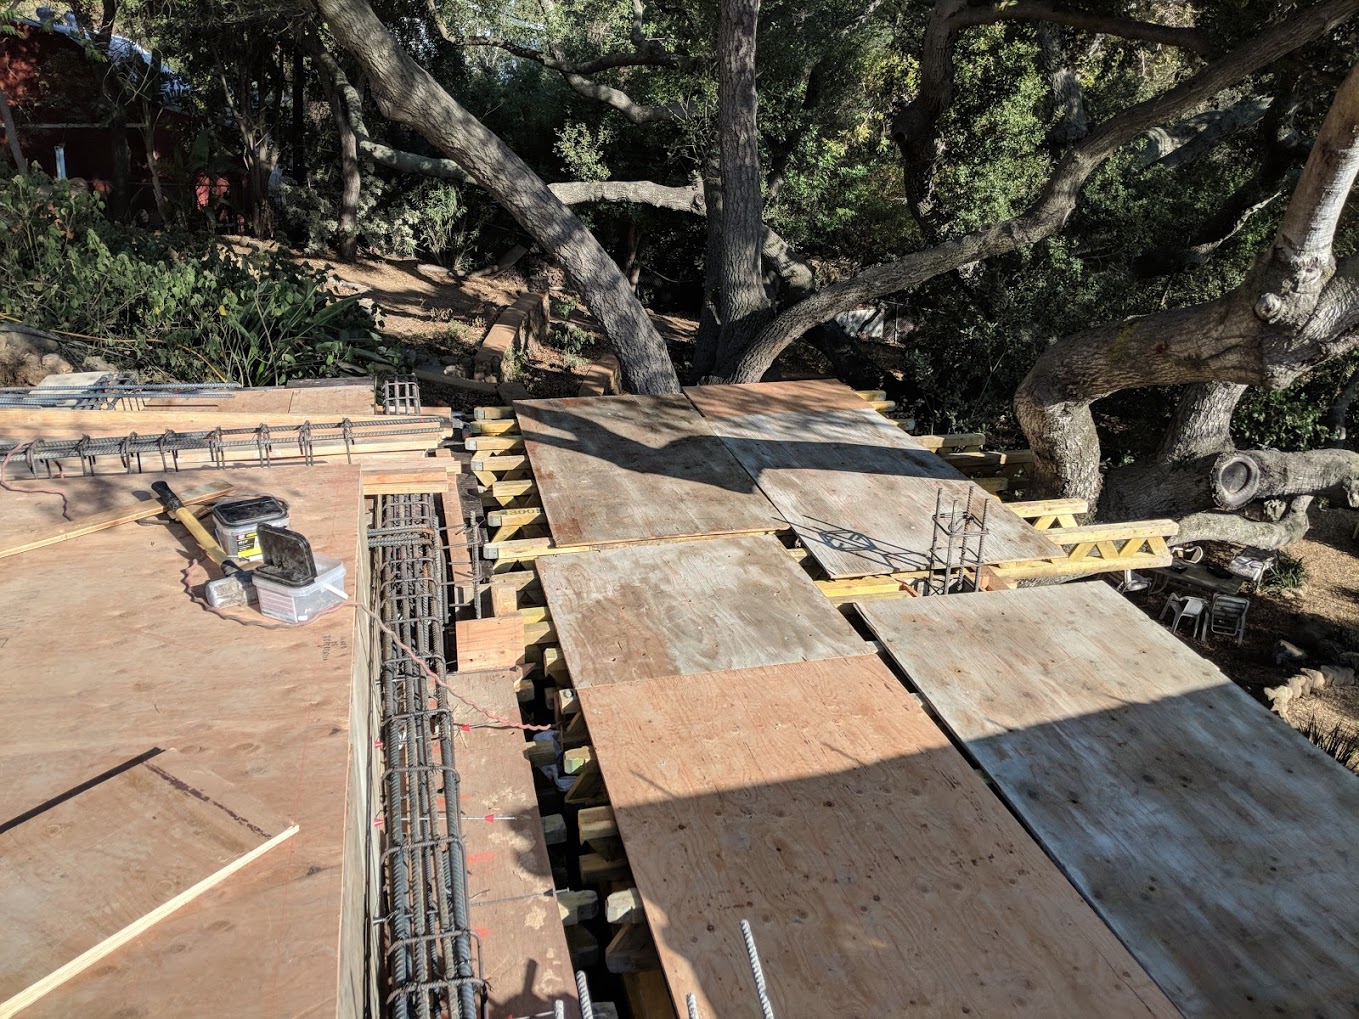
Although we have been away, our neighbor Michael kindly took and provided us with pictures. There are a lot of them, since they represent a week’s worth of work — the workmen did not work last Thursday or Friday because of all the smoke. Since we have been lazy and have not been updating the blog as Michael sent us the photos, we will try a somewhat different tactic here, grouping sets of photos taken on different days that show the same area of the house at different points in time. Below are two pairs of pictures of the deck before and after pouring the concrete. The first pair (Pictures 4 and 5) show the upper deck. The second pair (Pictures 6 and 7) show the stairway between the upper deck and the lower deck (which was poured last time).

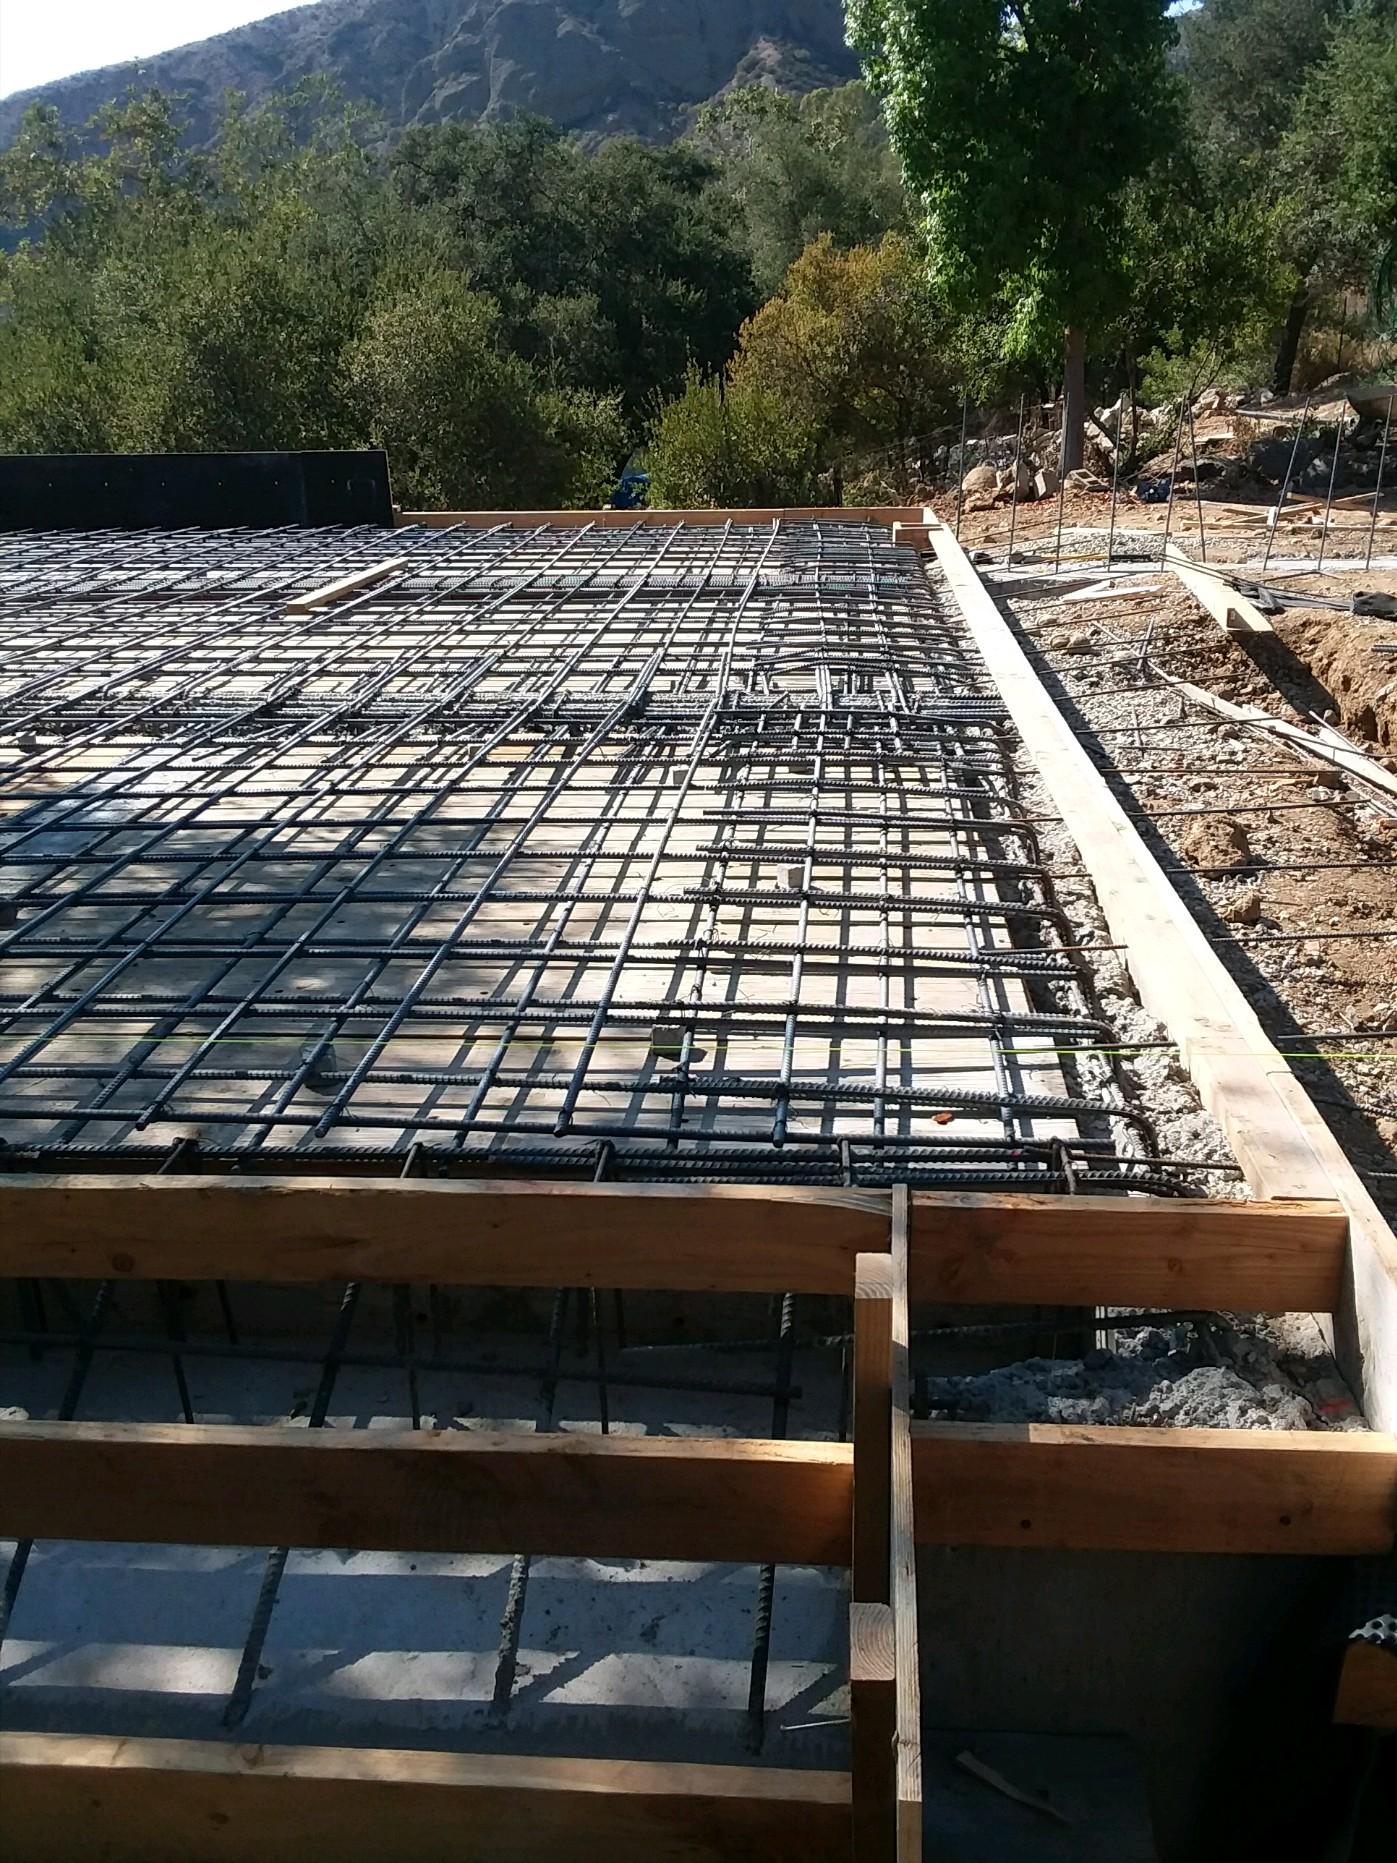
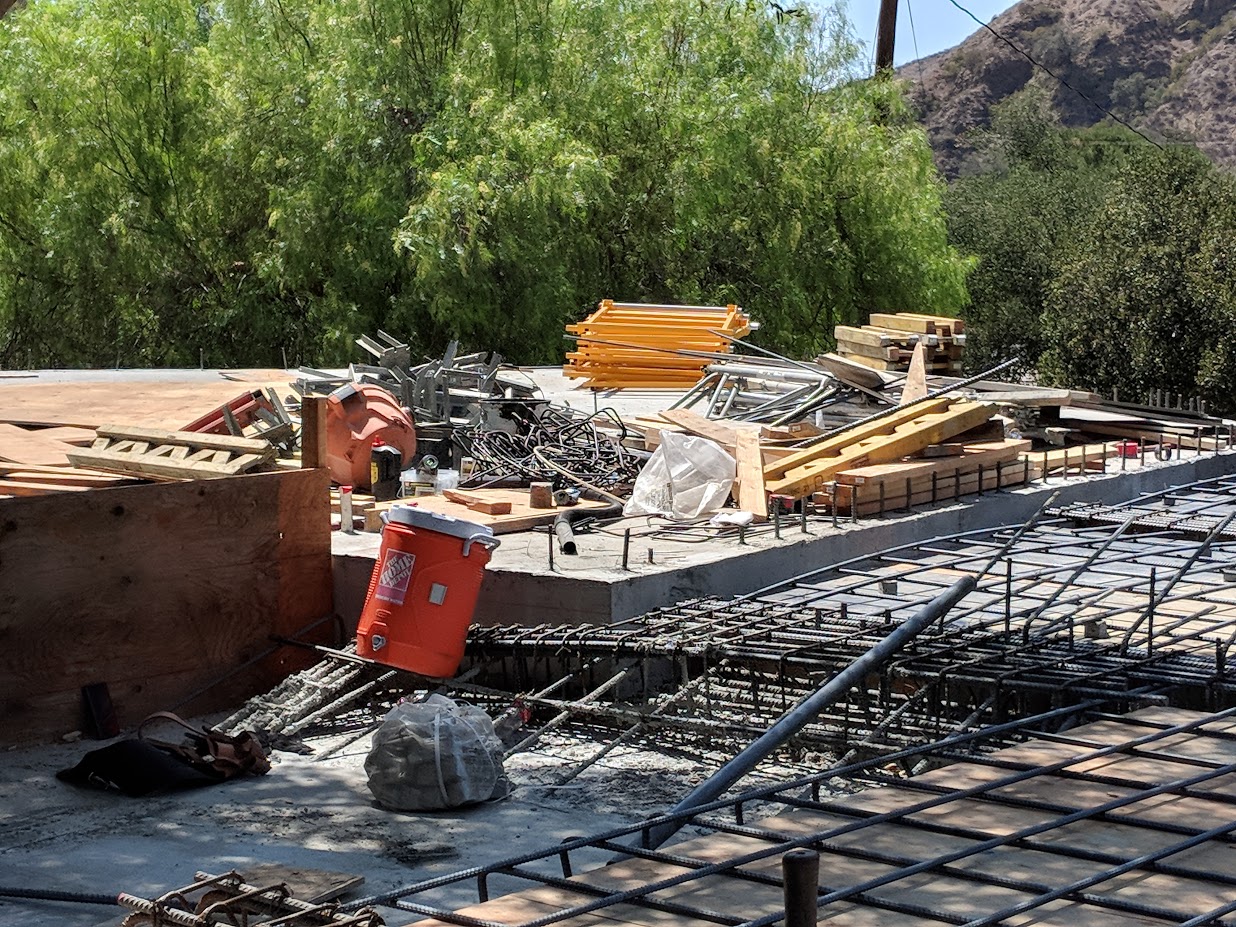
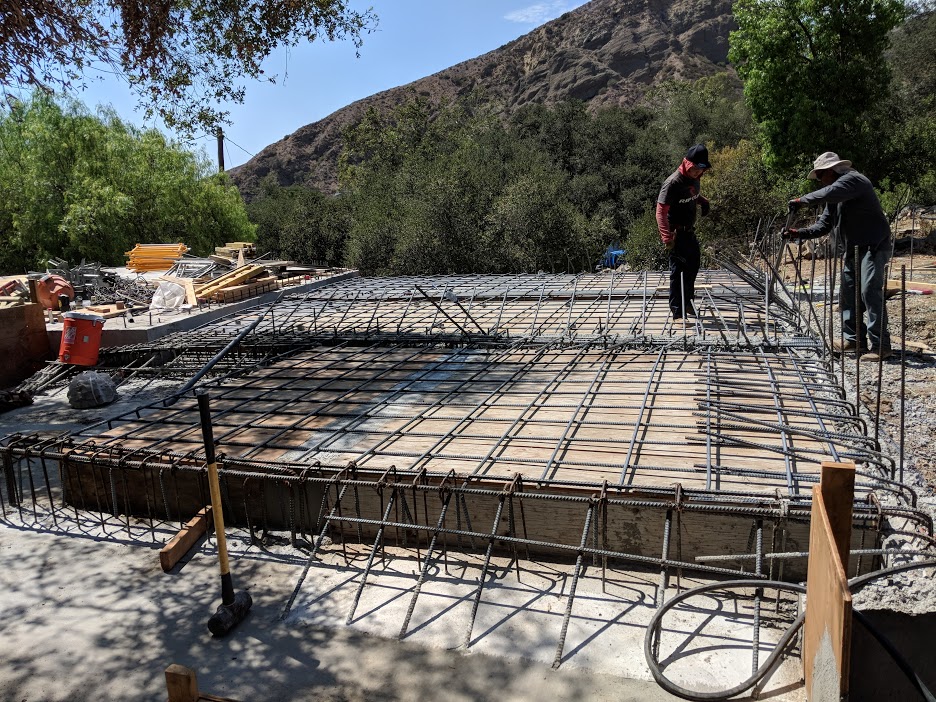
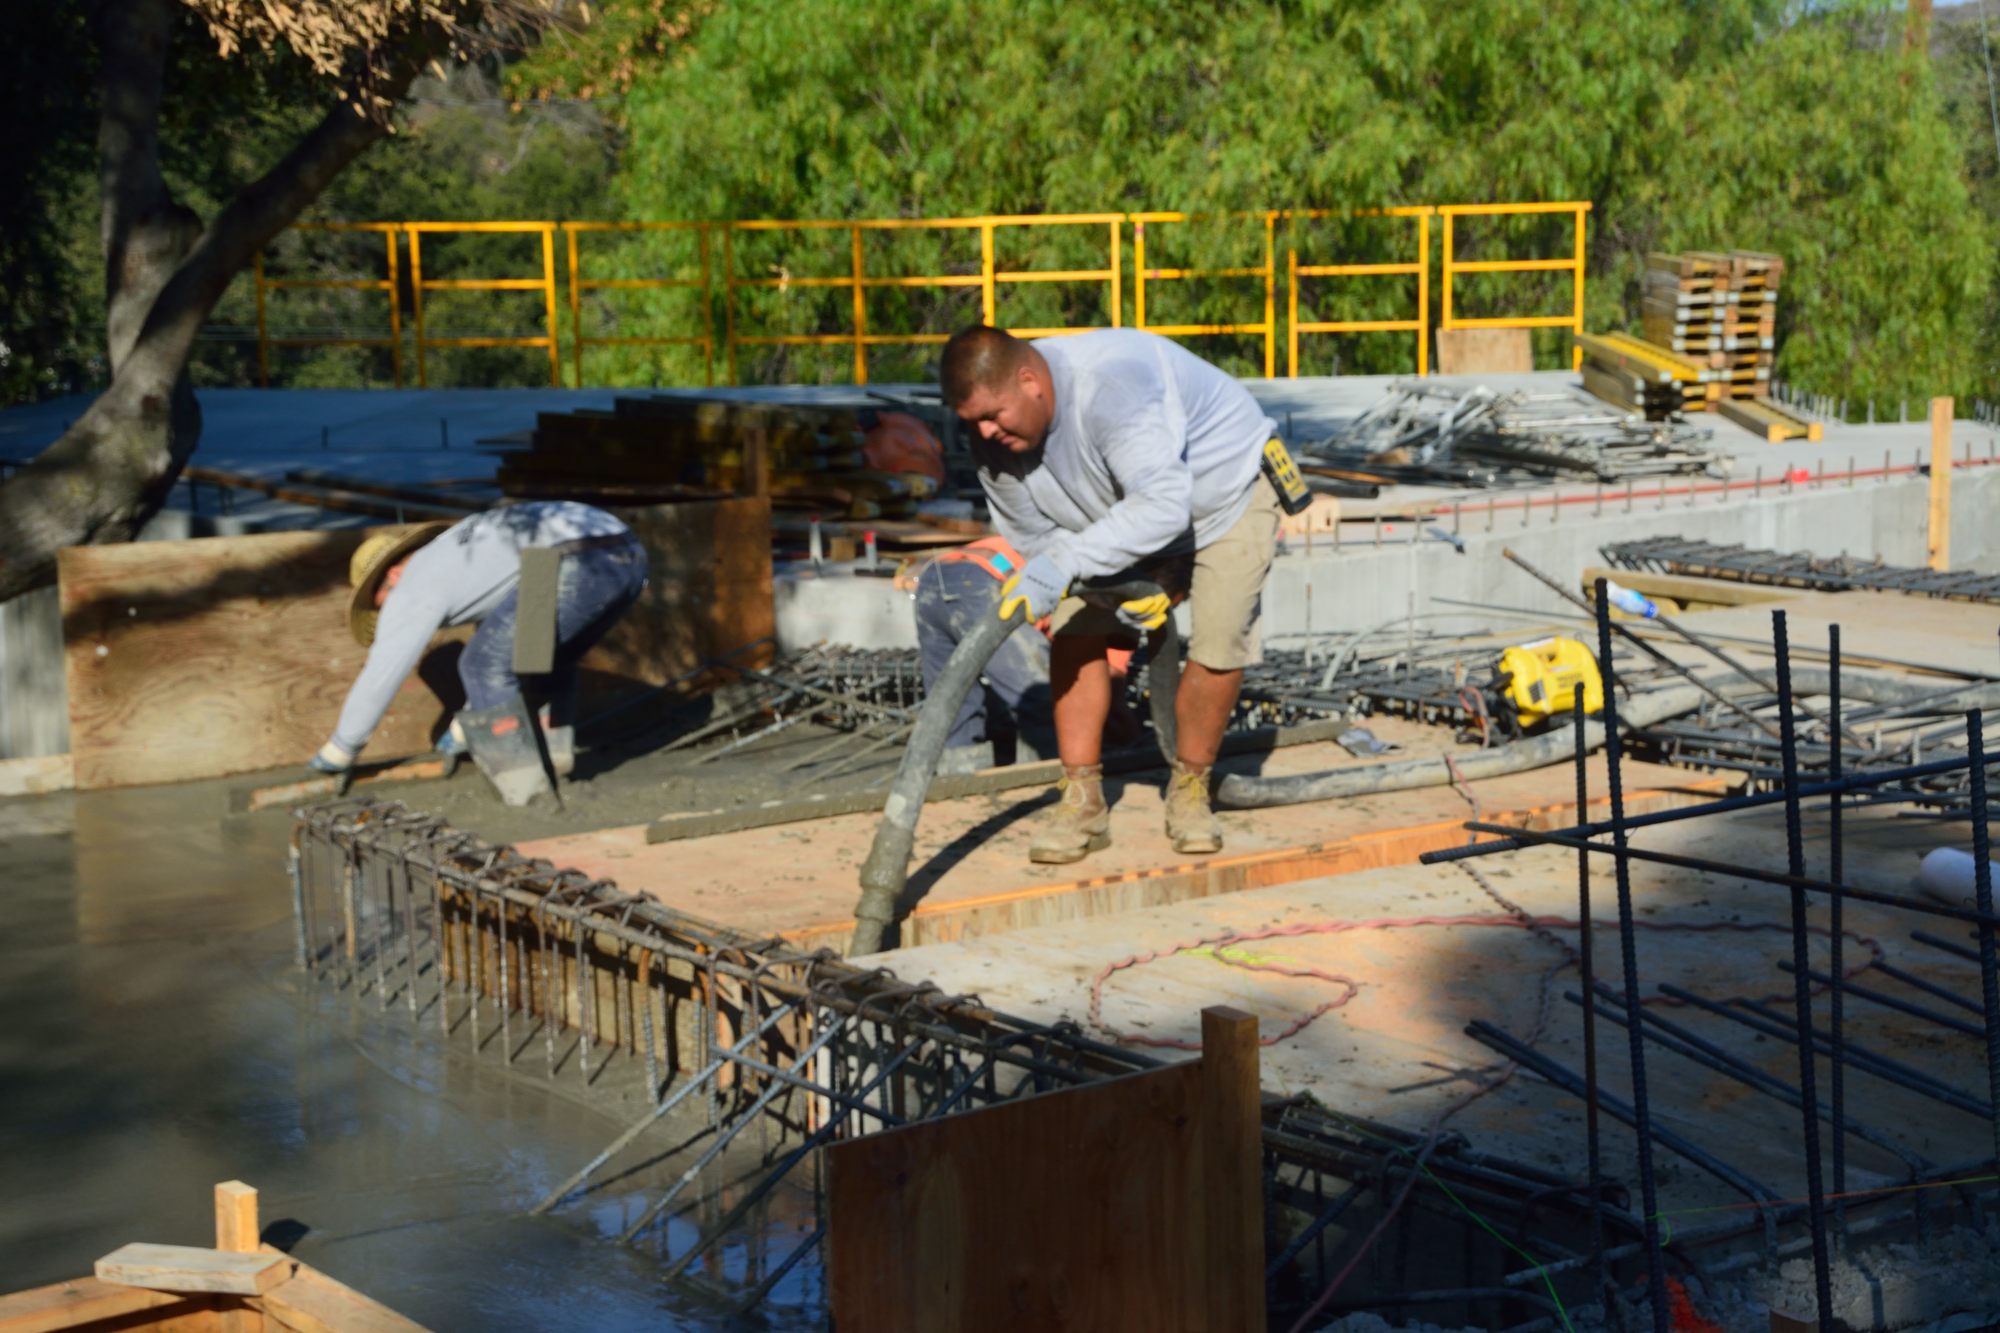
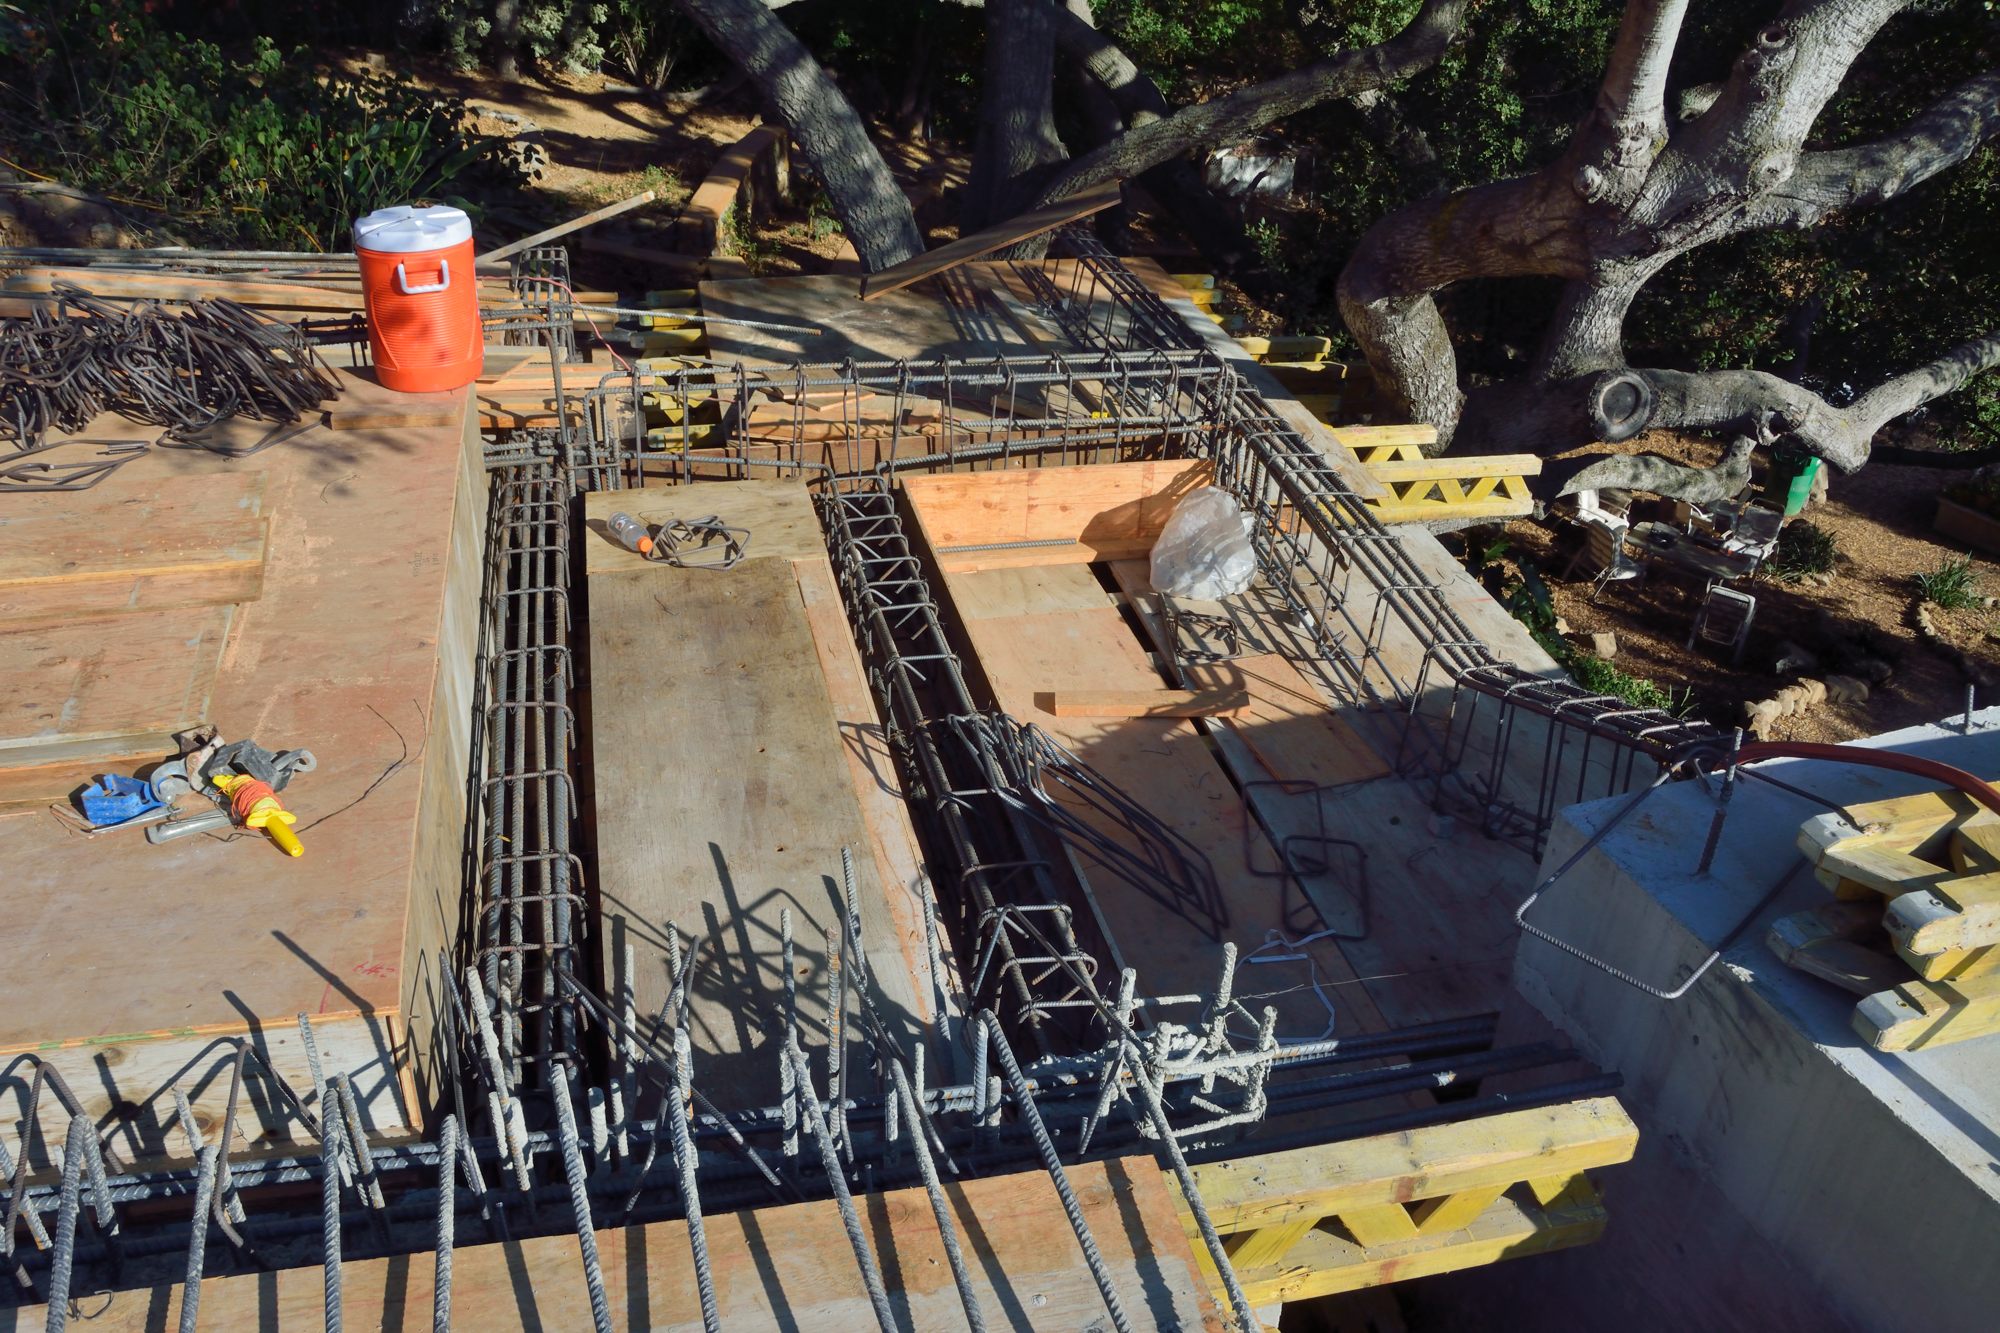
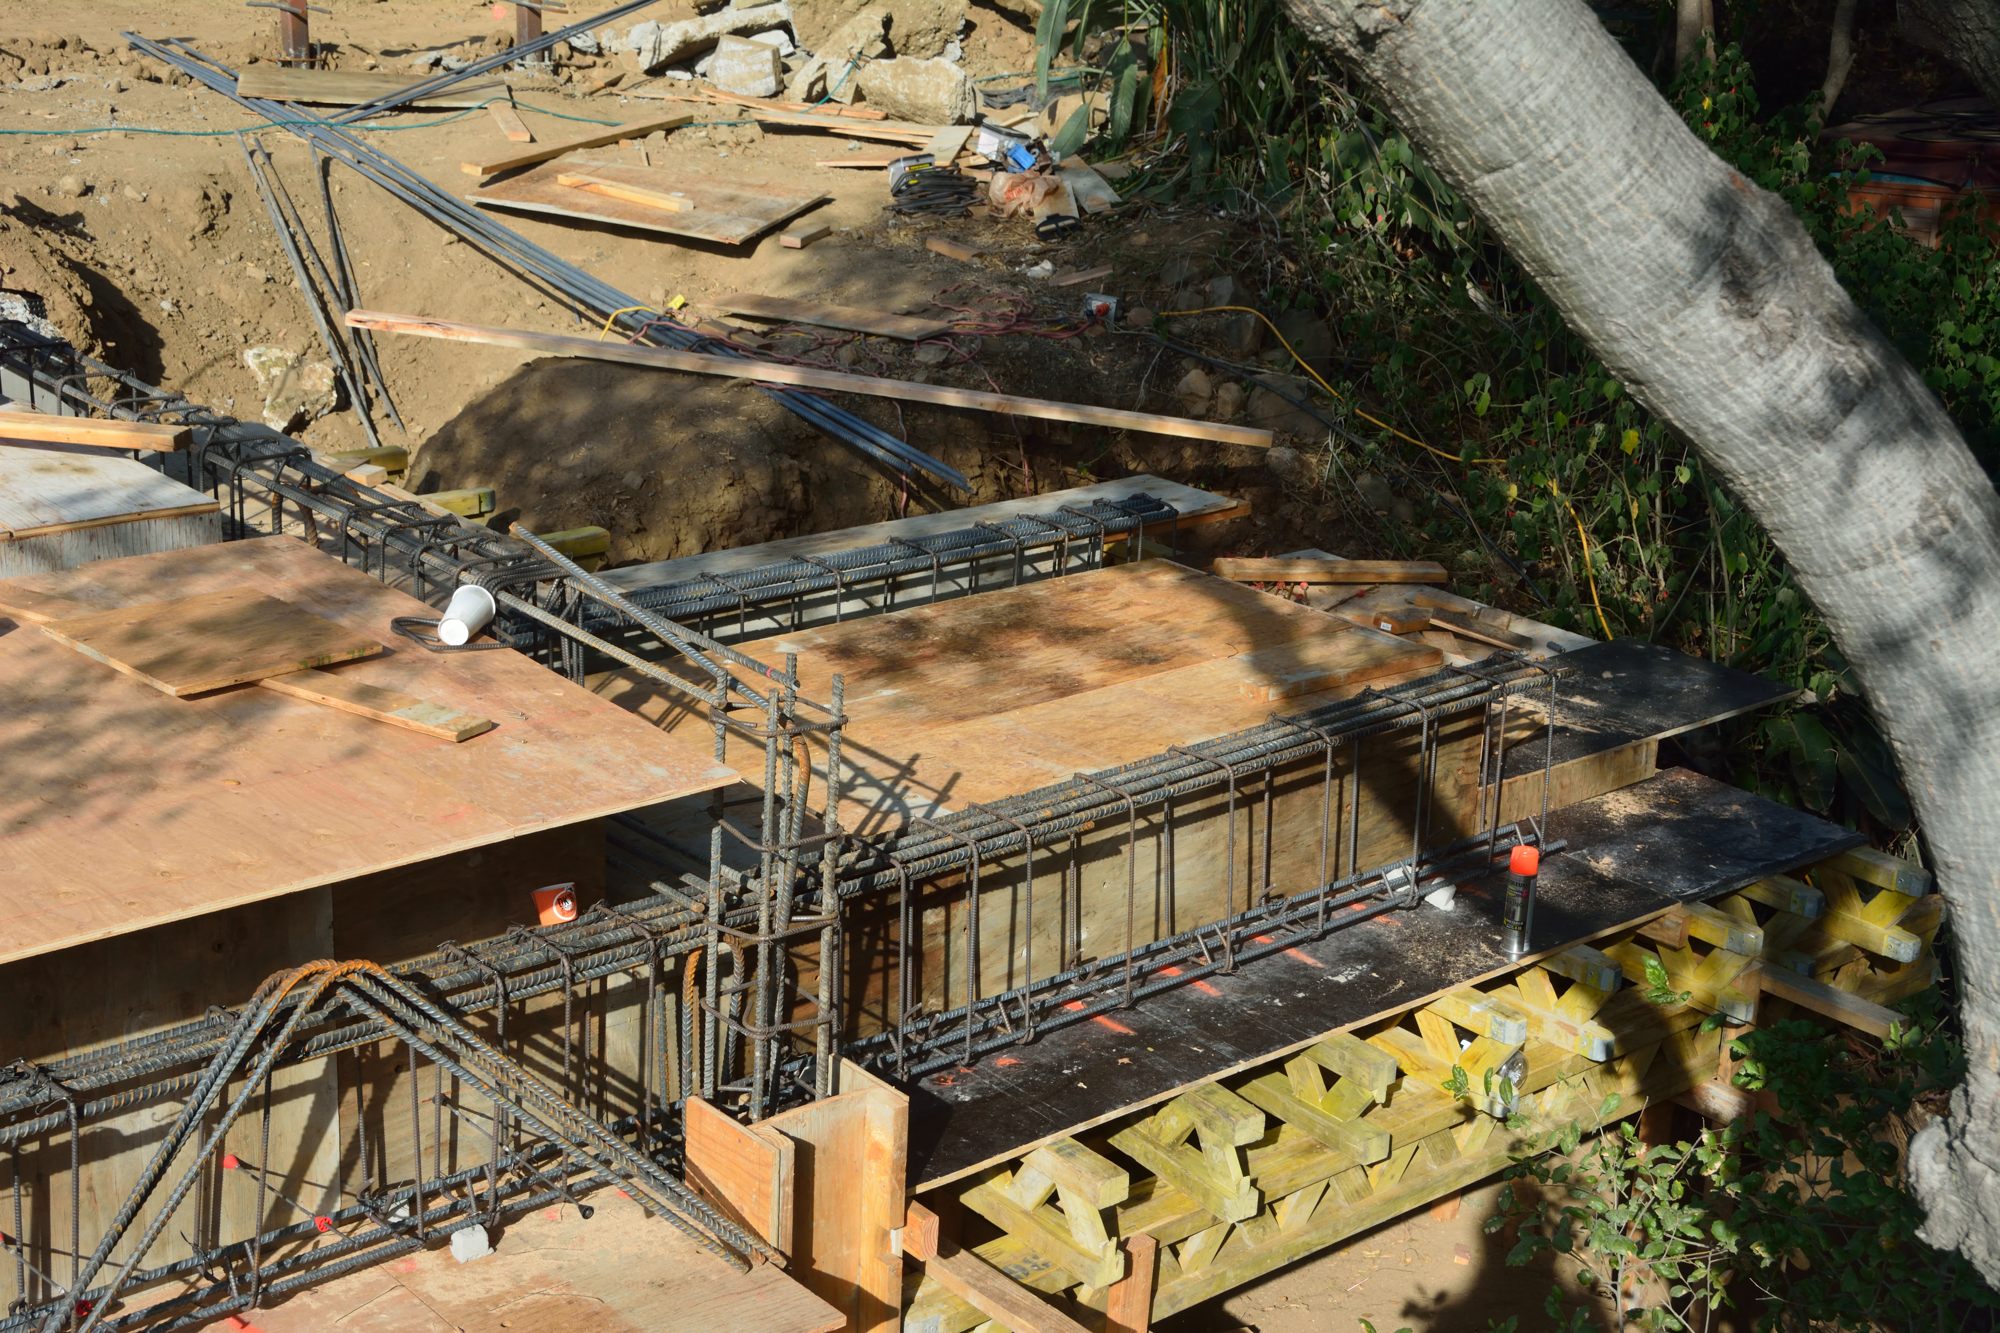
Picture 4 – Upper deck with framing and rebar viewed from the east.

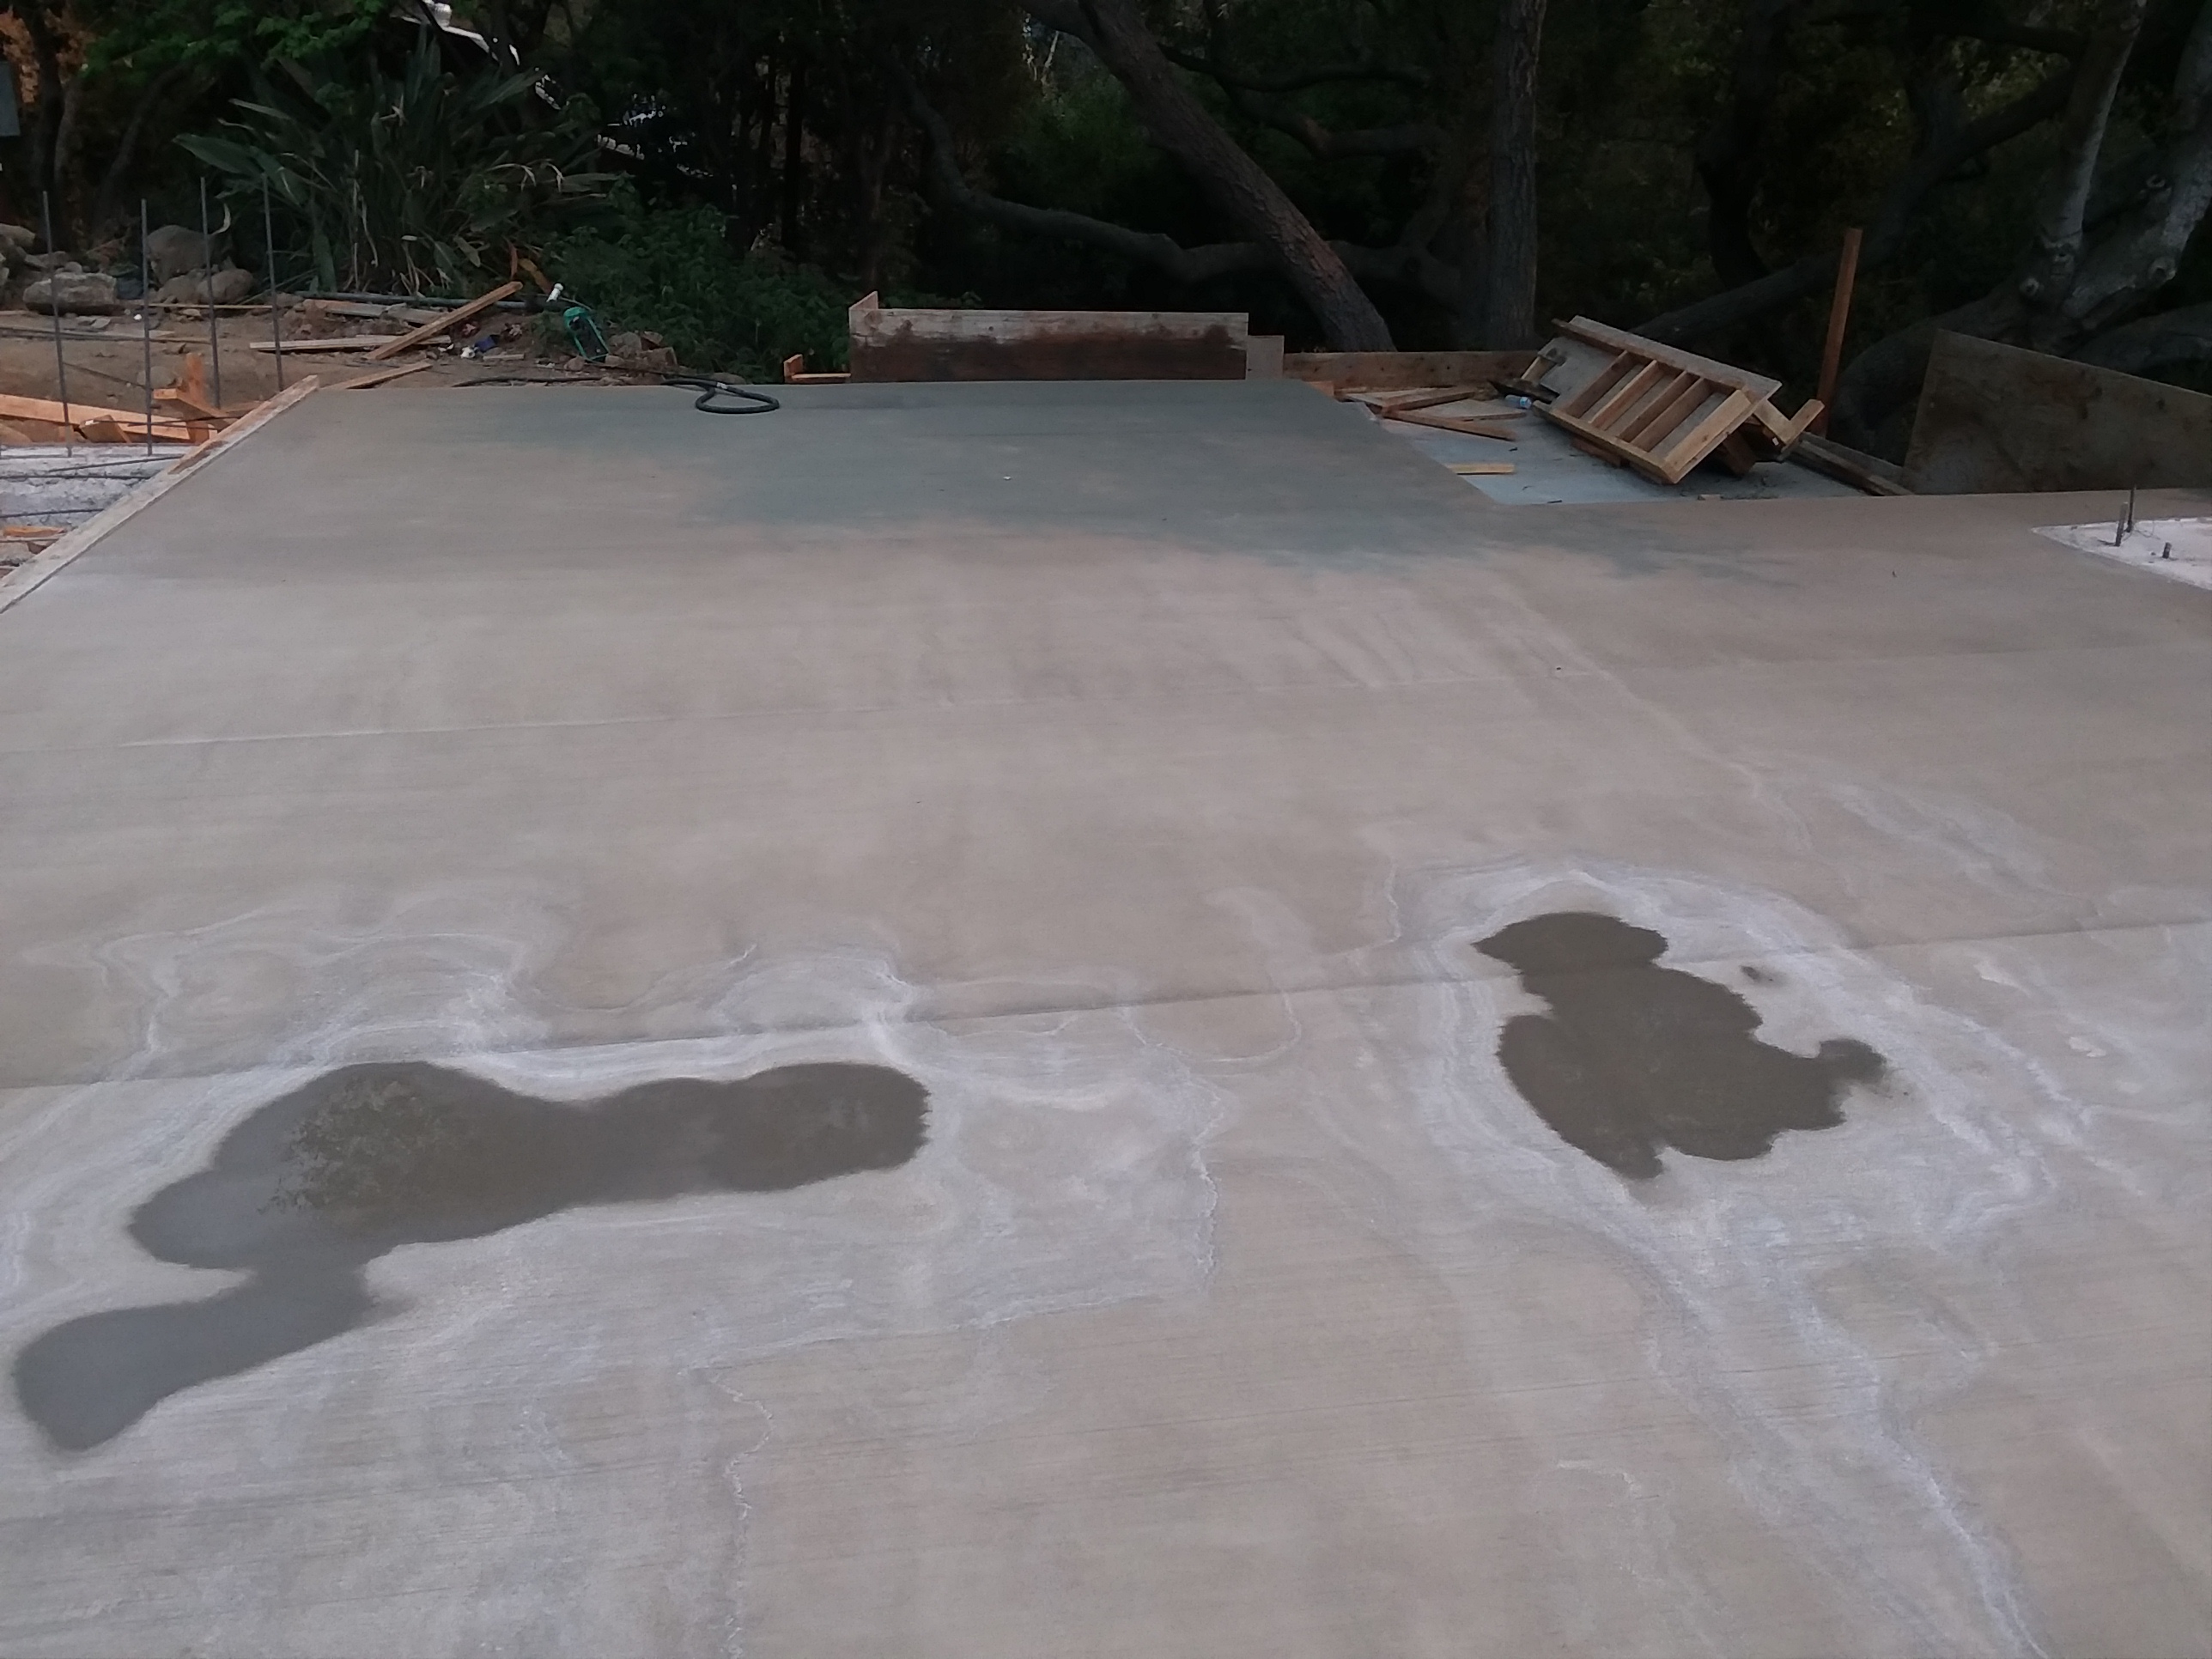
Picture 5 – Upper deck after the pour viewed from the west.


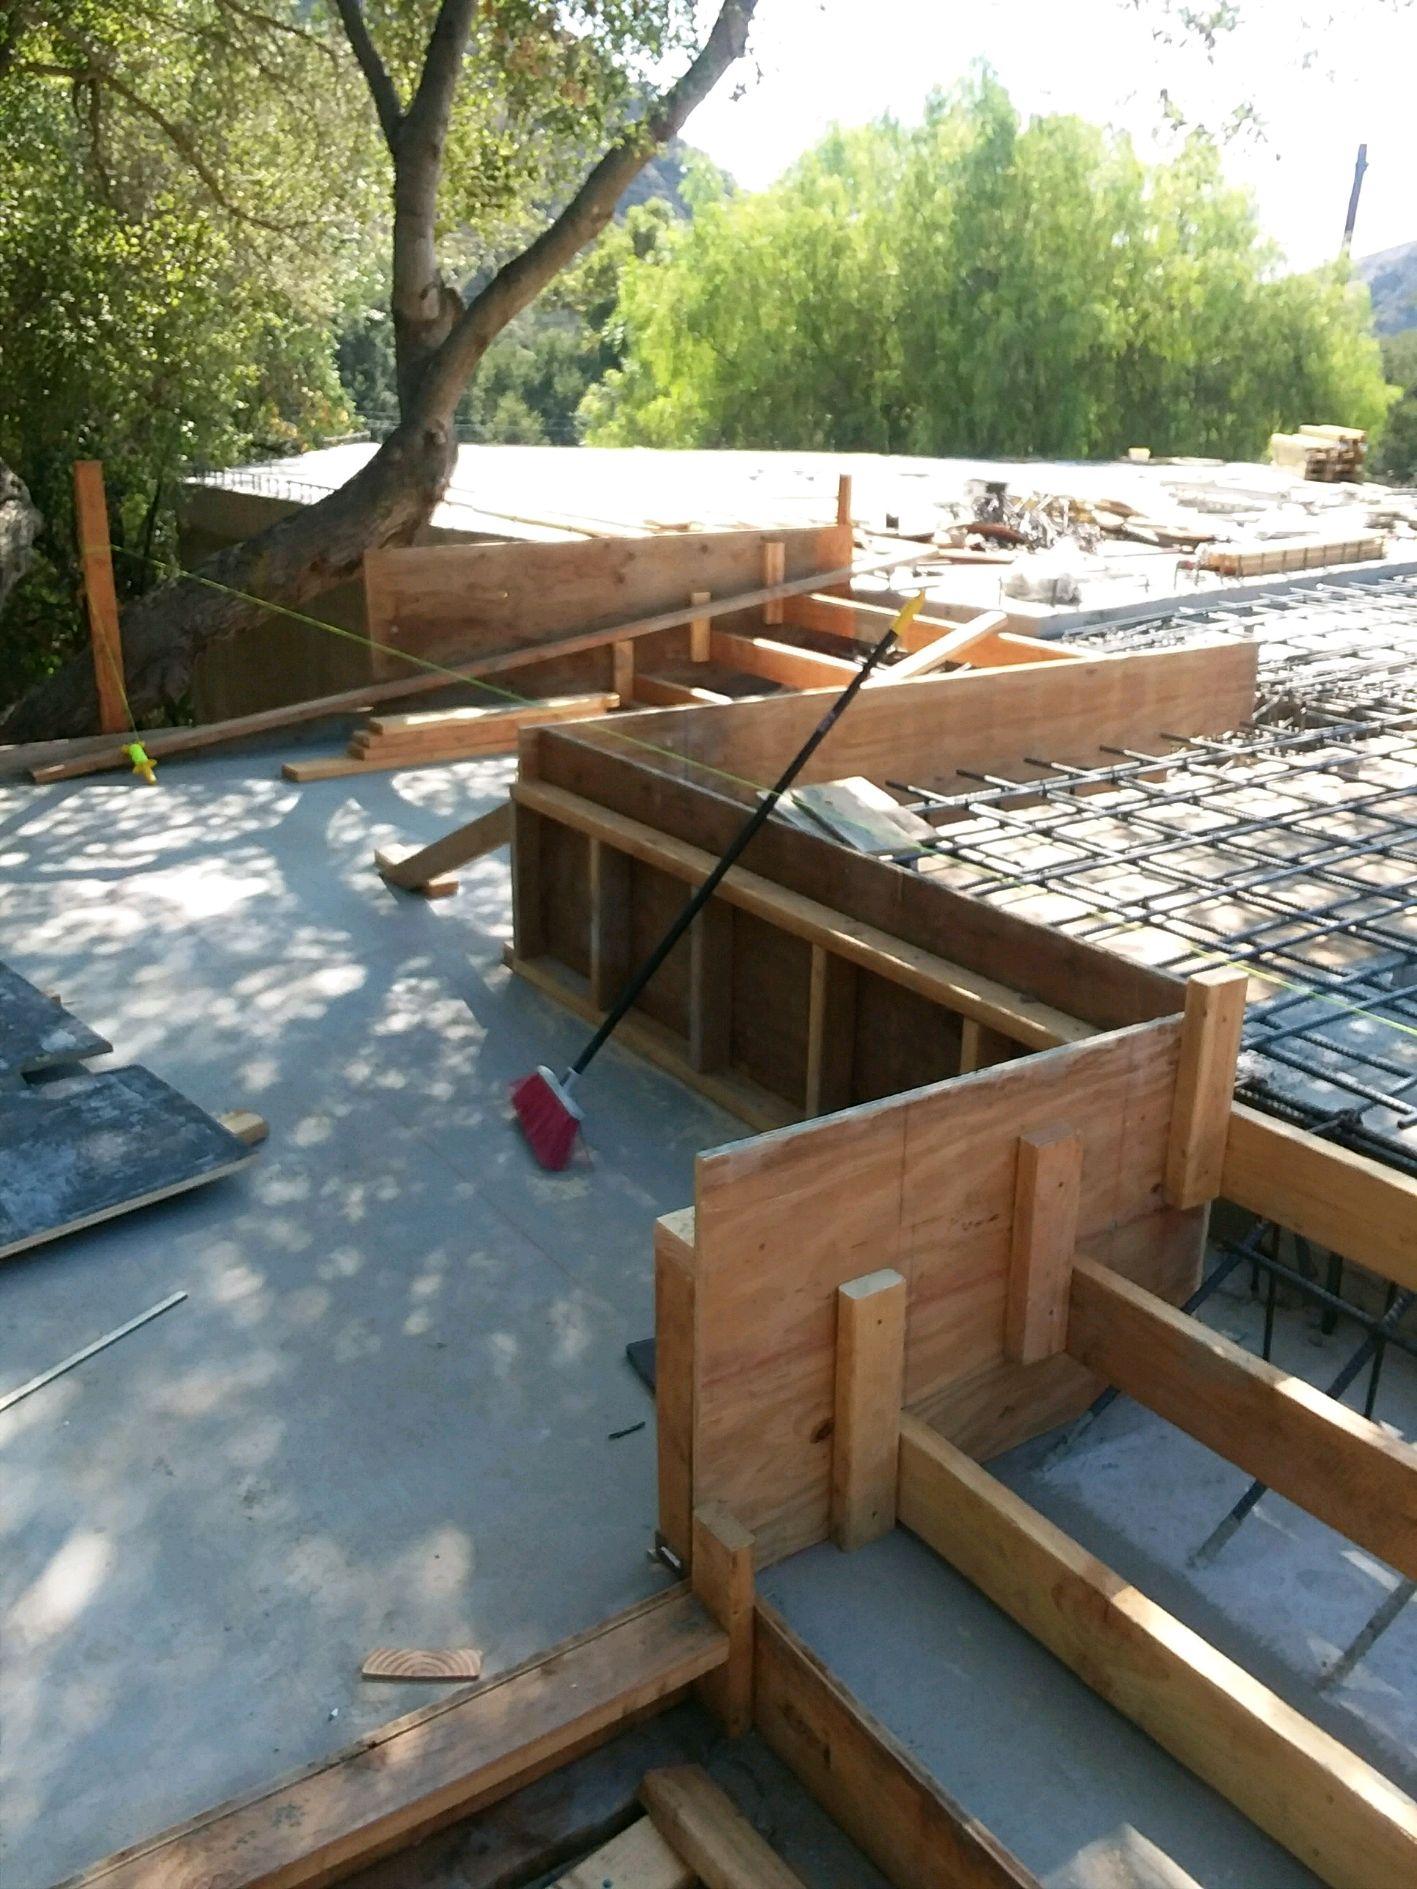
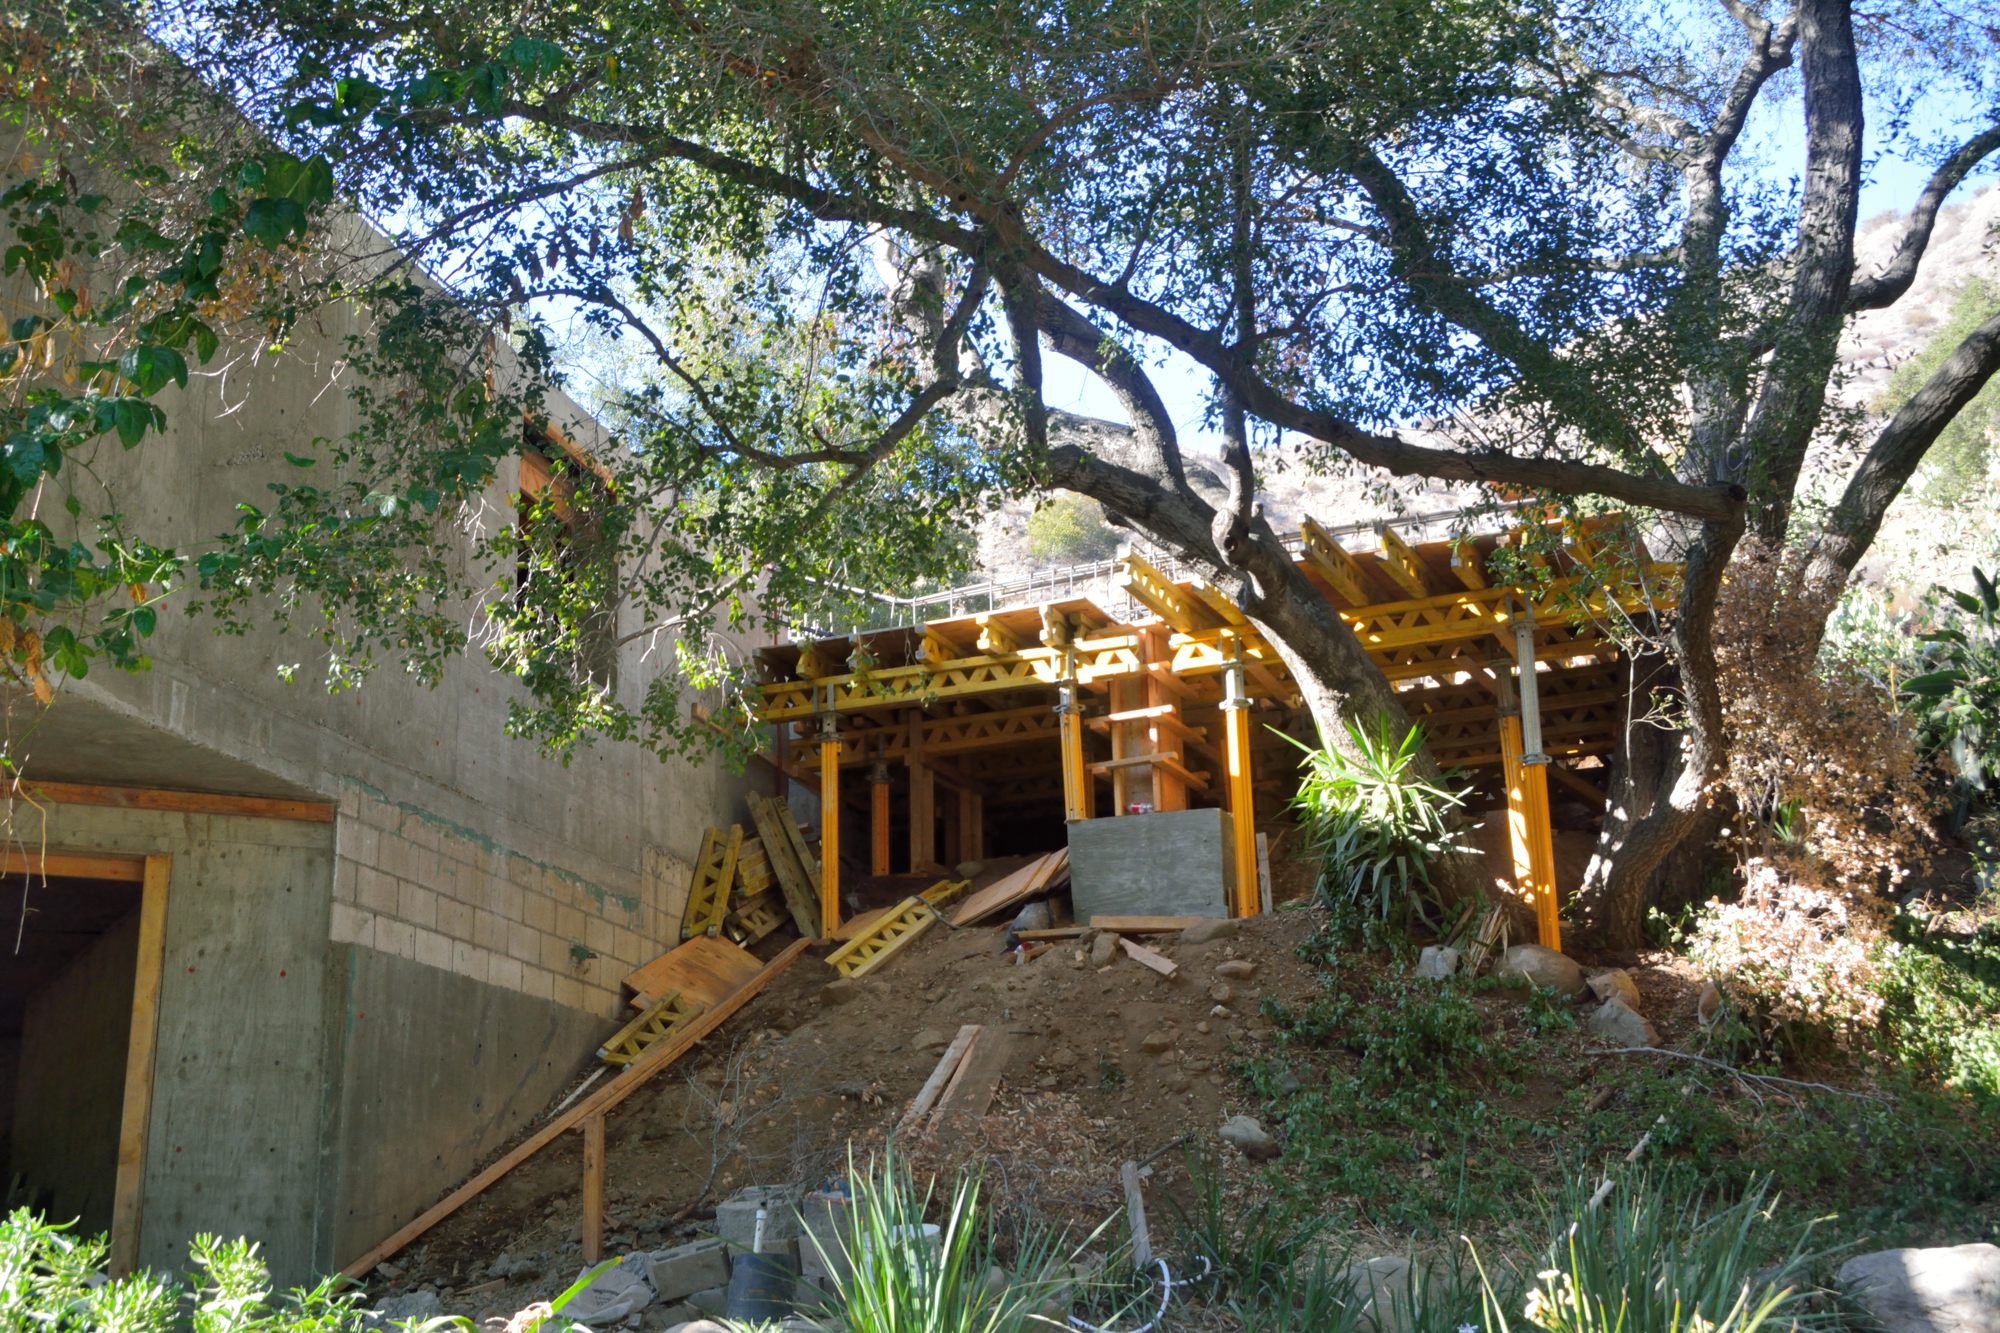
Picture 6 – Framing for the stairs near the house from the upper to the lower deck. The 2nd set of stairs is just visible in the background.

Picture 7 – 2nd set of stairs from the upper to the lower decks (the ones in the background in Picture 6) after the pour, with the roof of the apartment in the background.

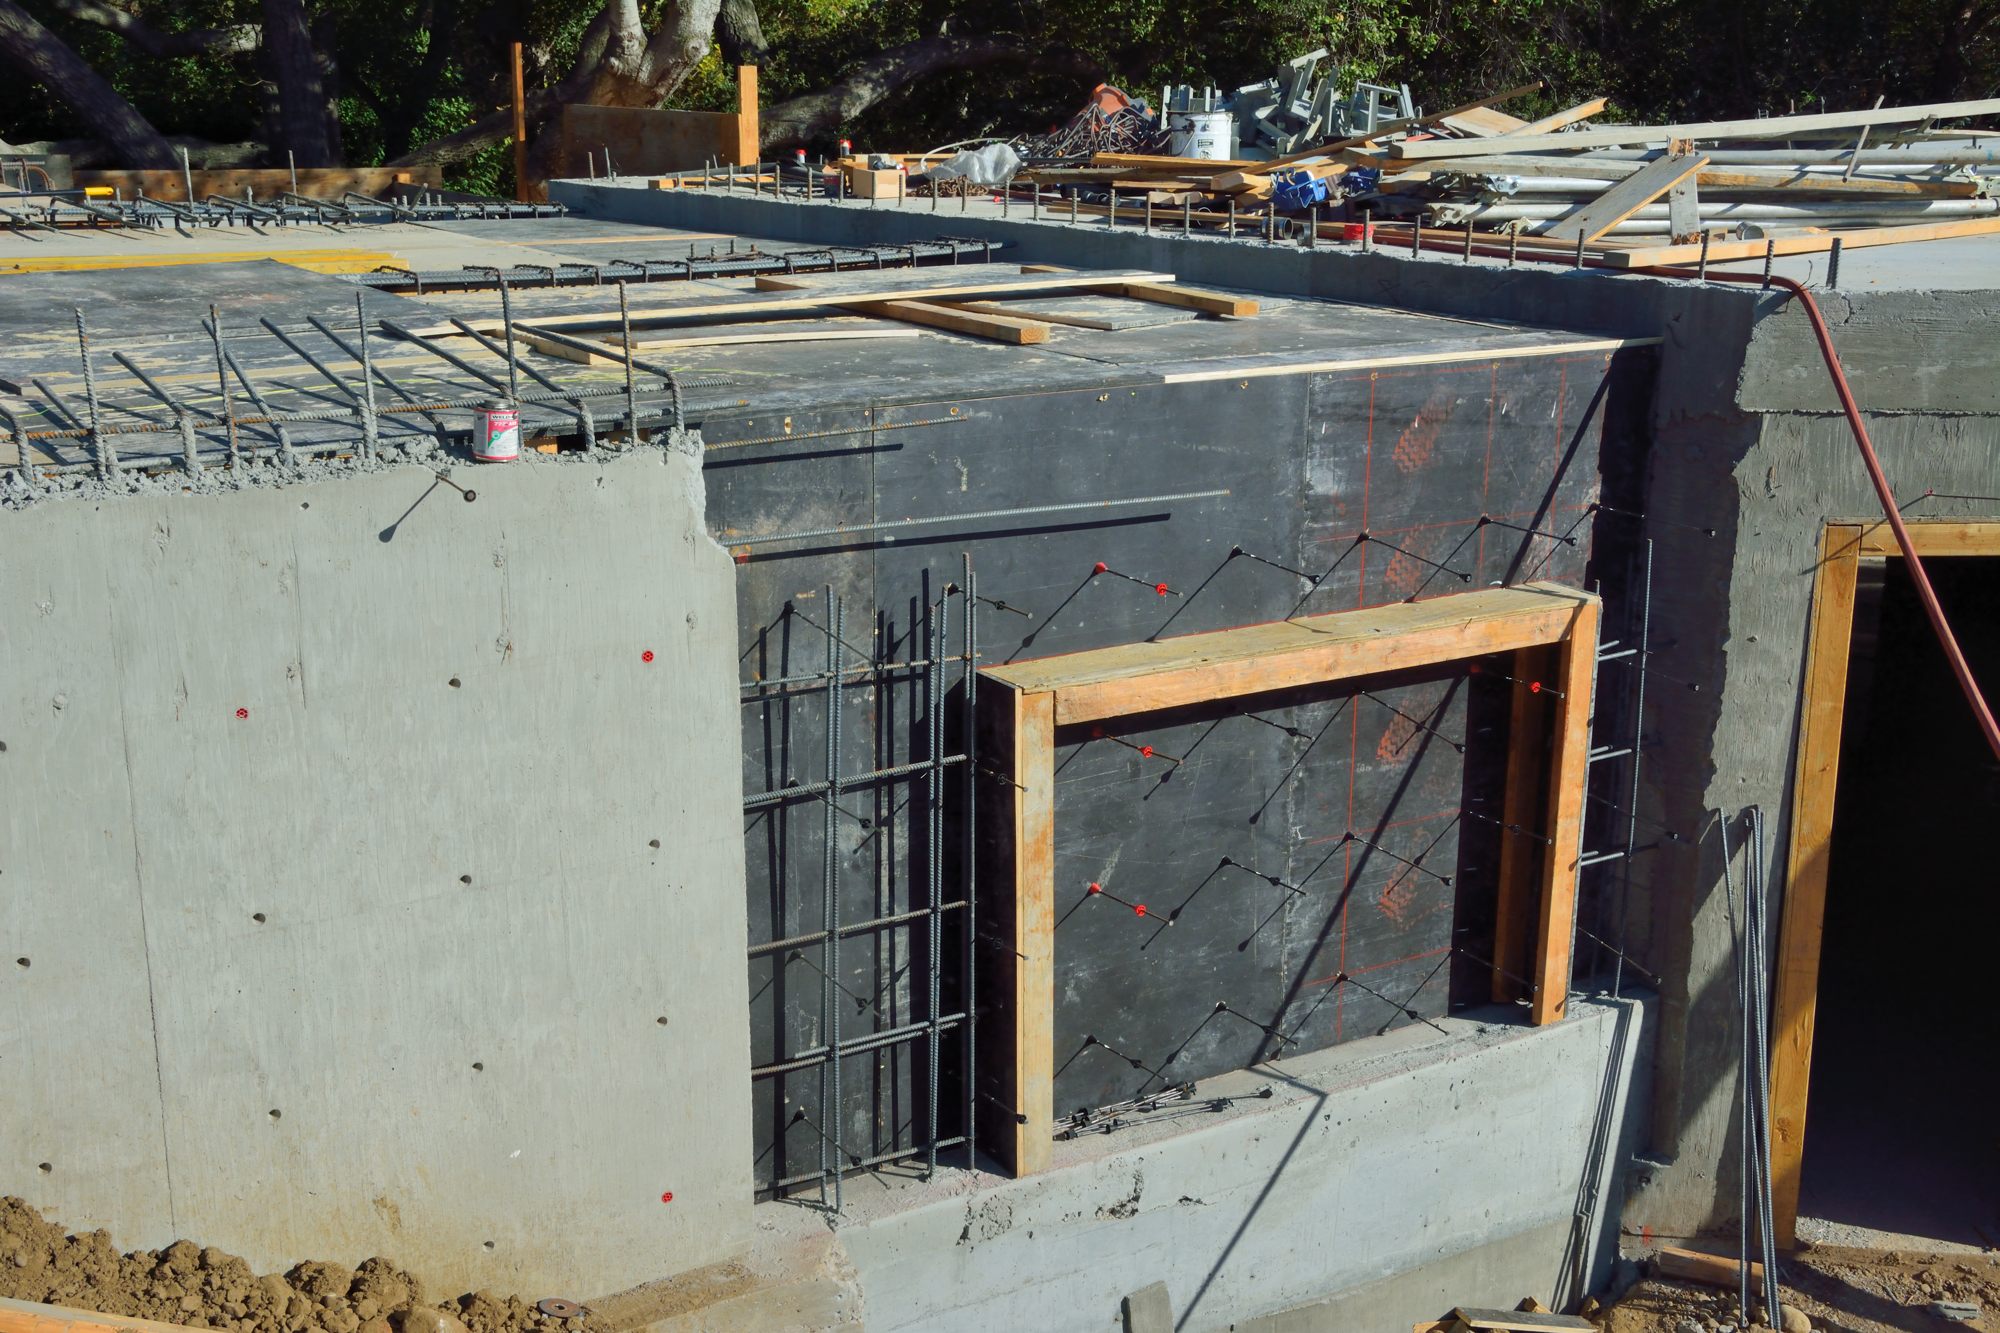
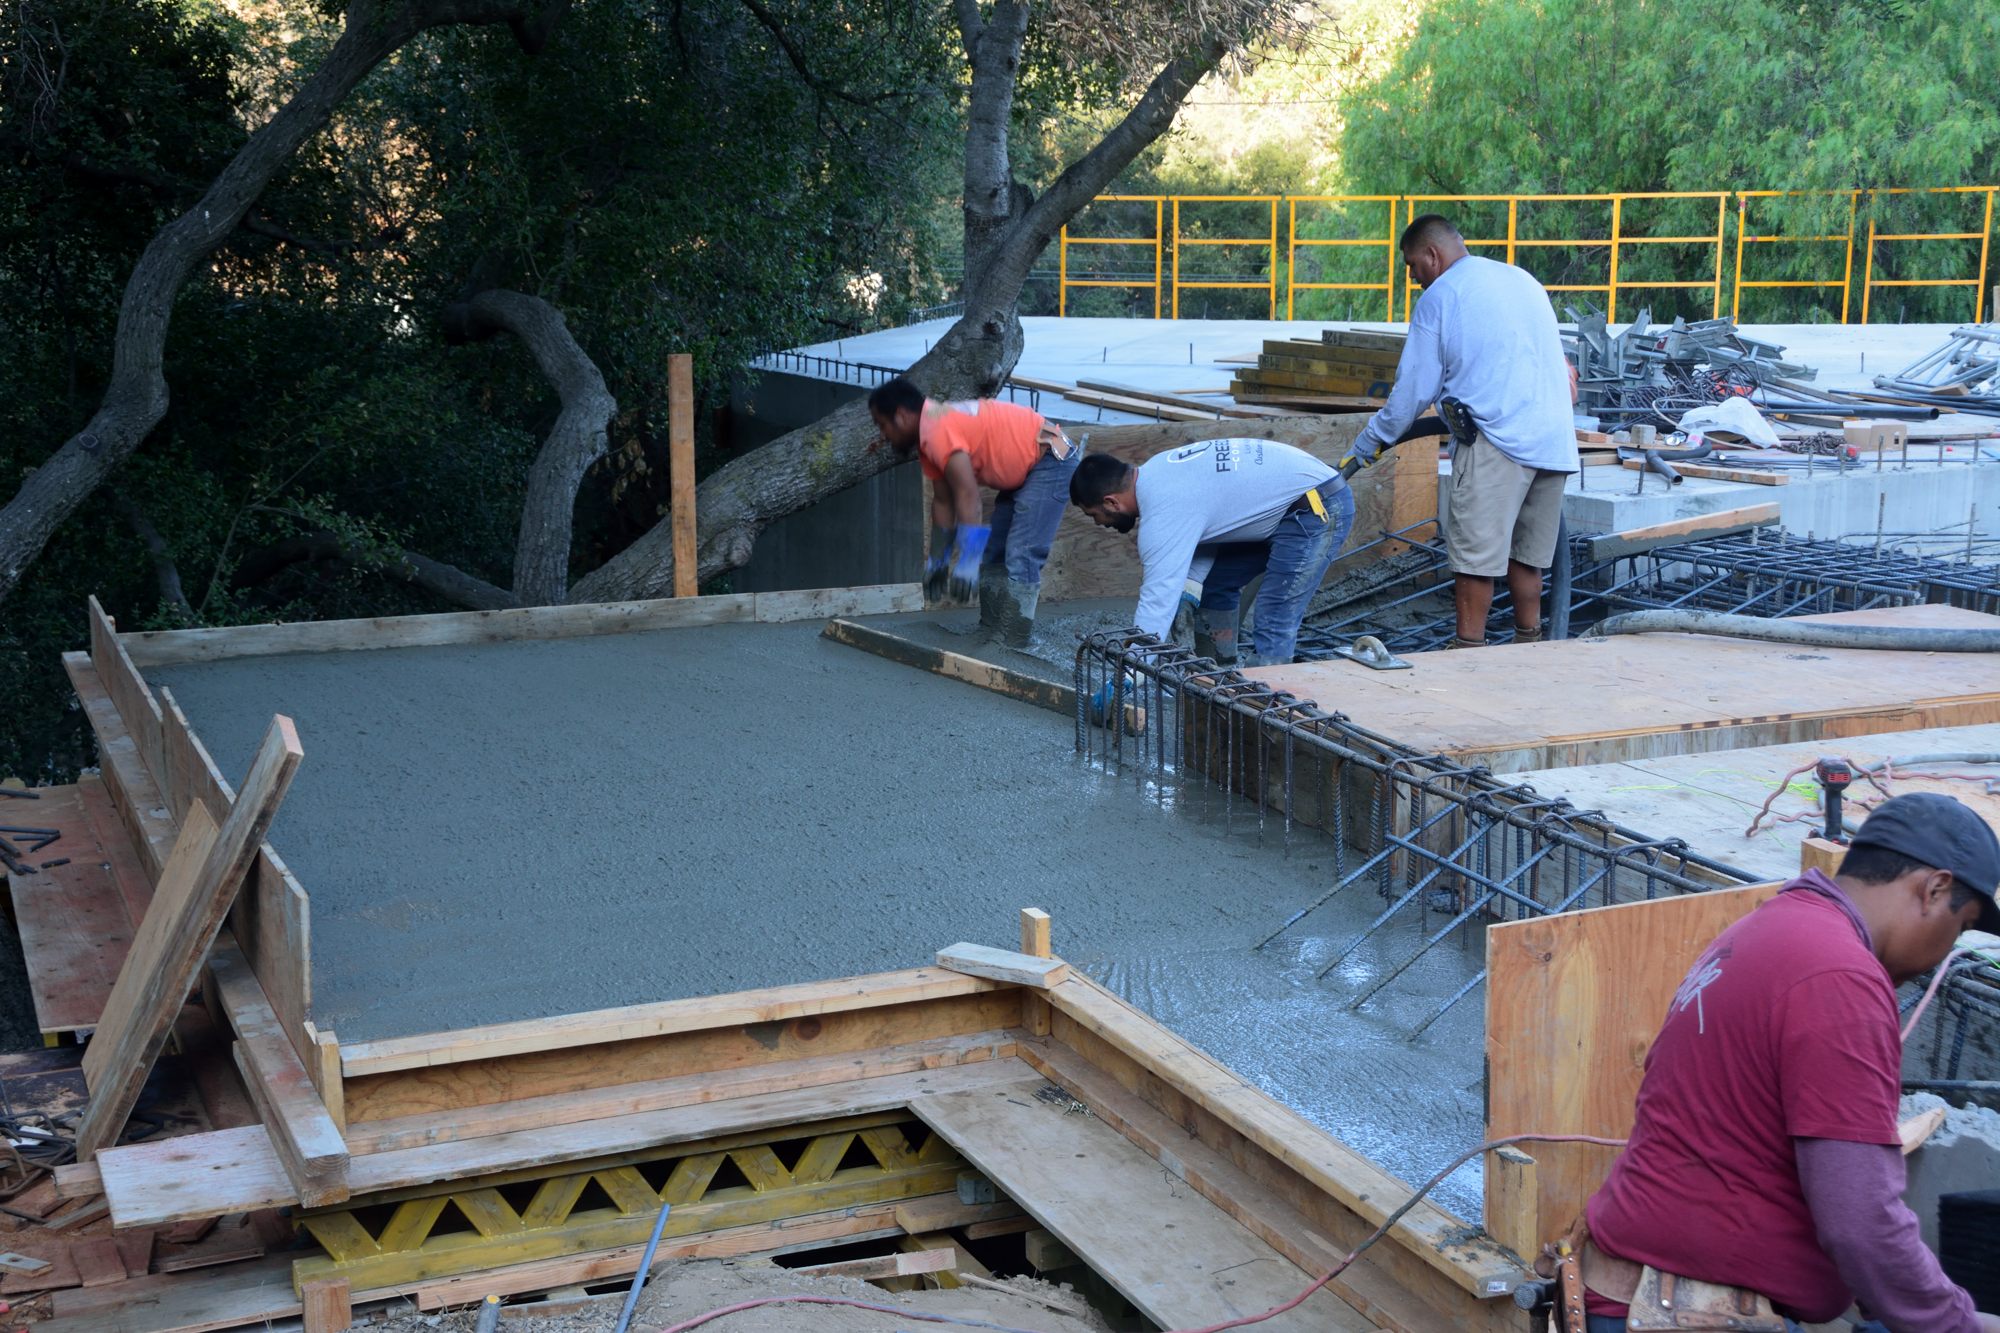
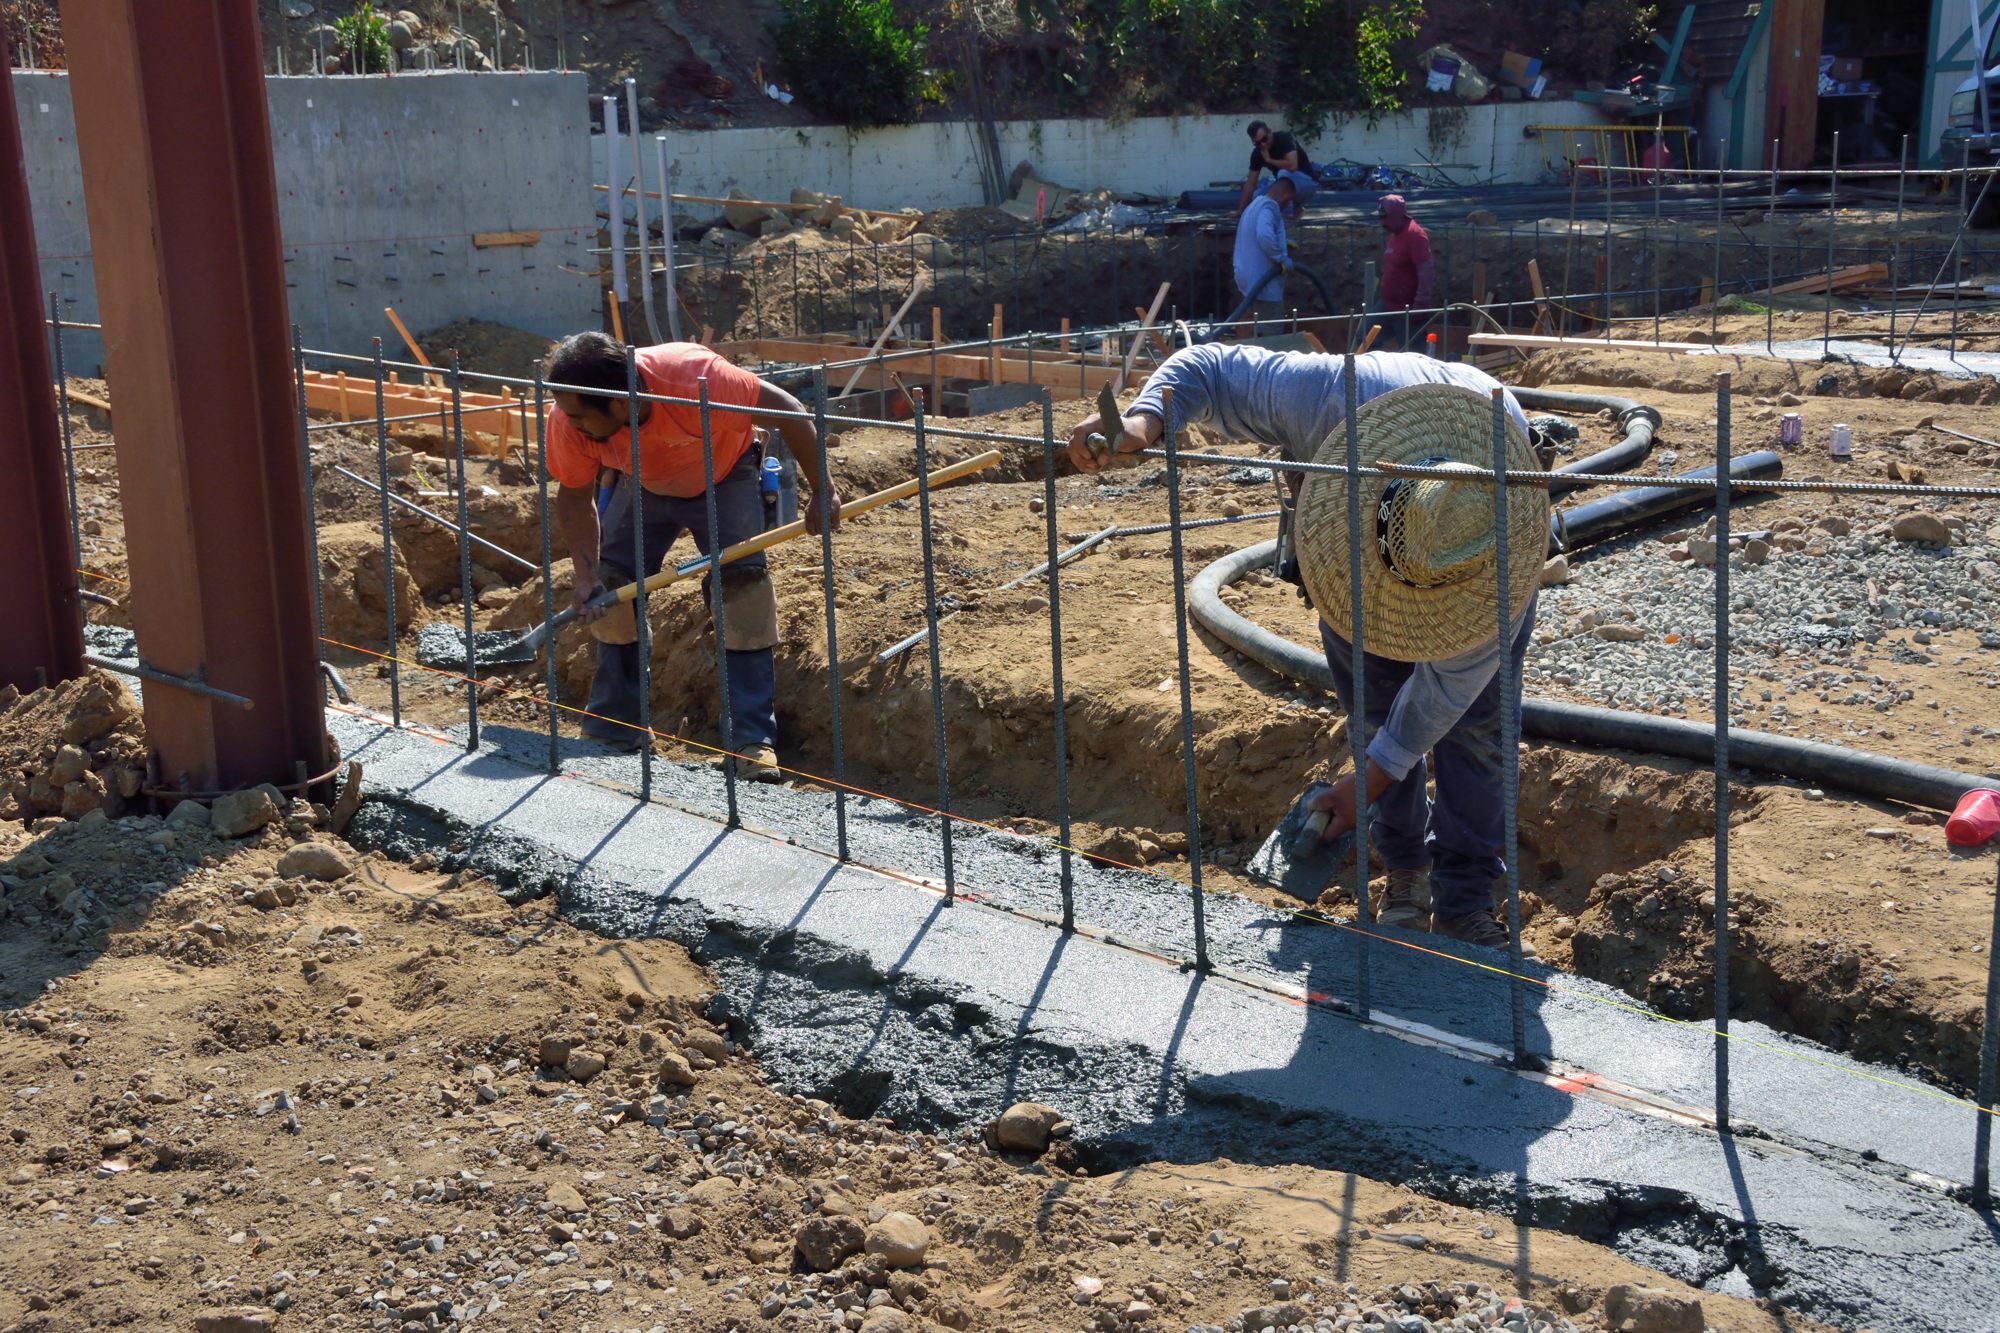
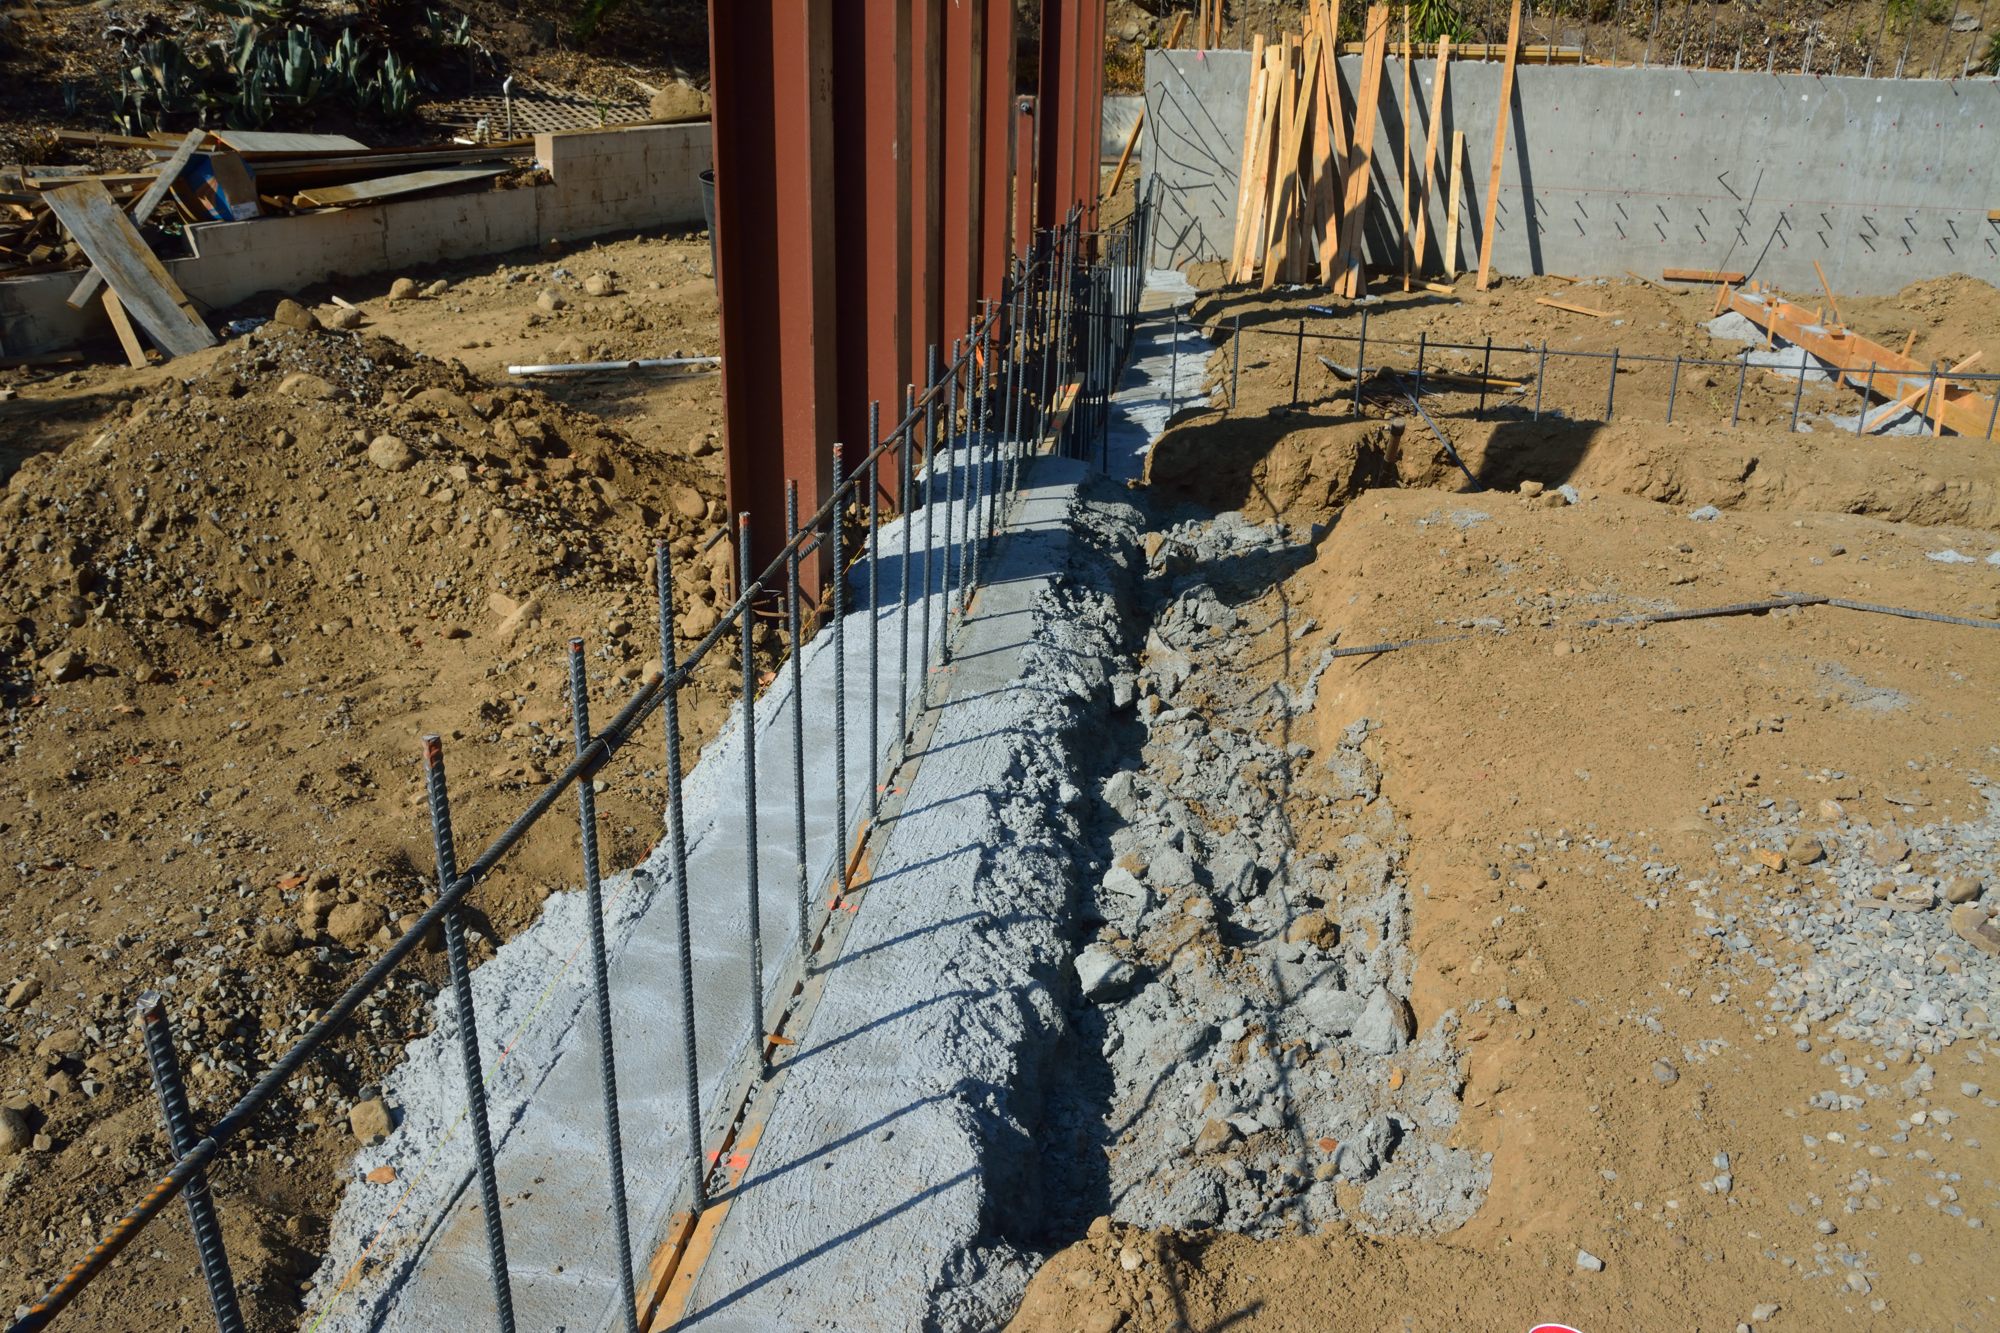
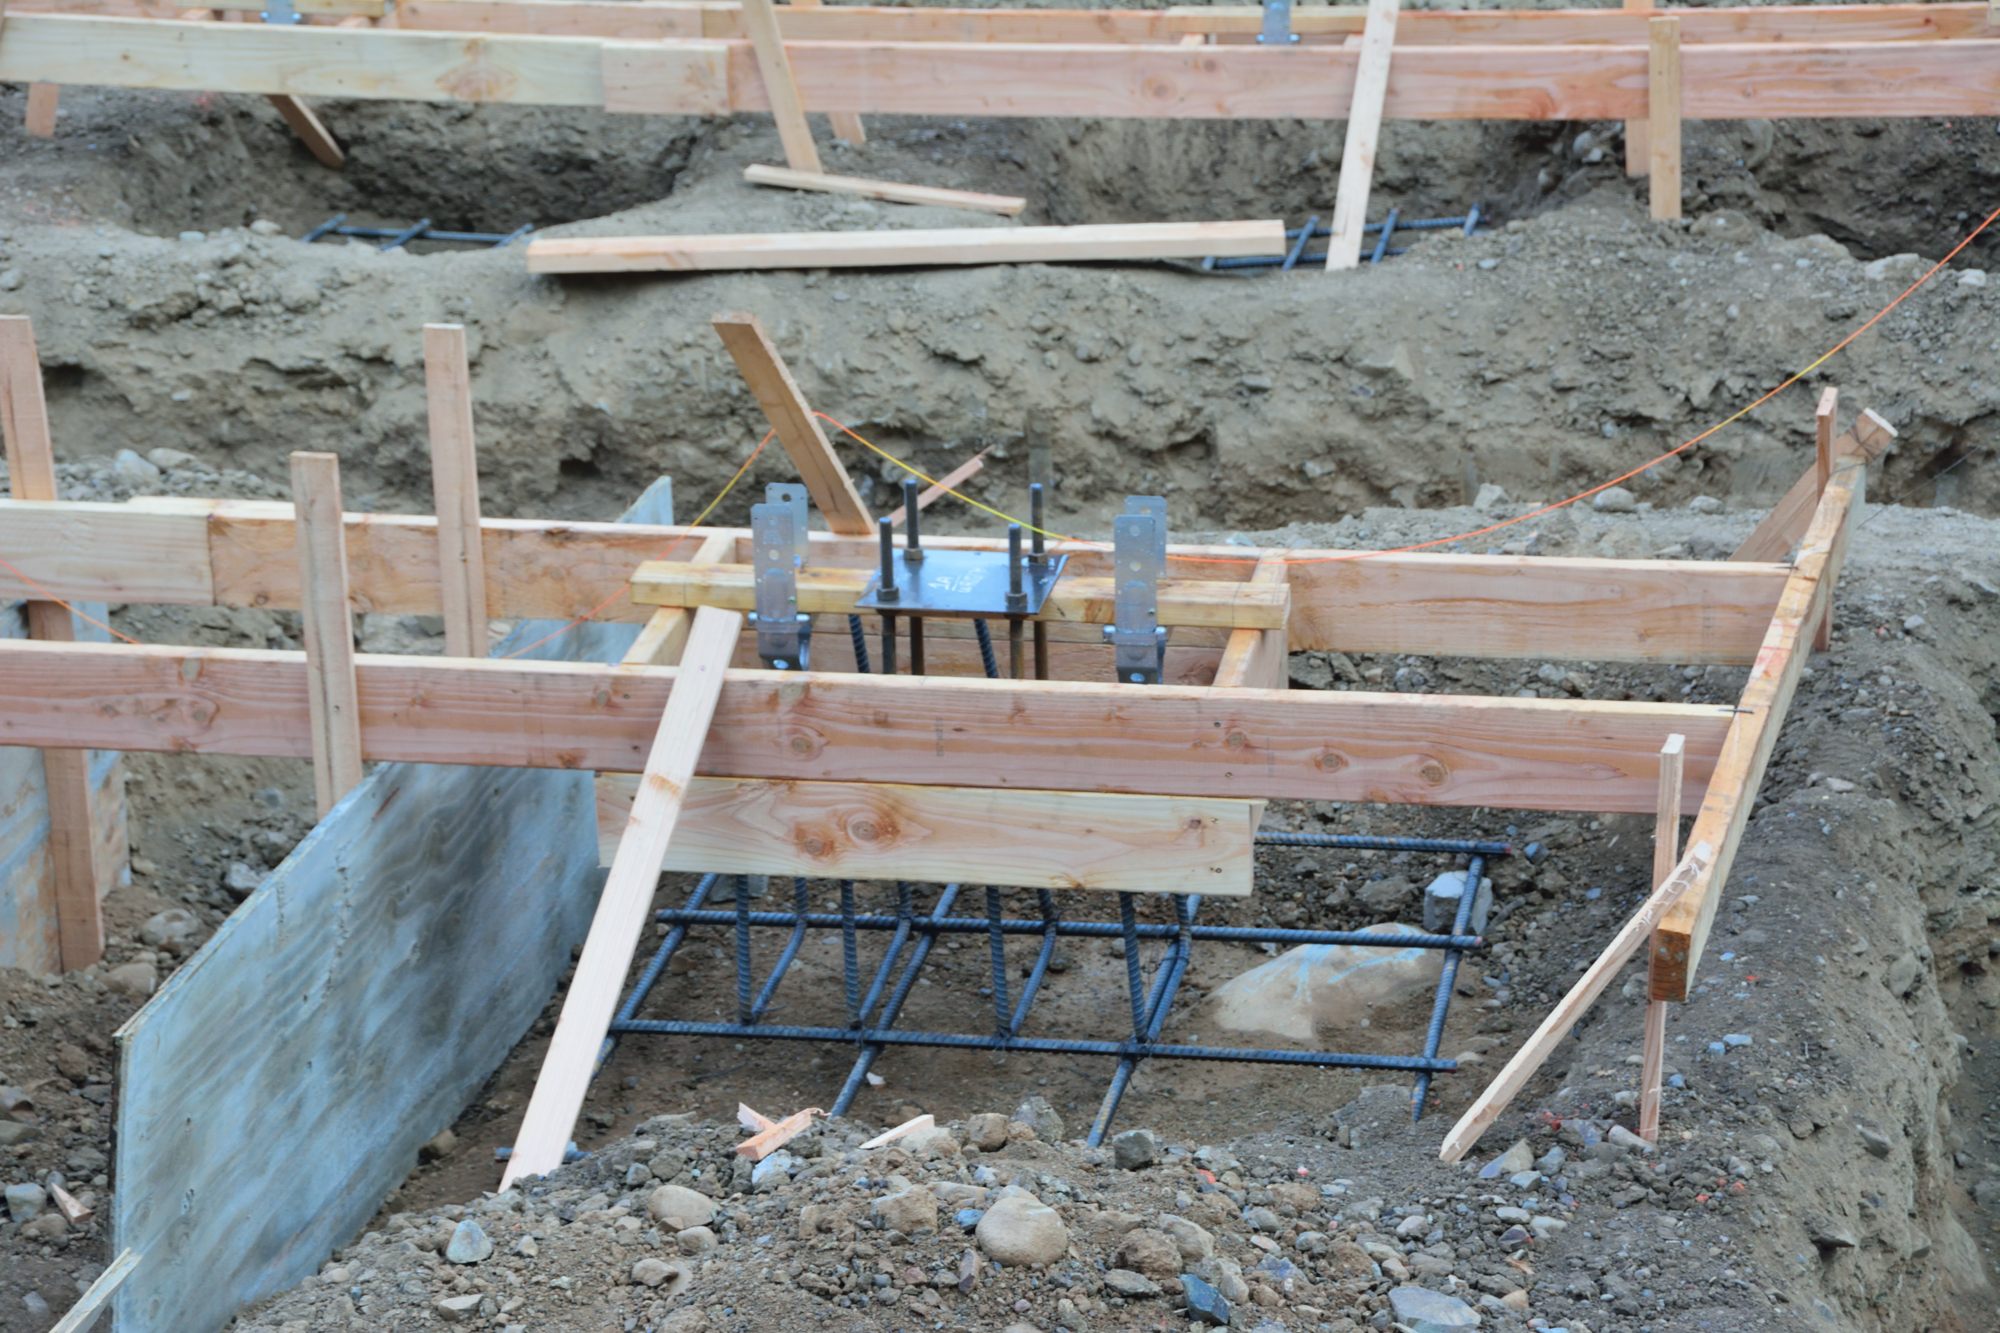
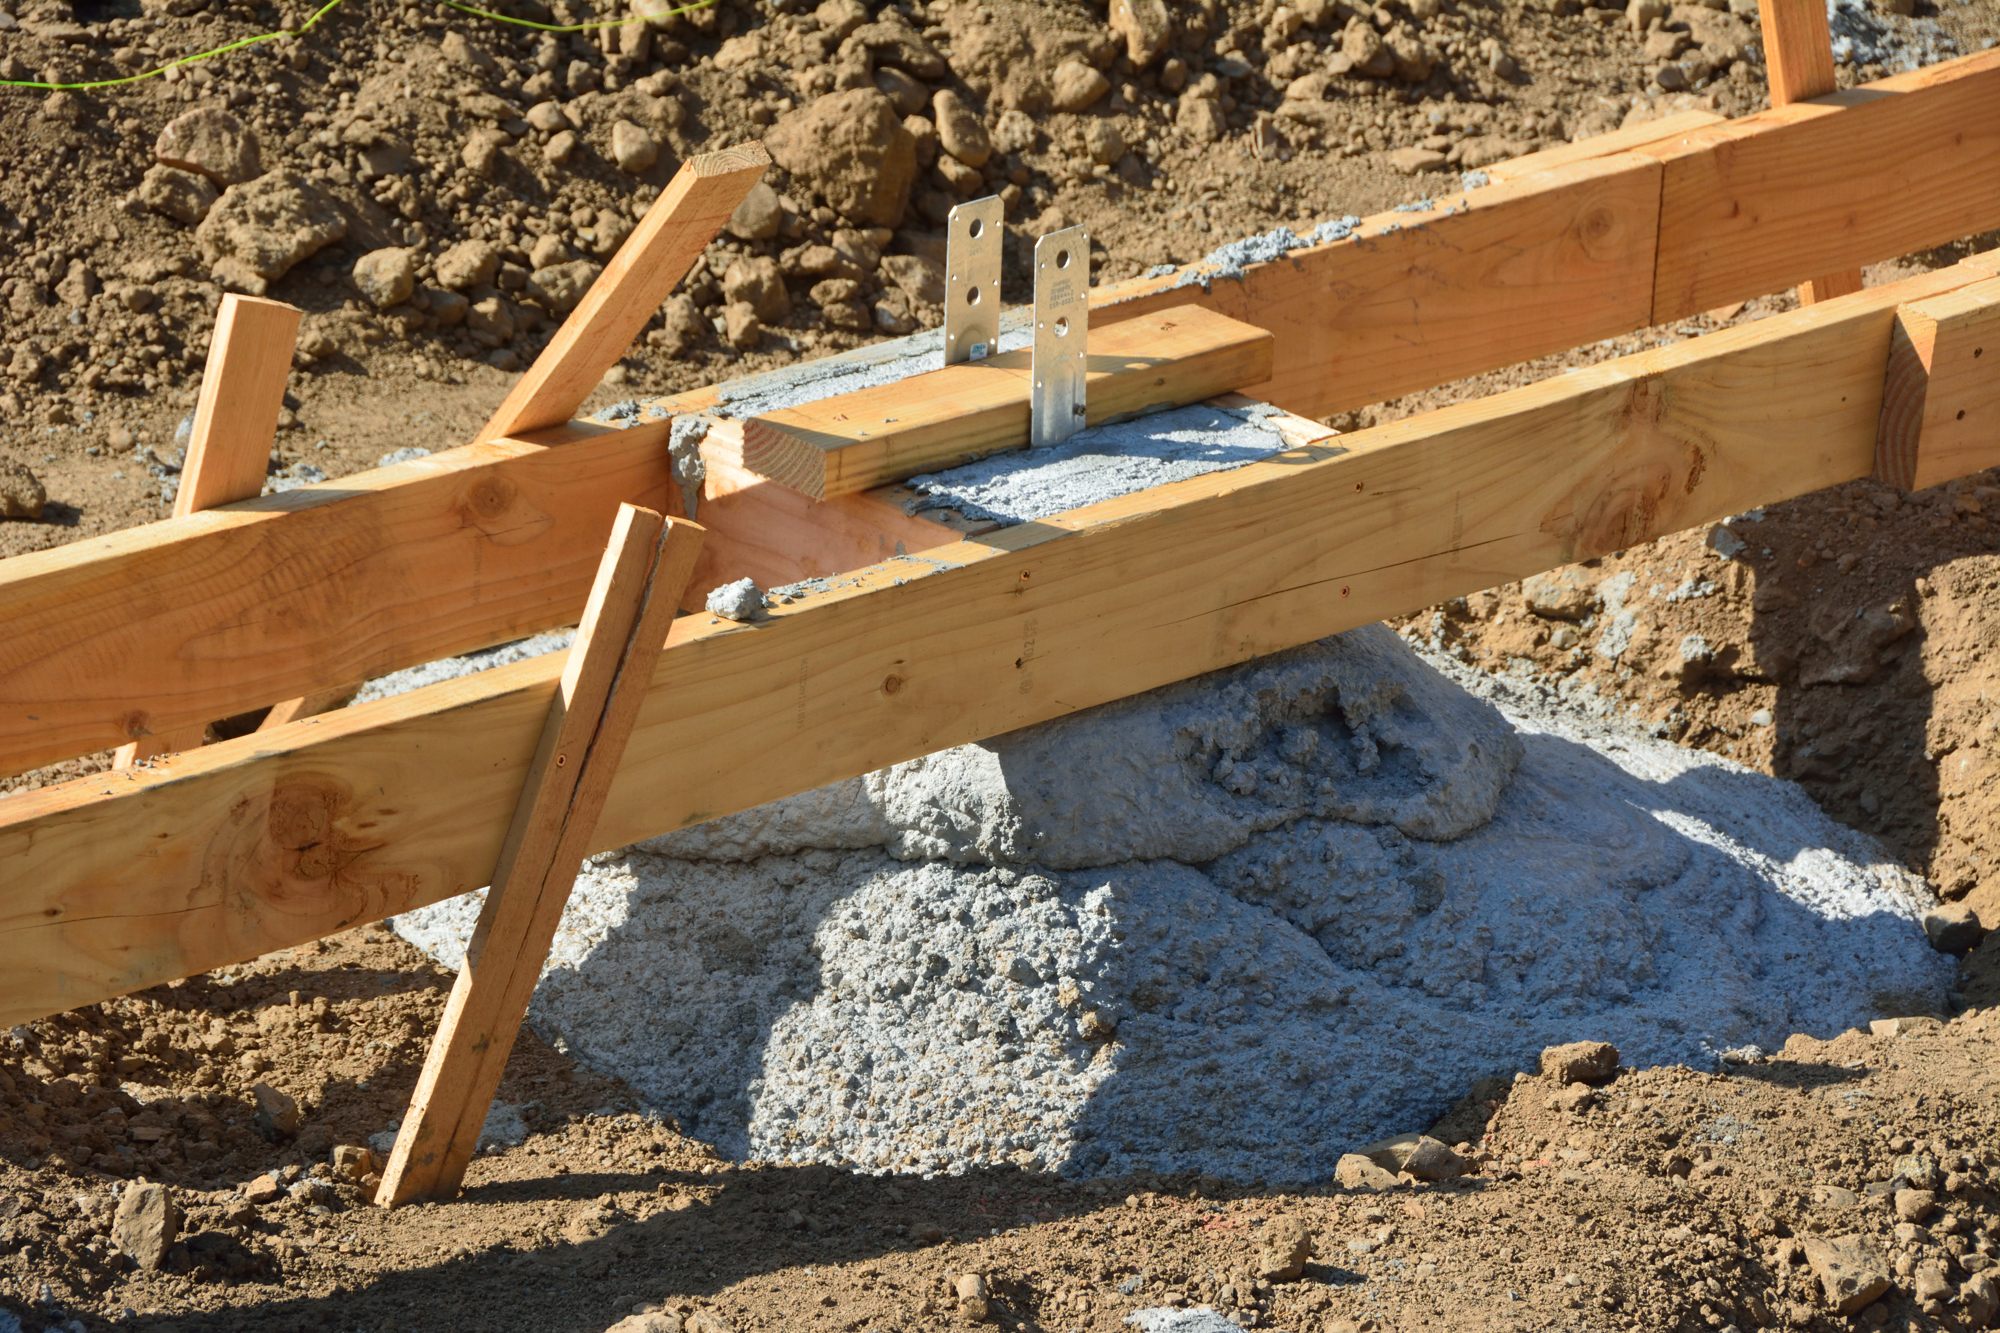
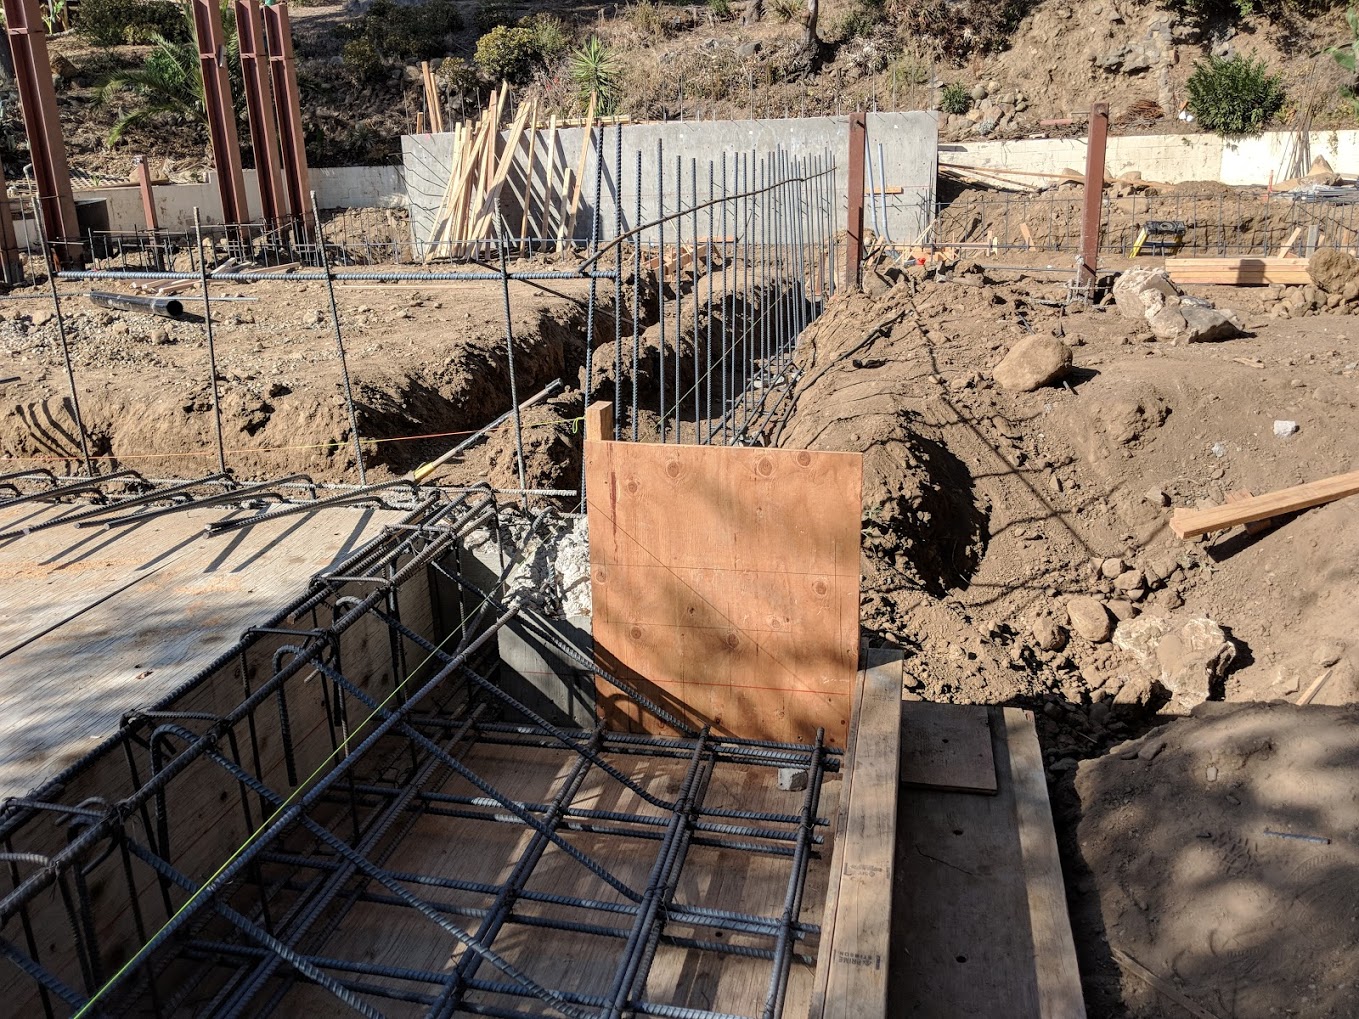
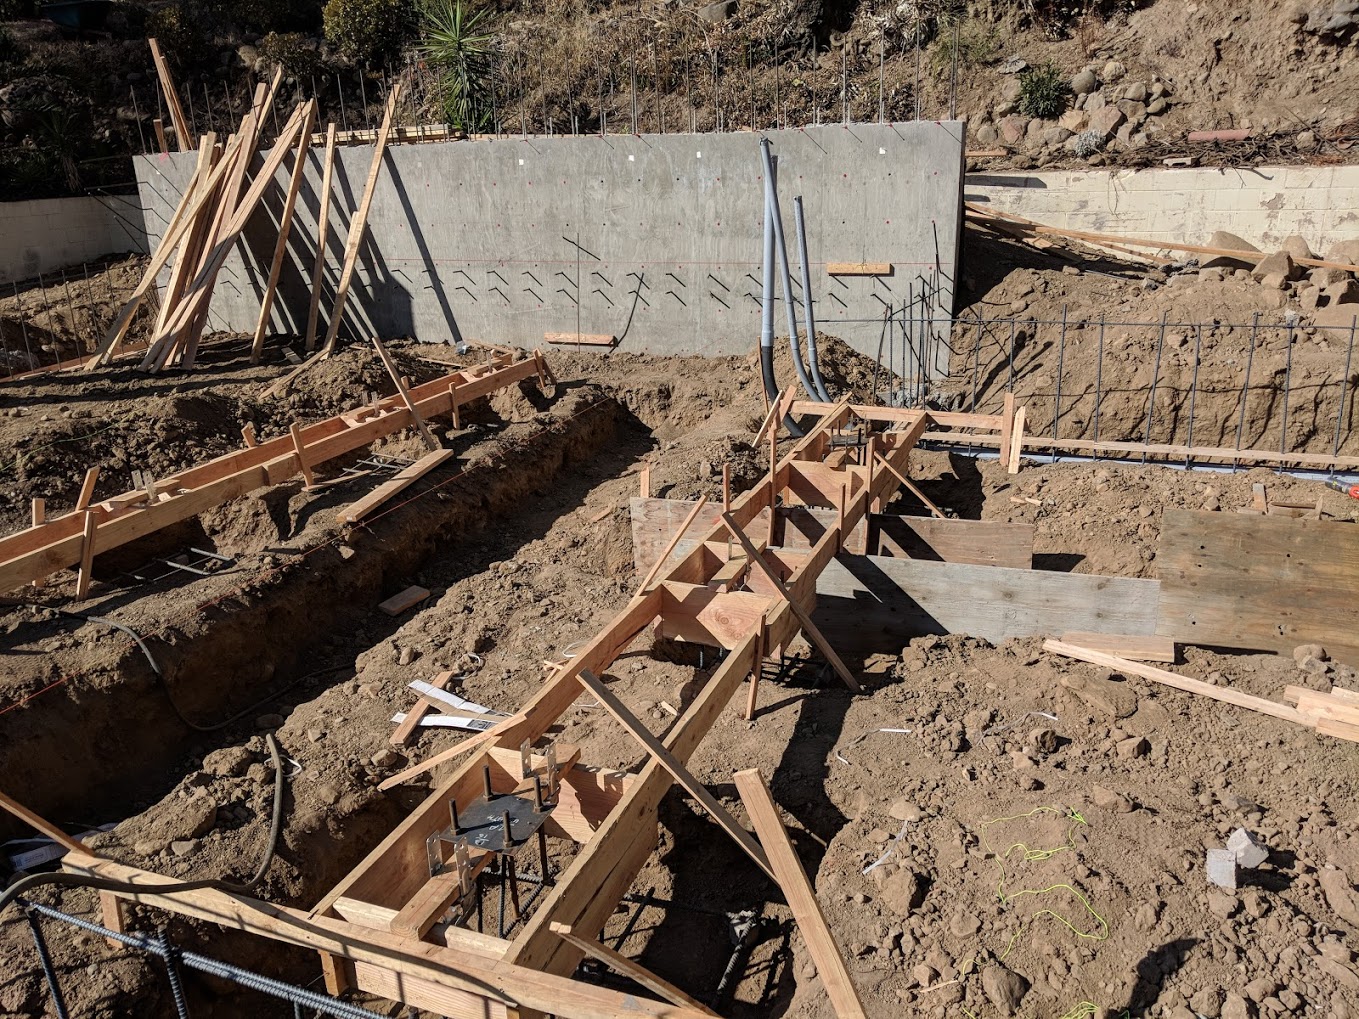
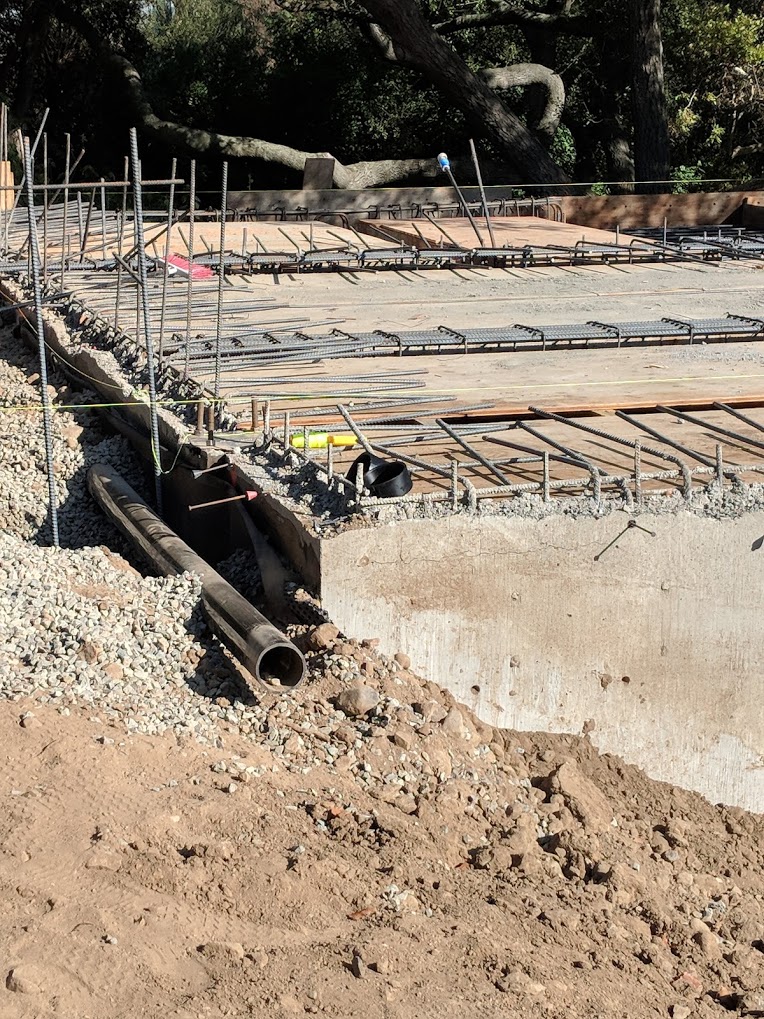
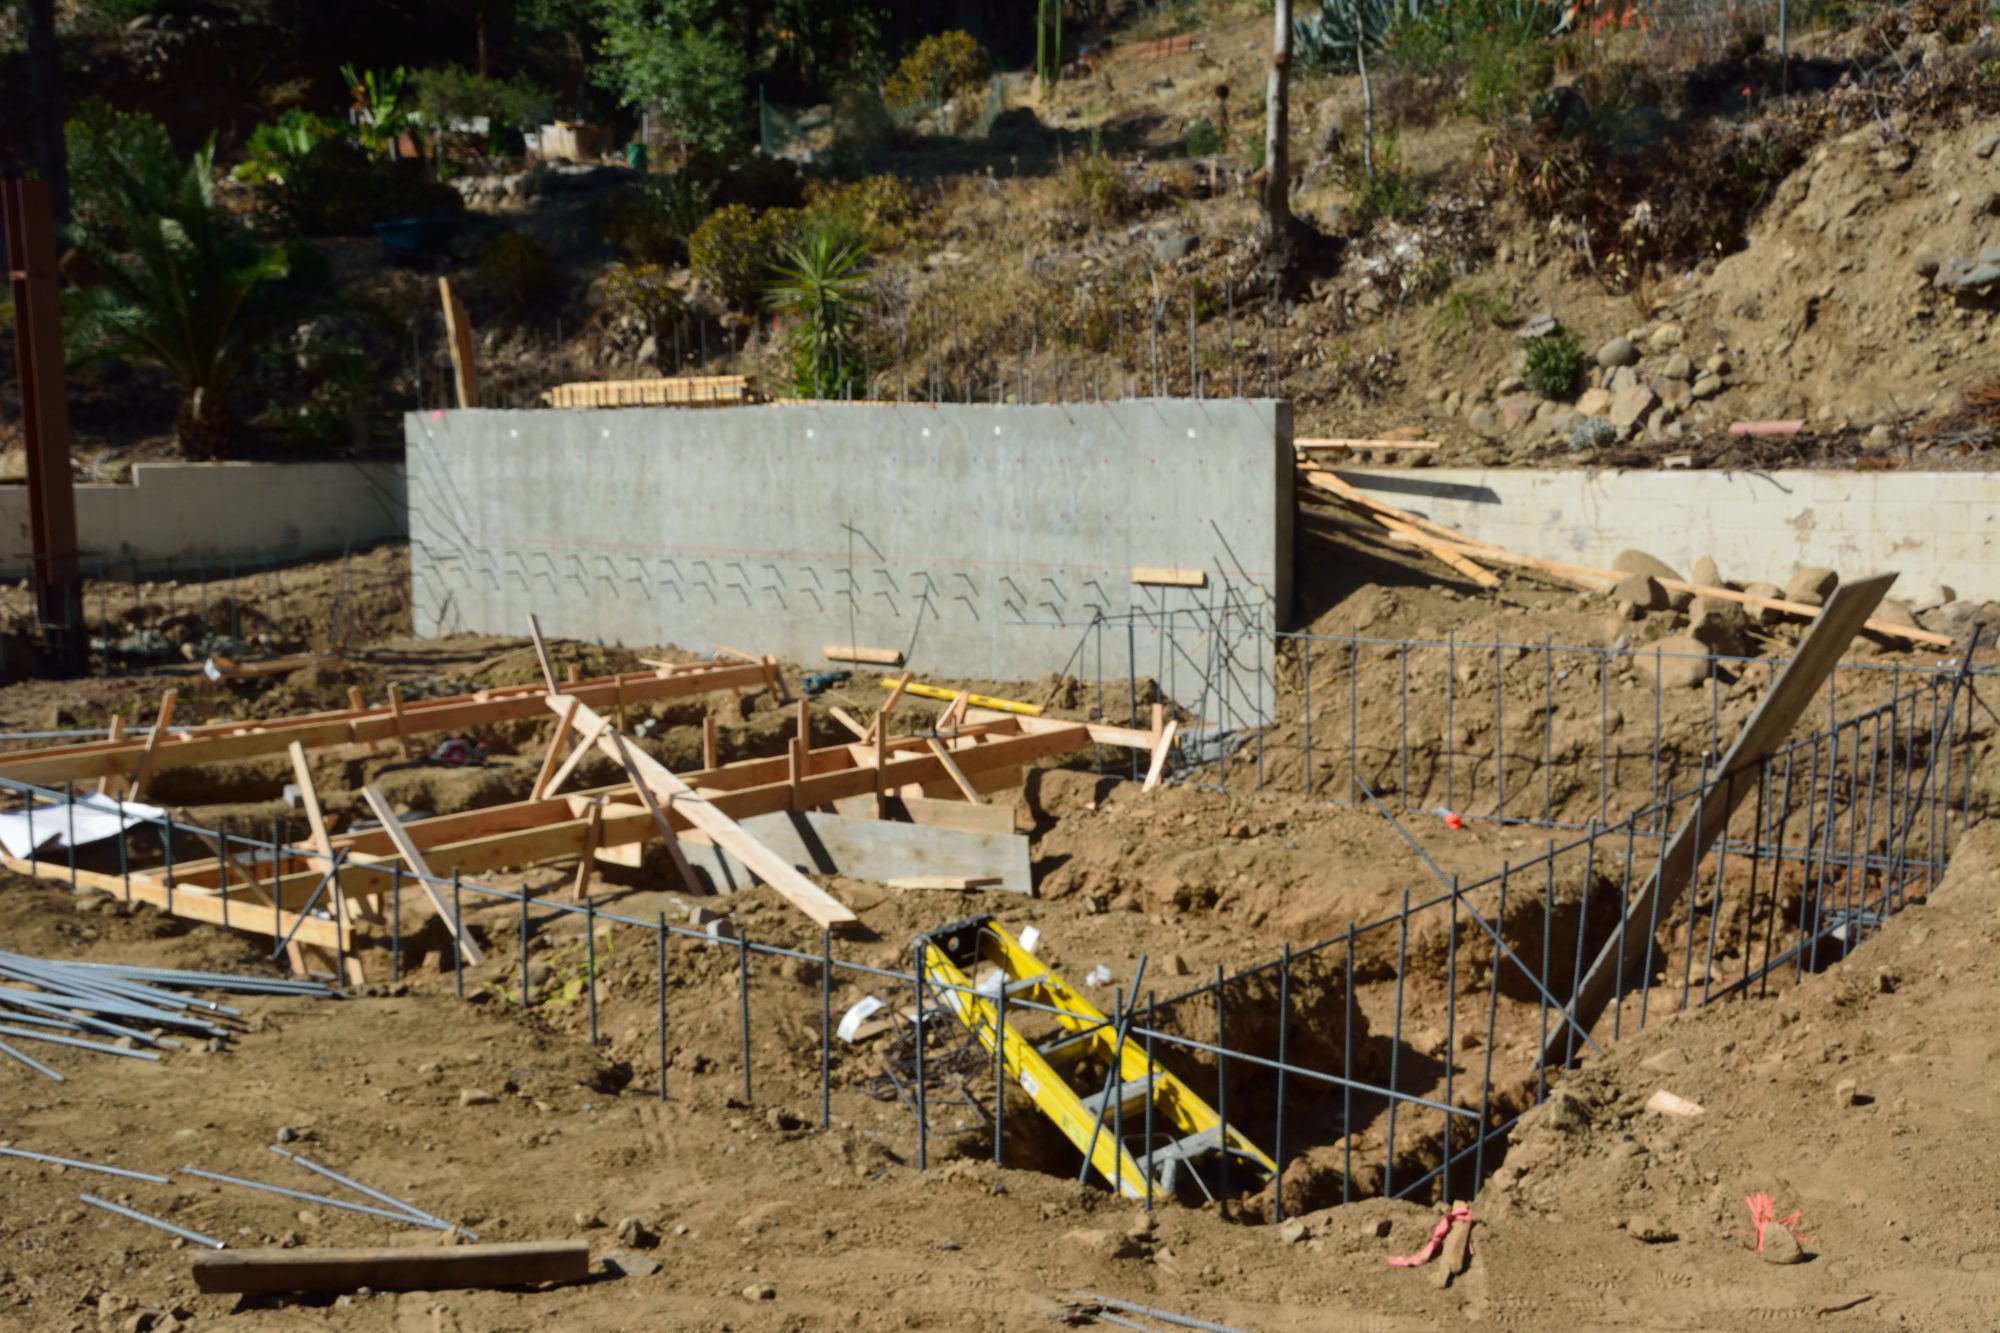
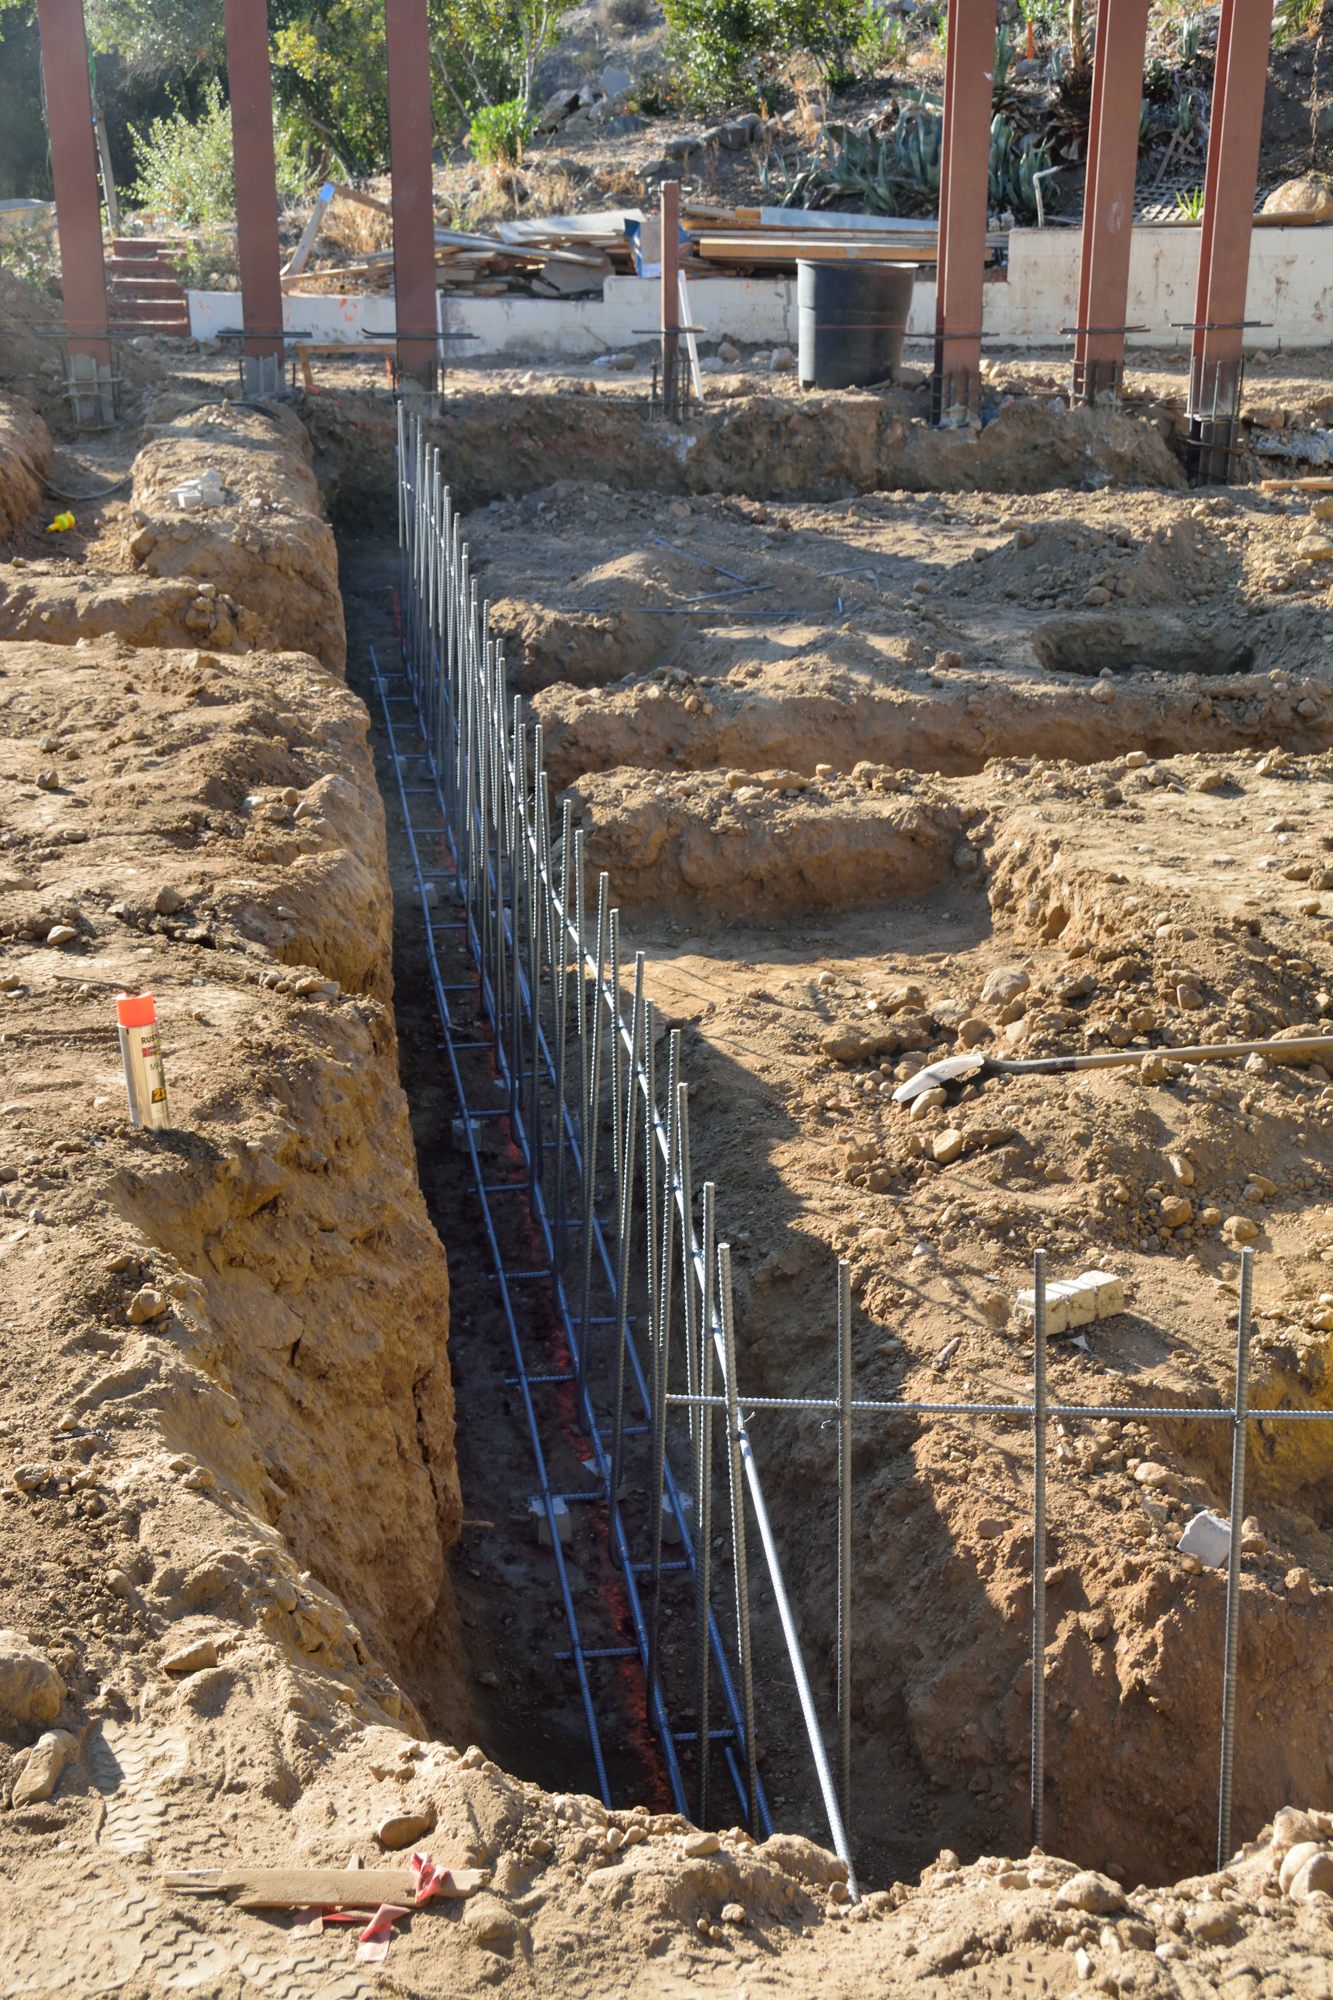
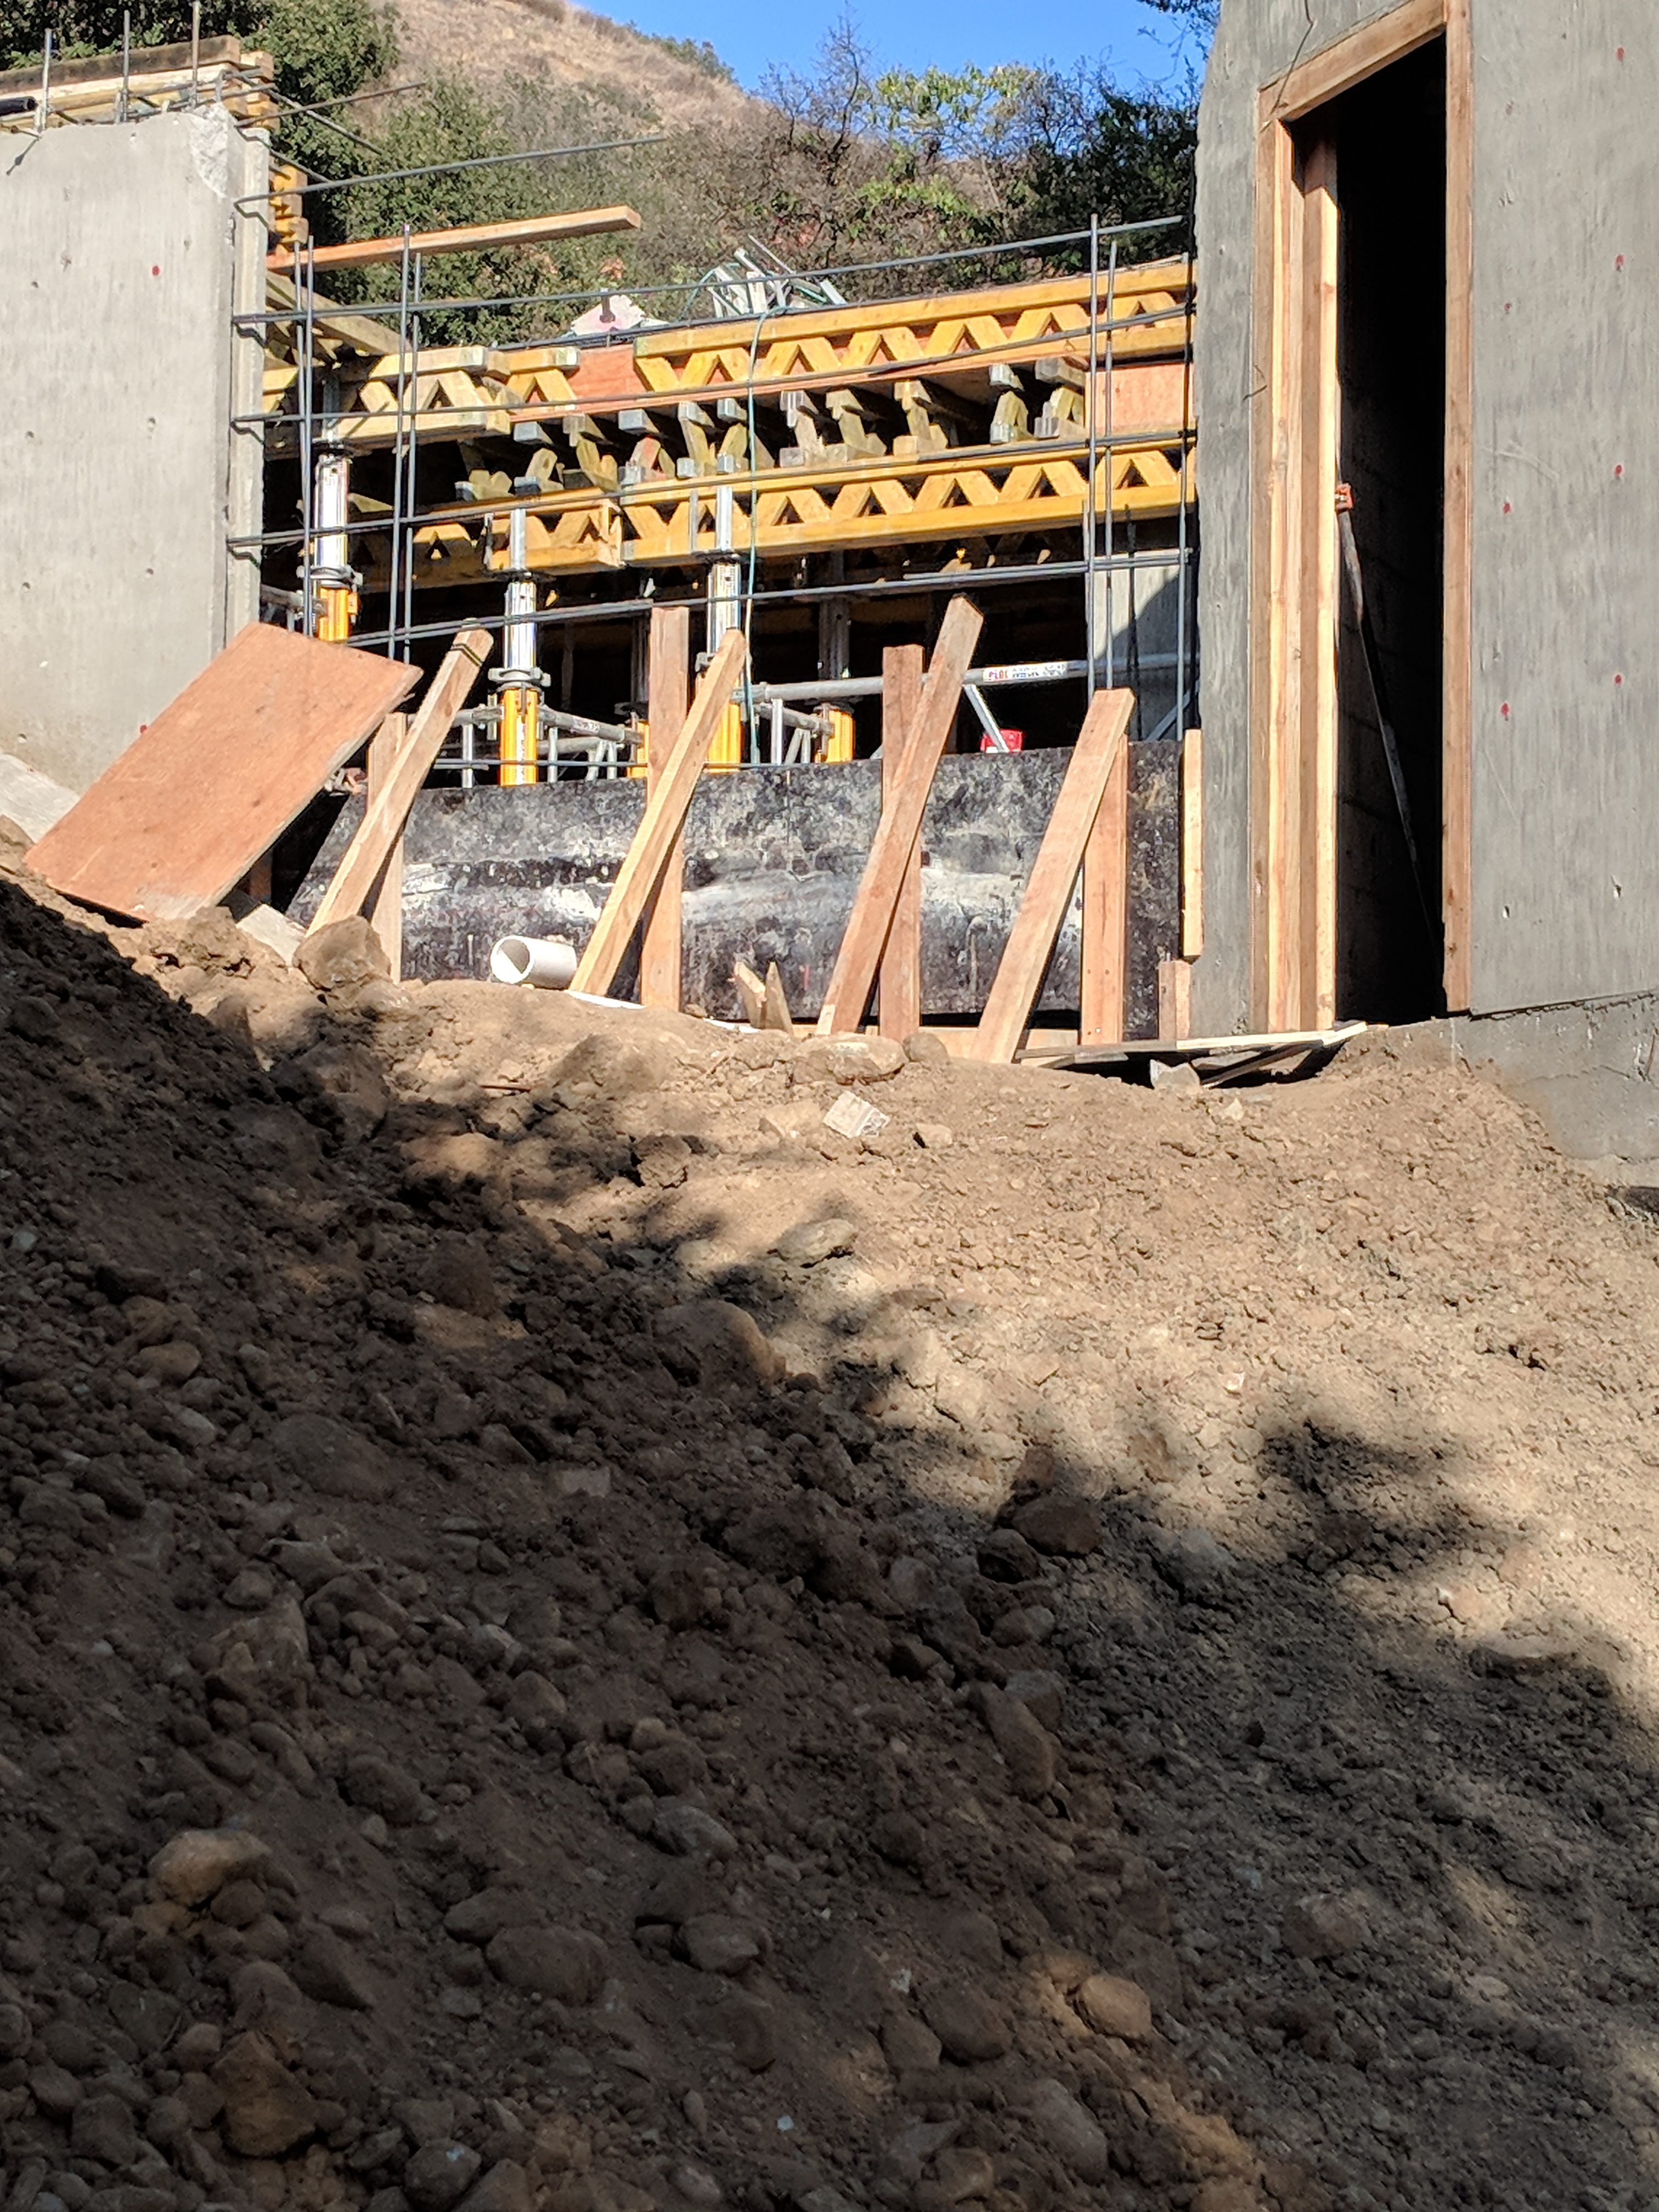
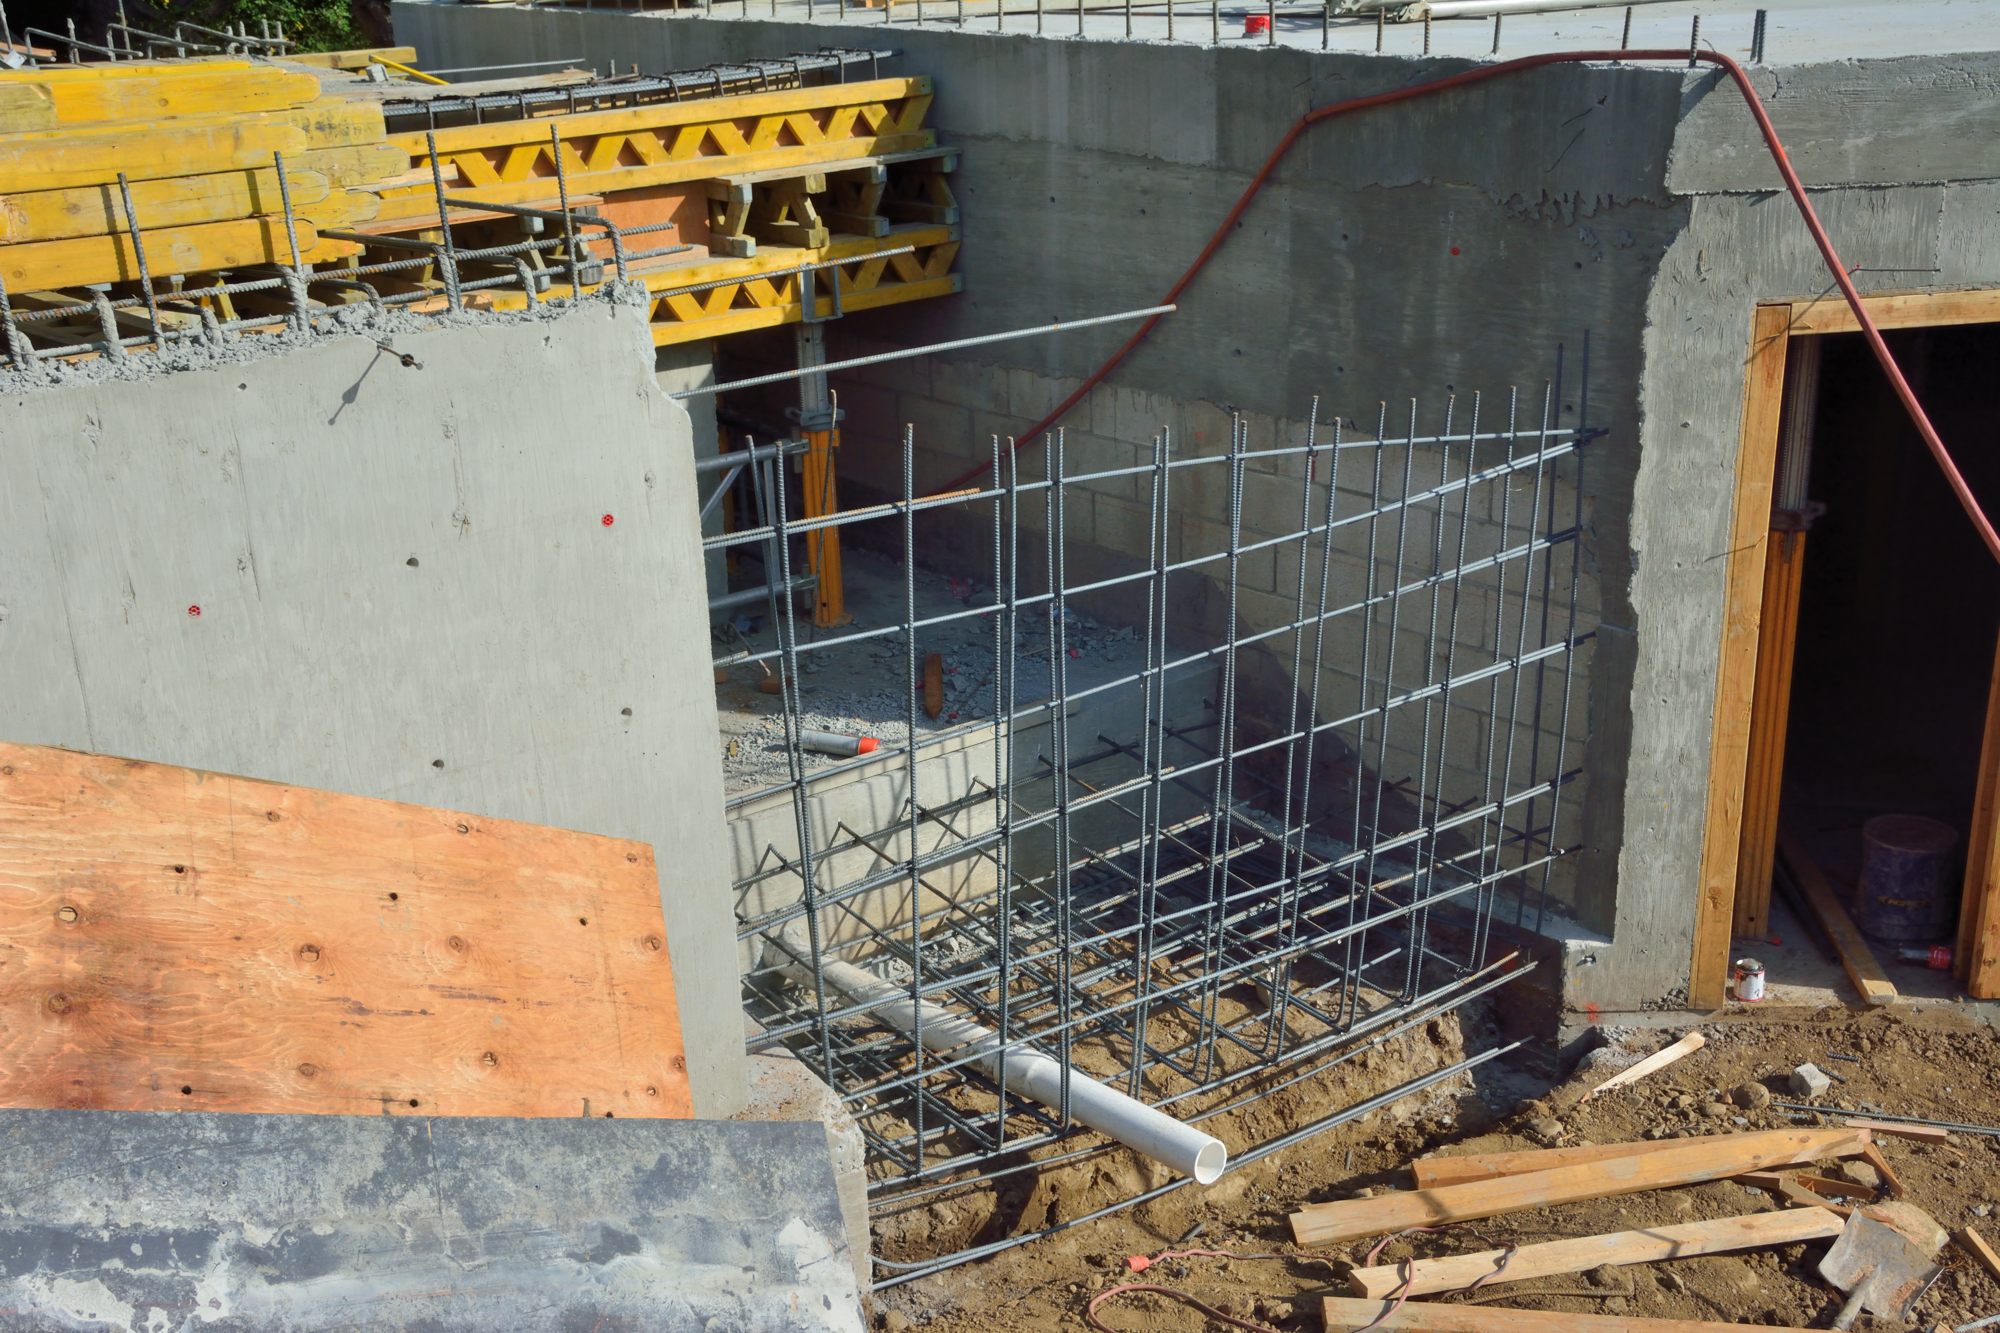
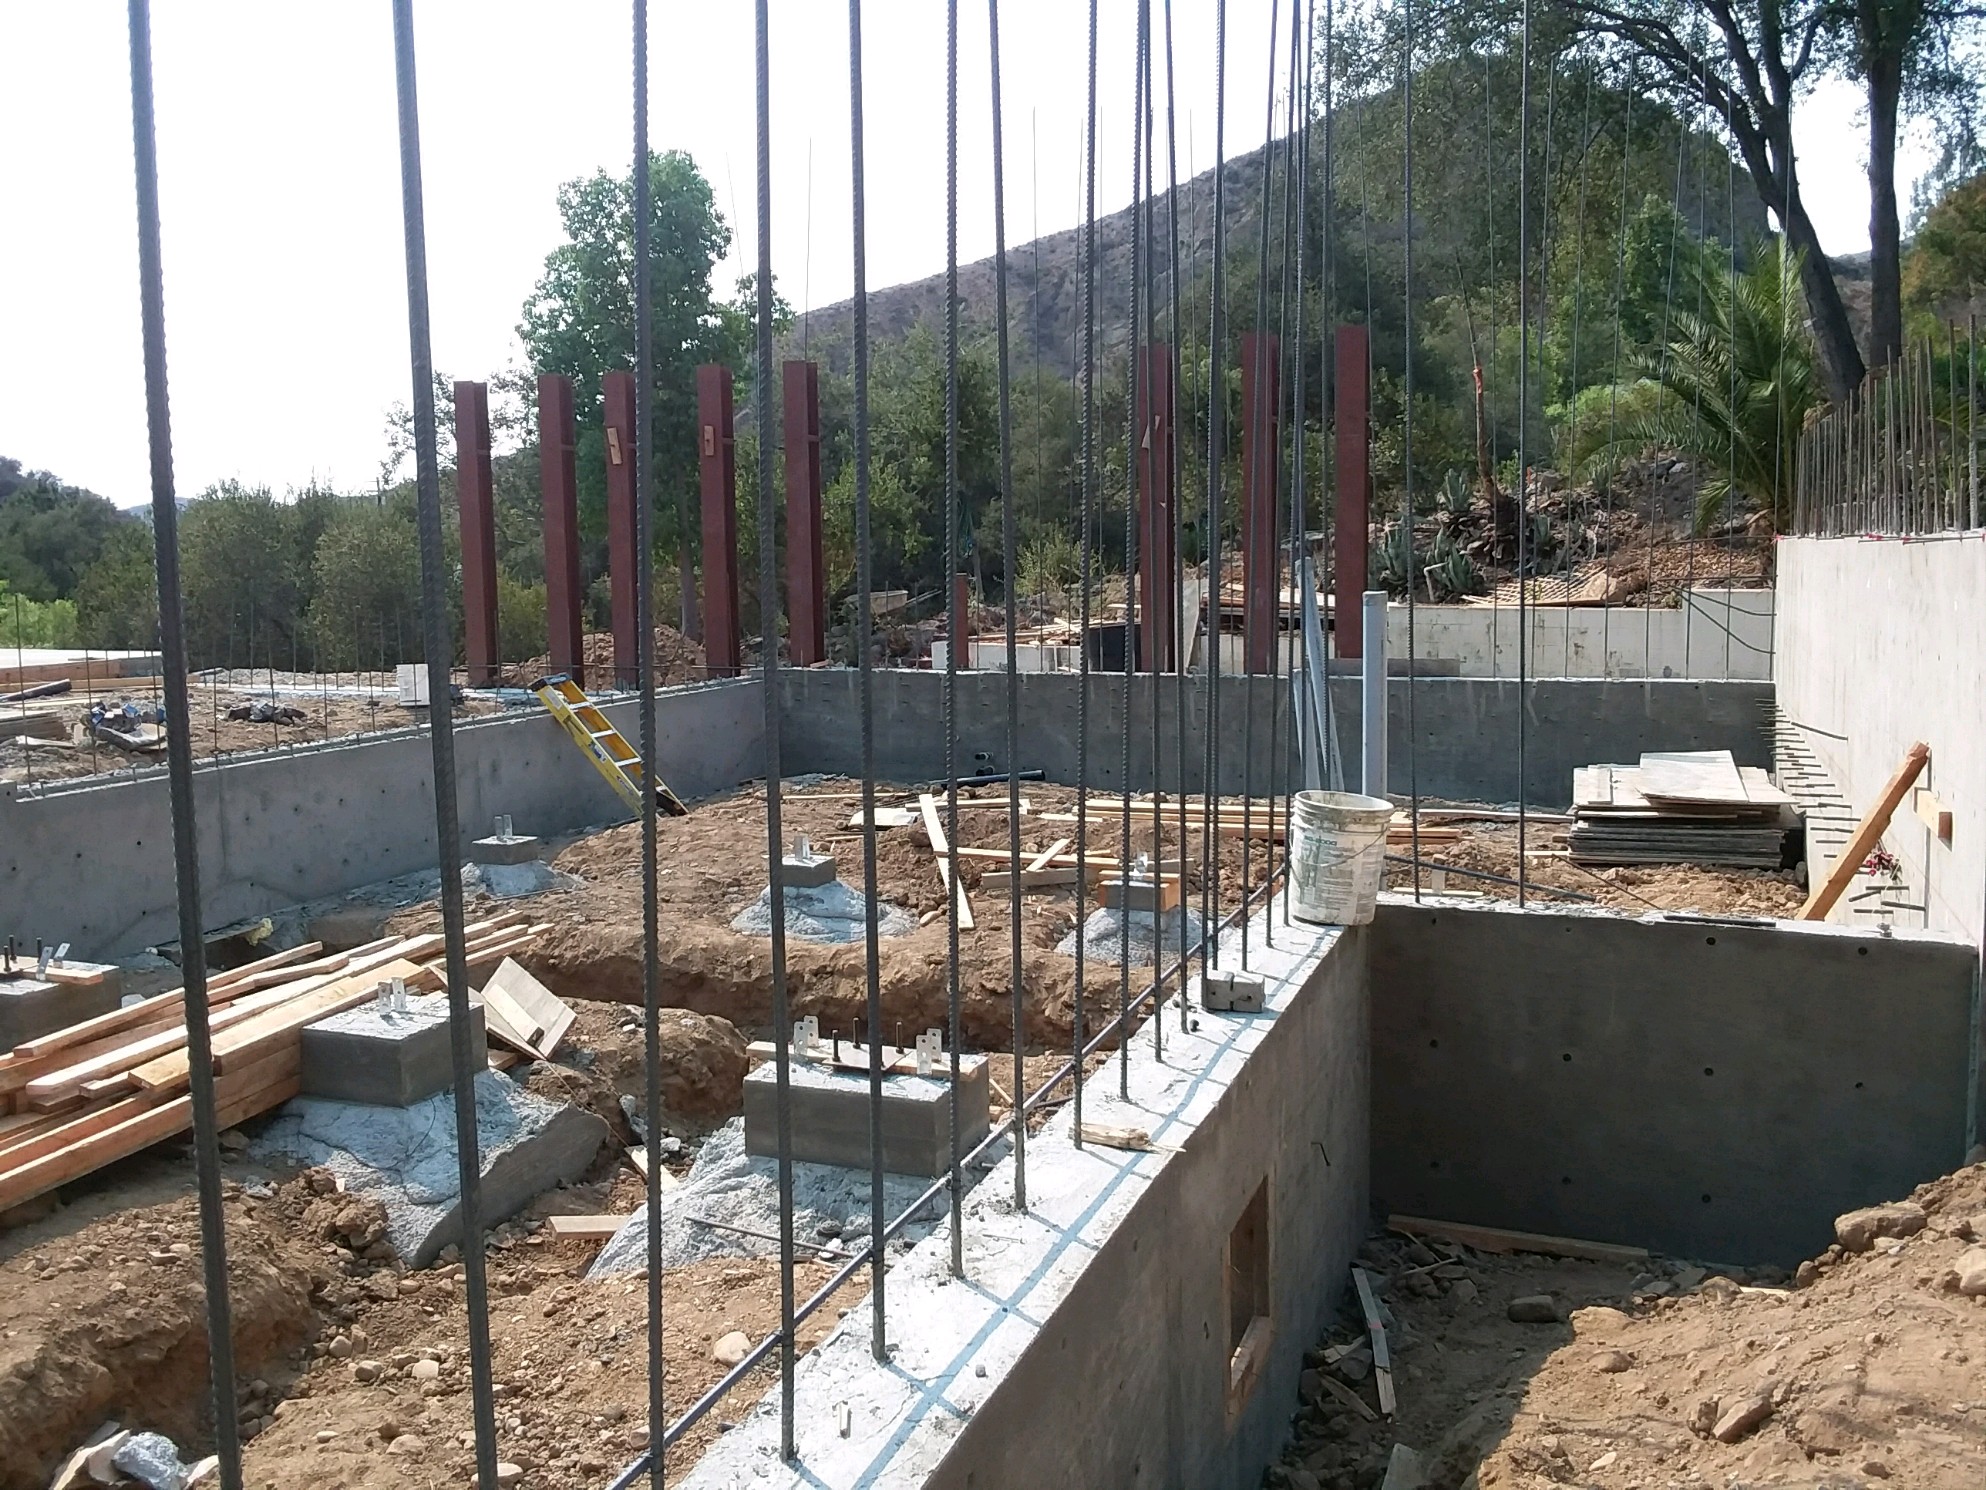
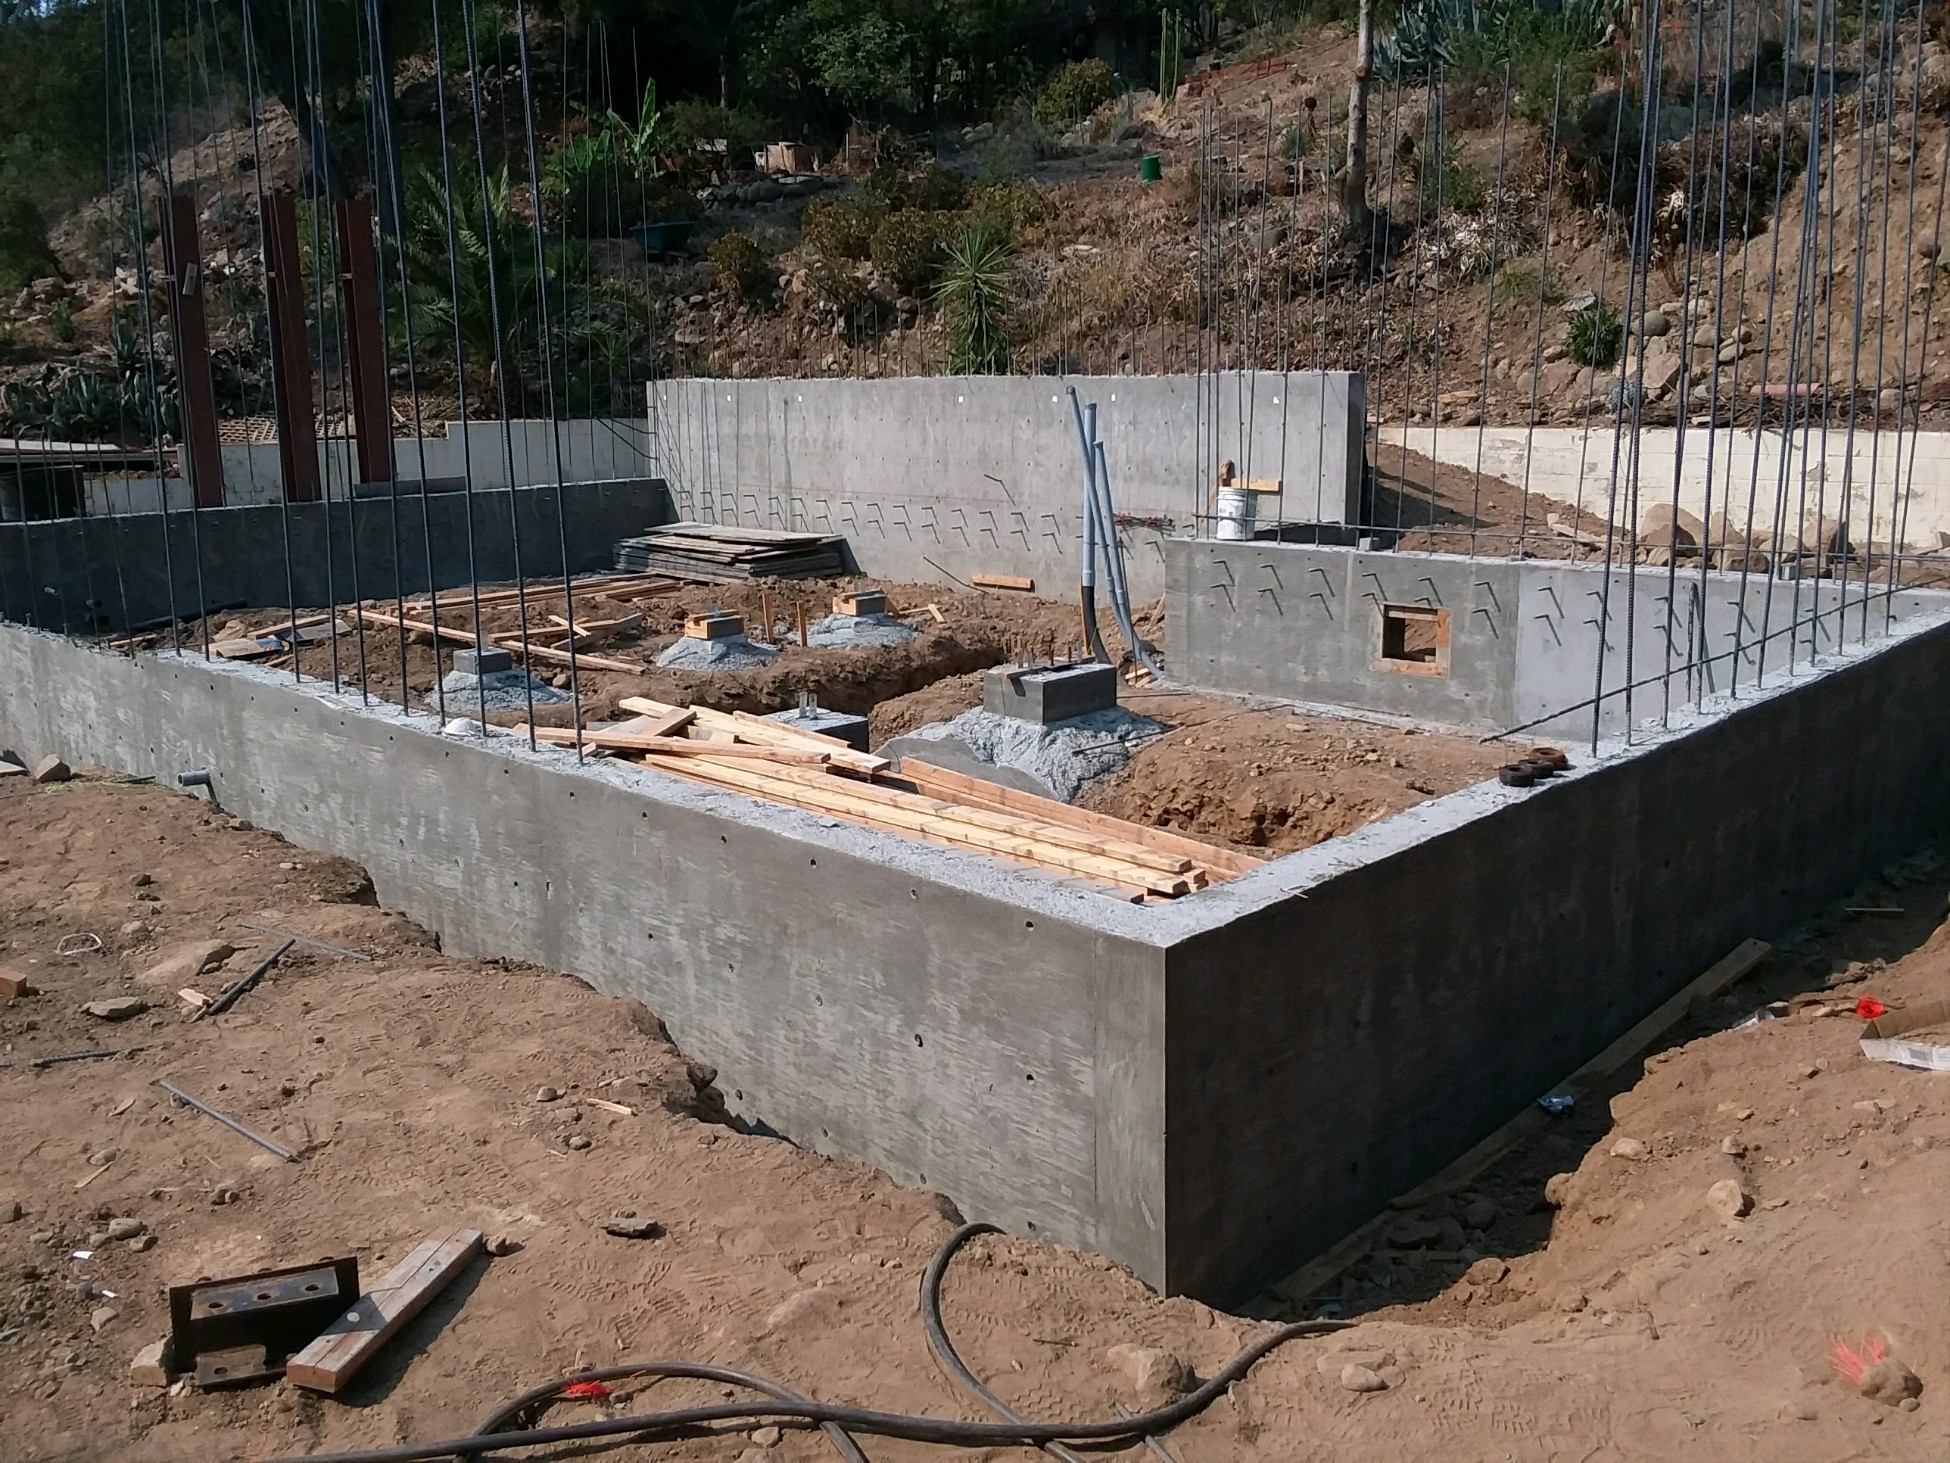
The next set of photos show shows the stem wall between the crawl space and the pad where the slab will go. The slab, which will be poured in several weeks, will be the floor of the great room. Stem walls connect the foundation with slabs or the base of the actual walls of the house. There are three images: Picture 8 taken with the forms up but before the concrete was poured, Picture 9 after the concrete had been poured, and Picture 10 taken after the forms were taken down.

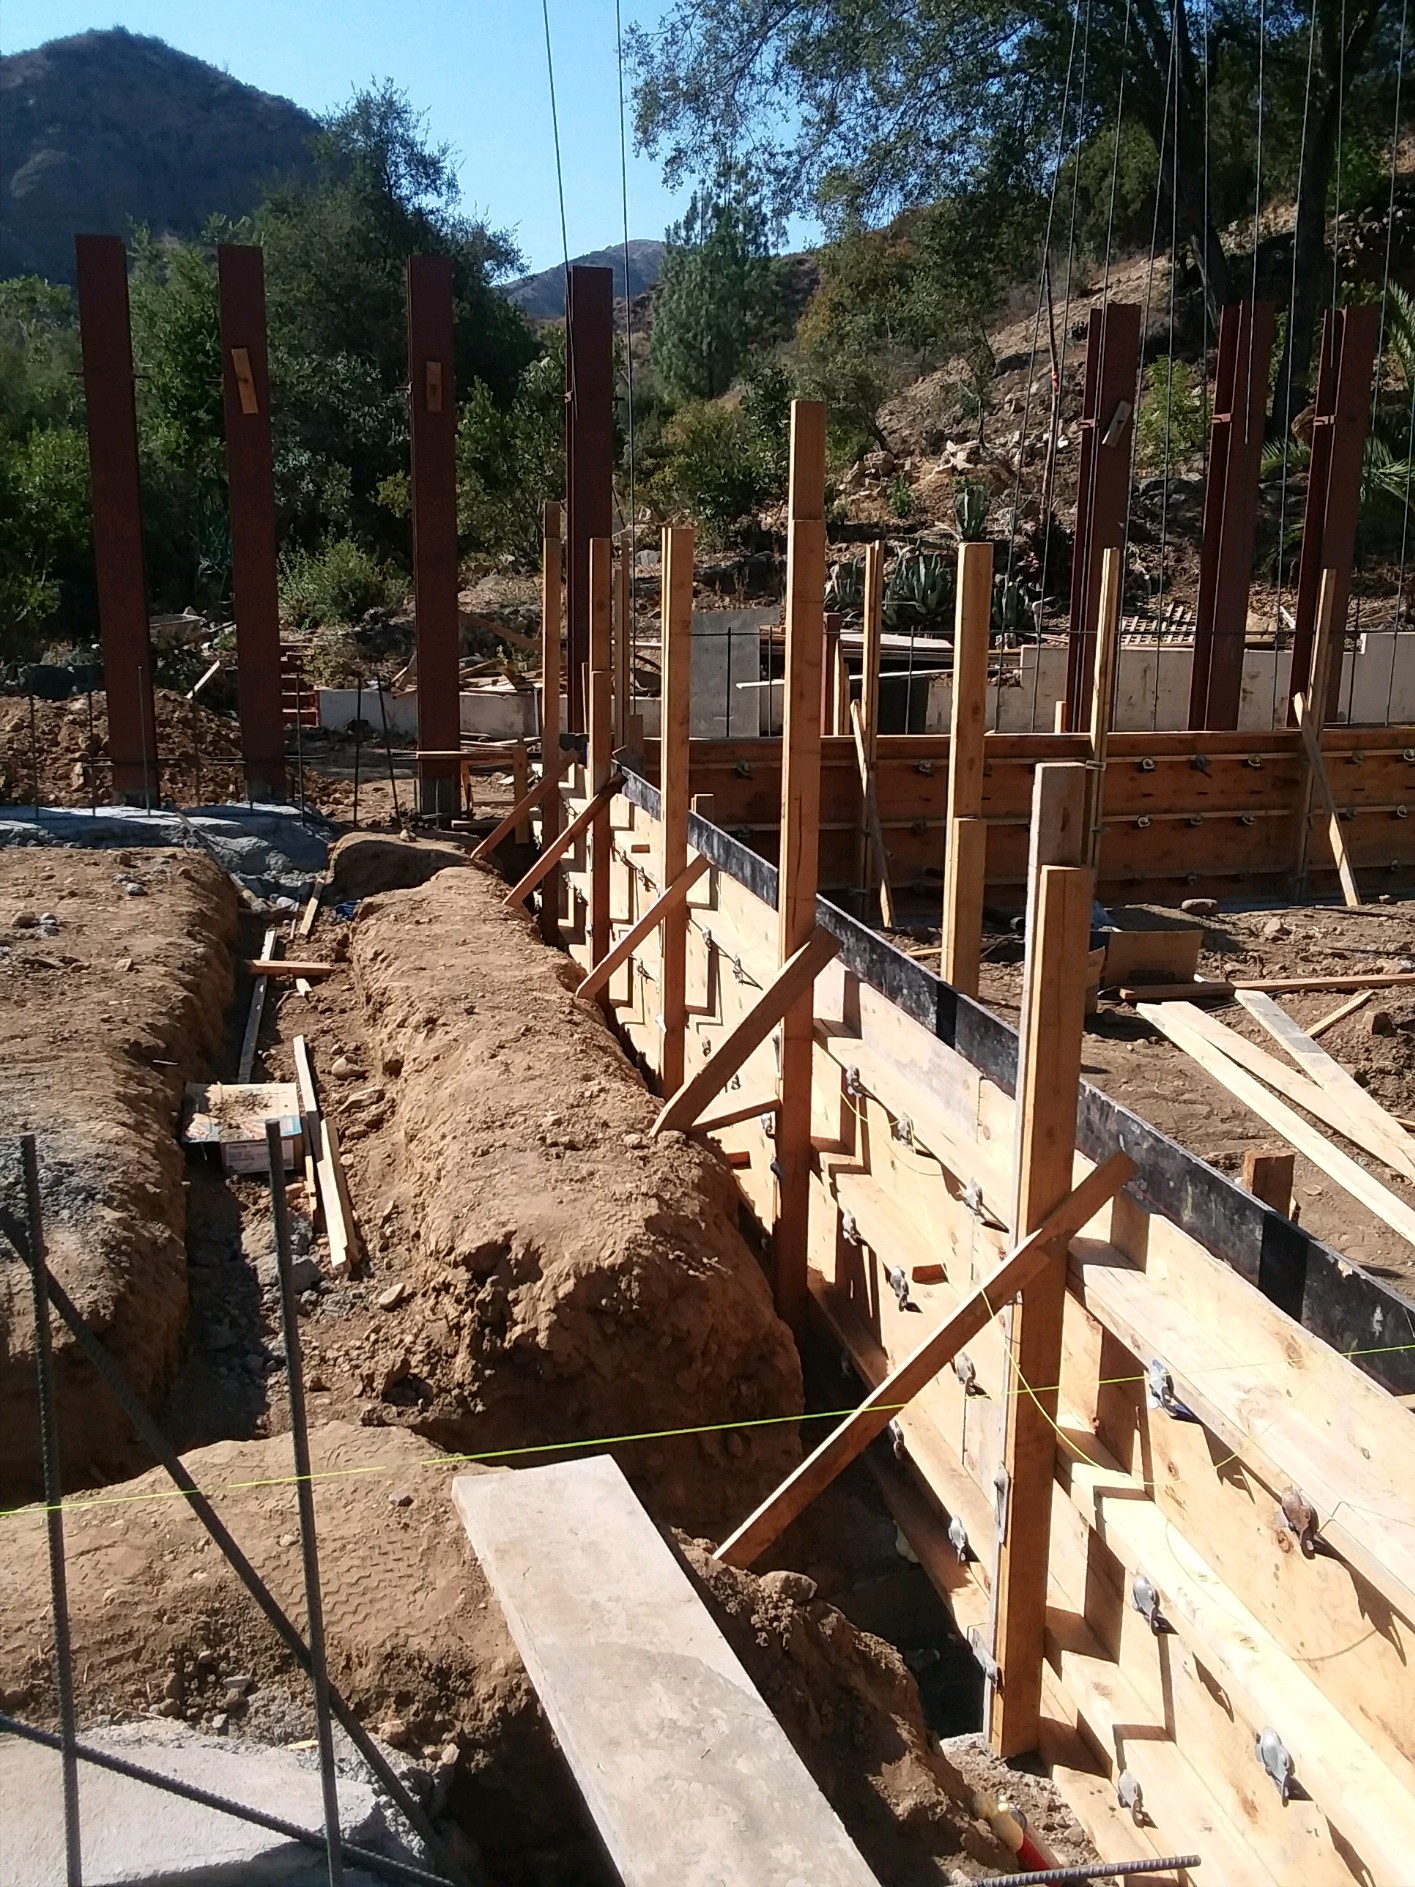
Picture 8 – Stem wall between the crawl space and the slab before the concrete was poured.

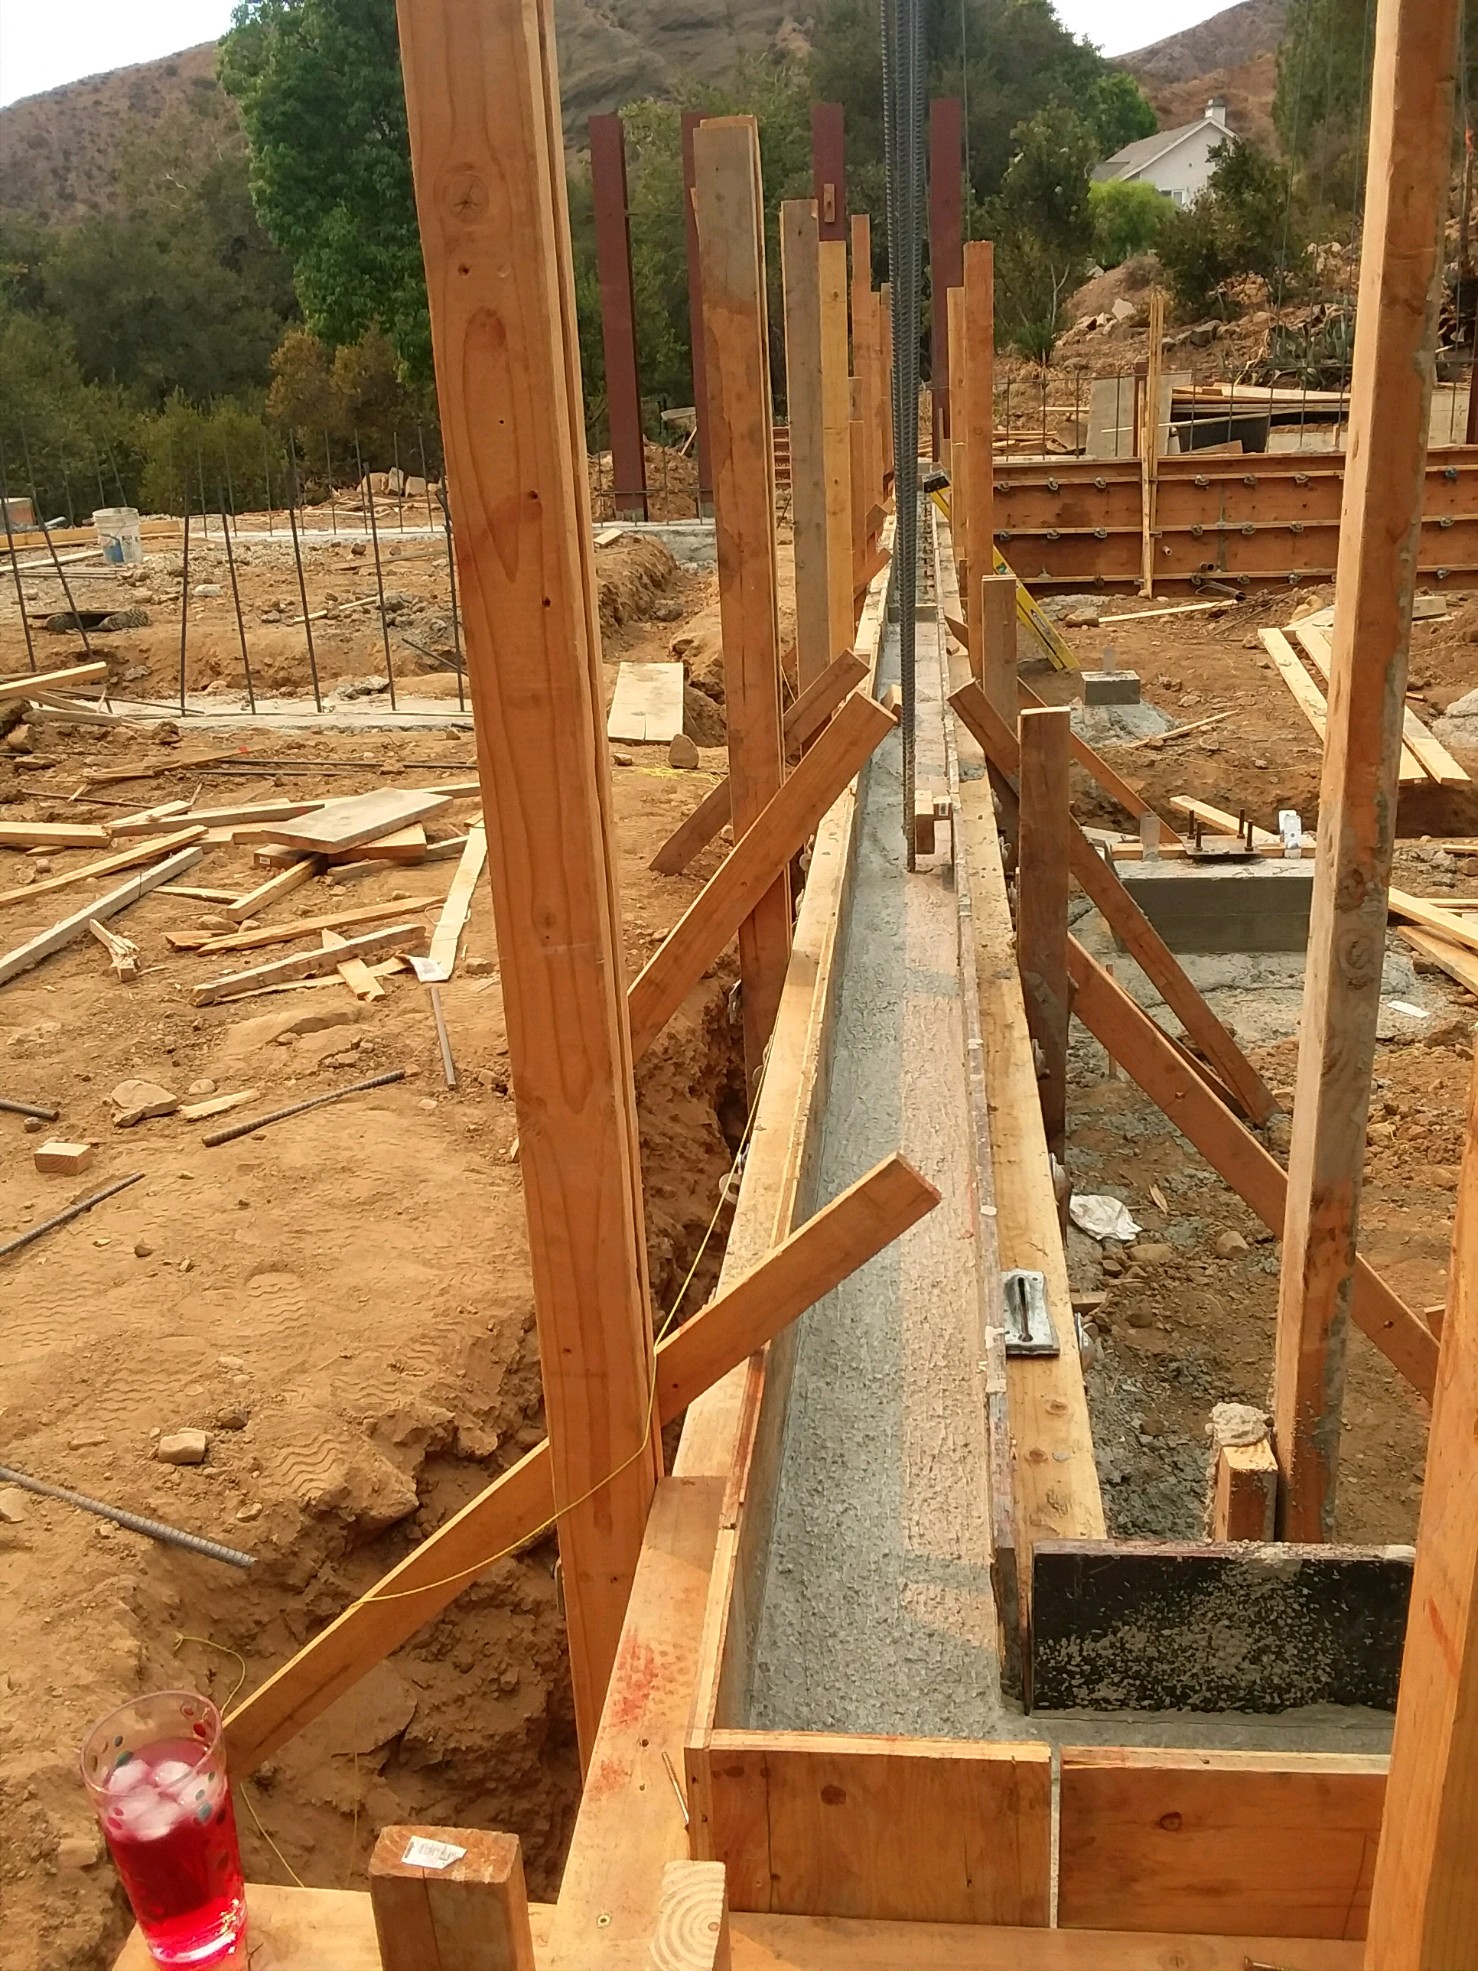
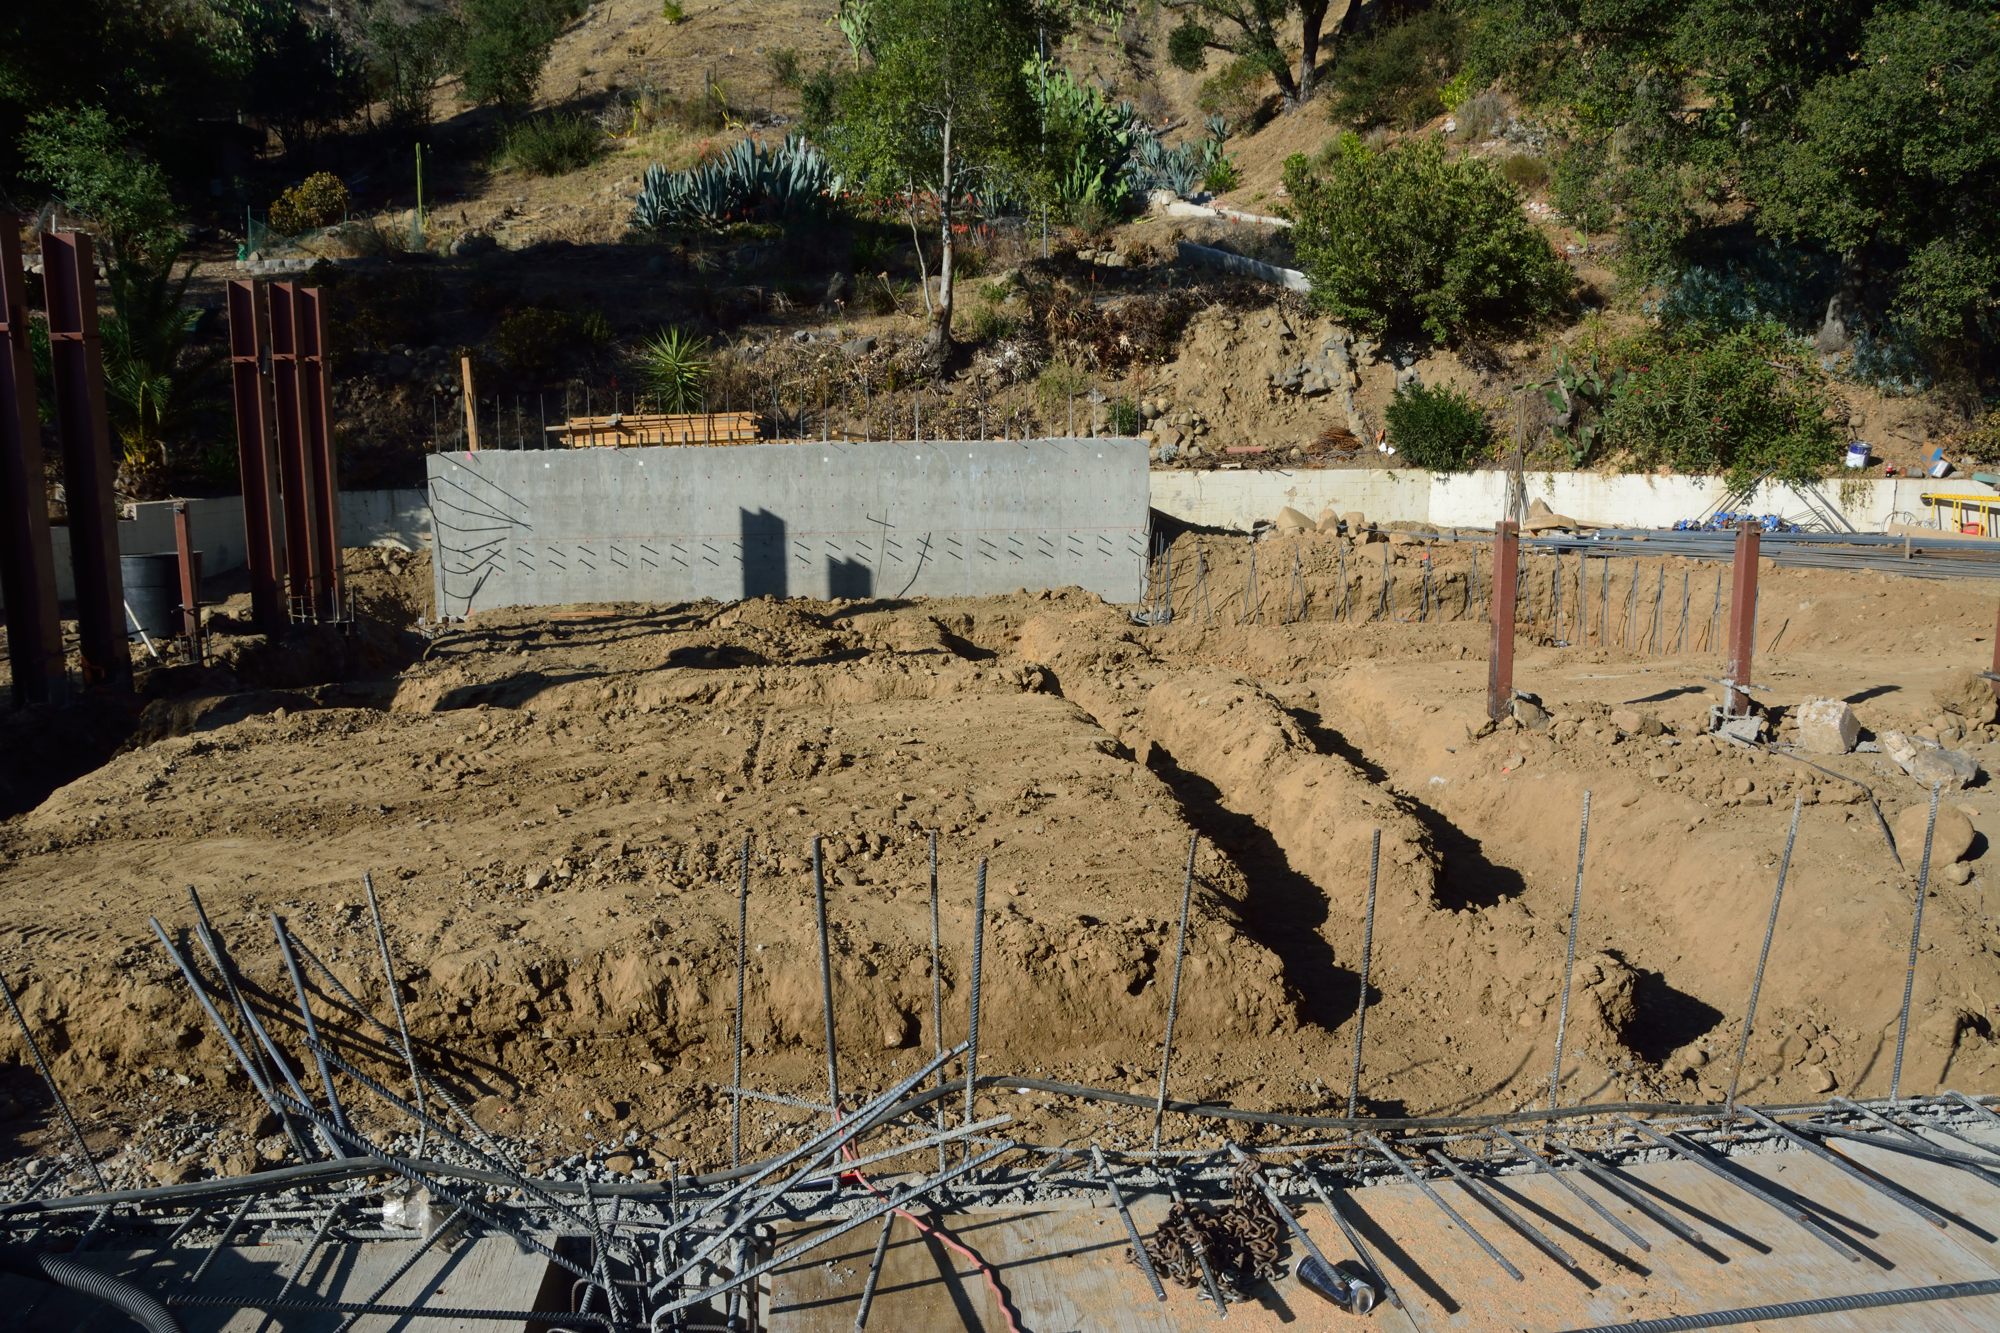
Picture 9 – Stem wall between the crawl space and the slab before the concrete was poured.

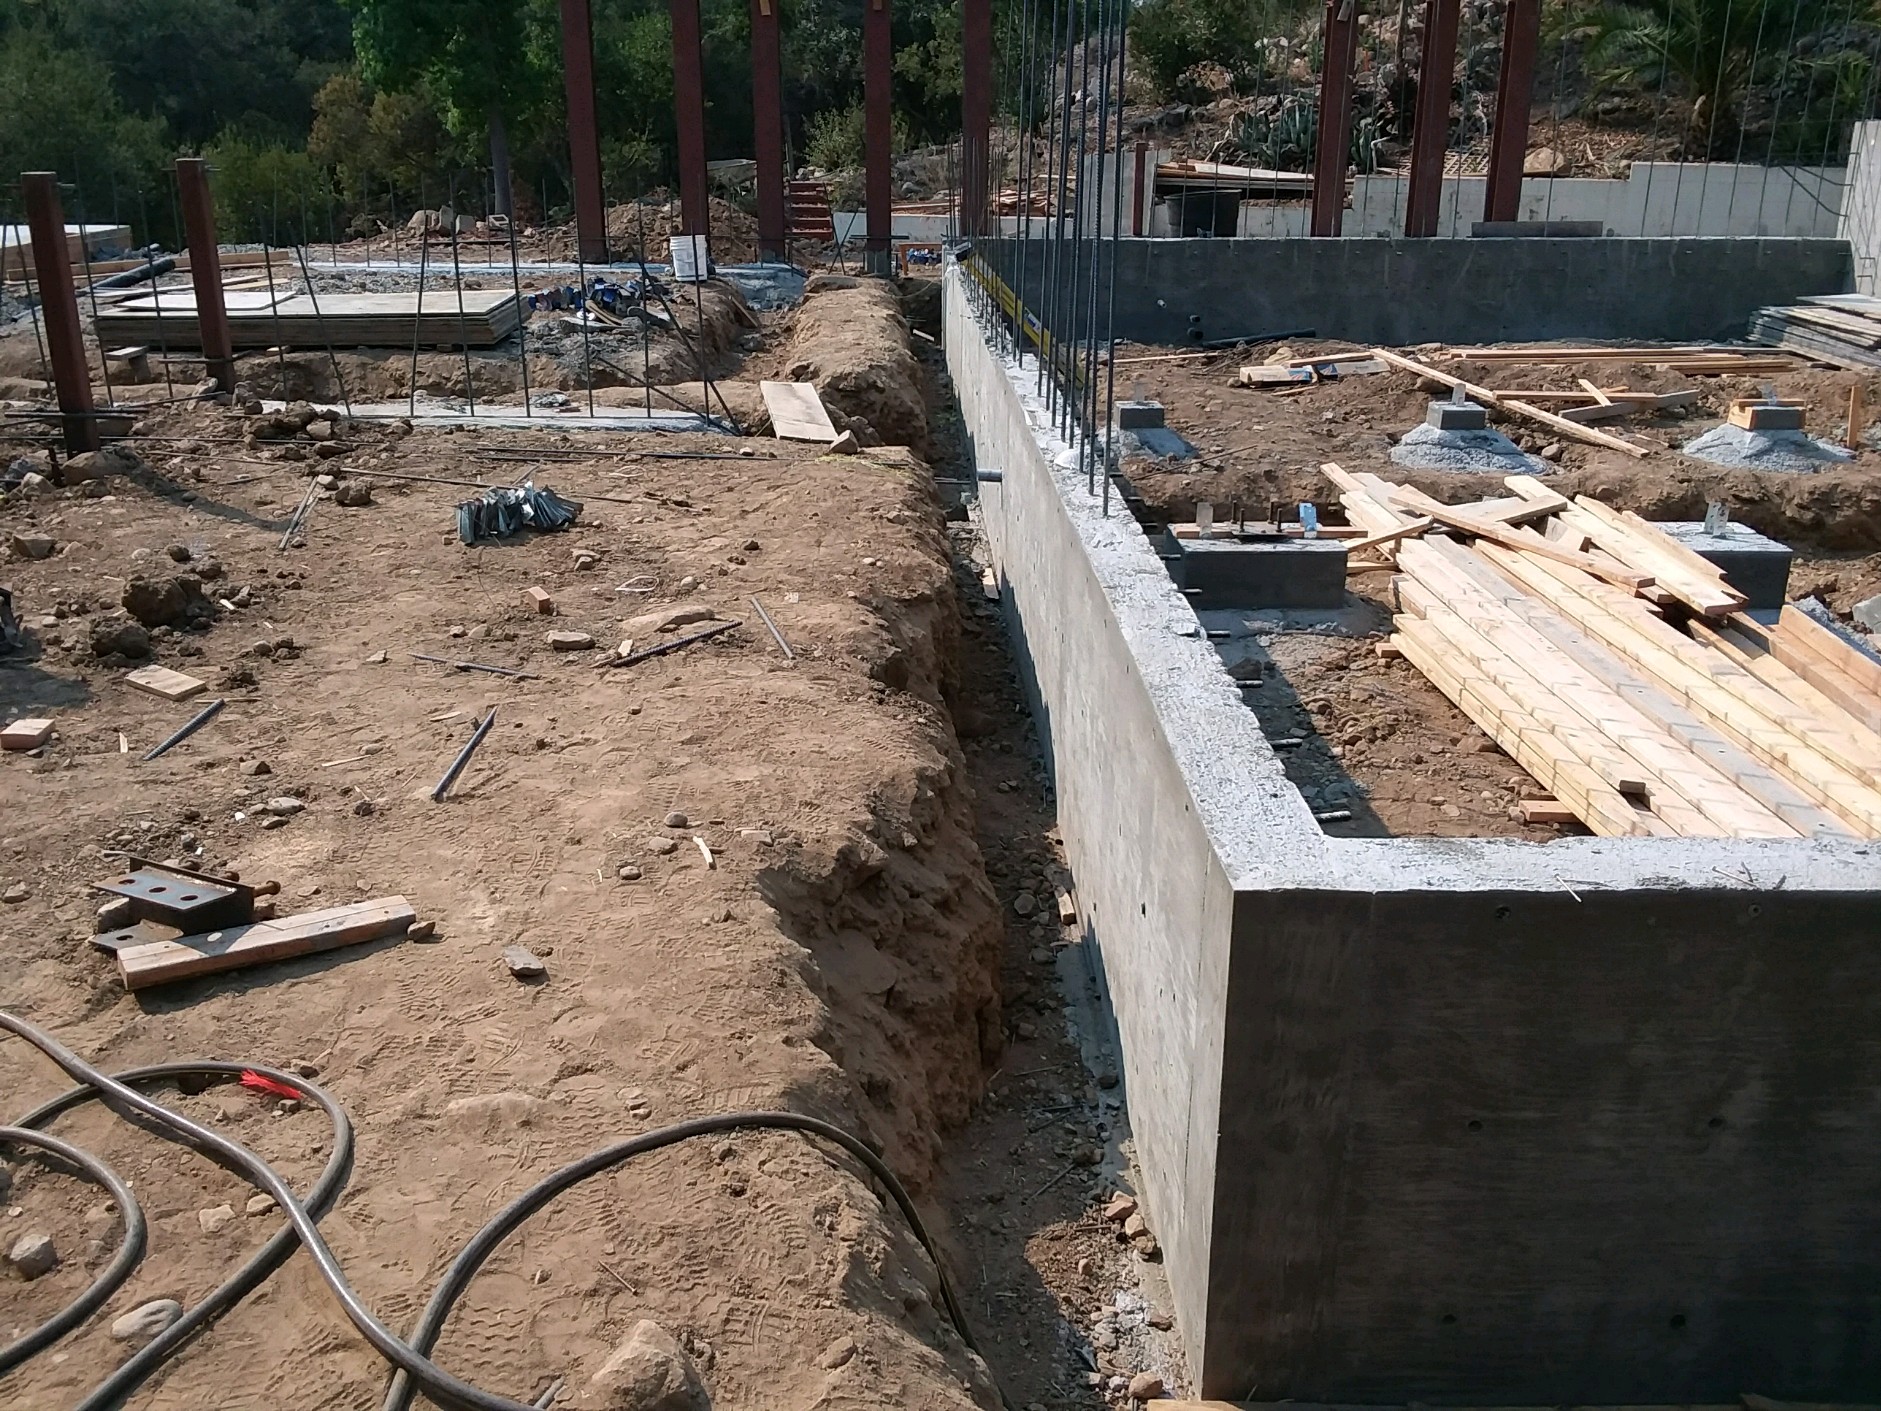
Picture 10 – Stem wall between the crawl space and the slab after the forms were removed.

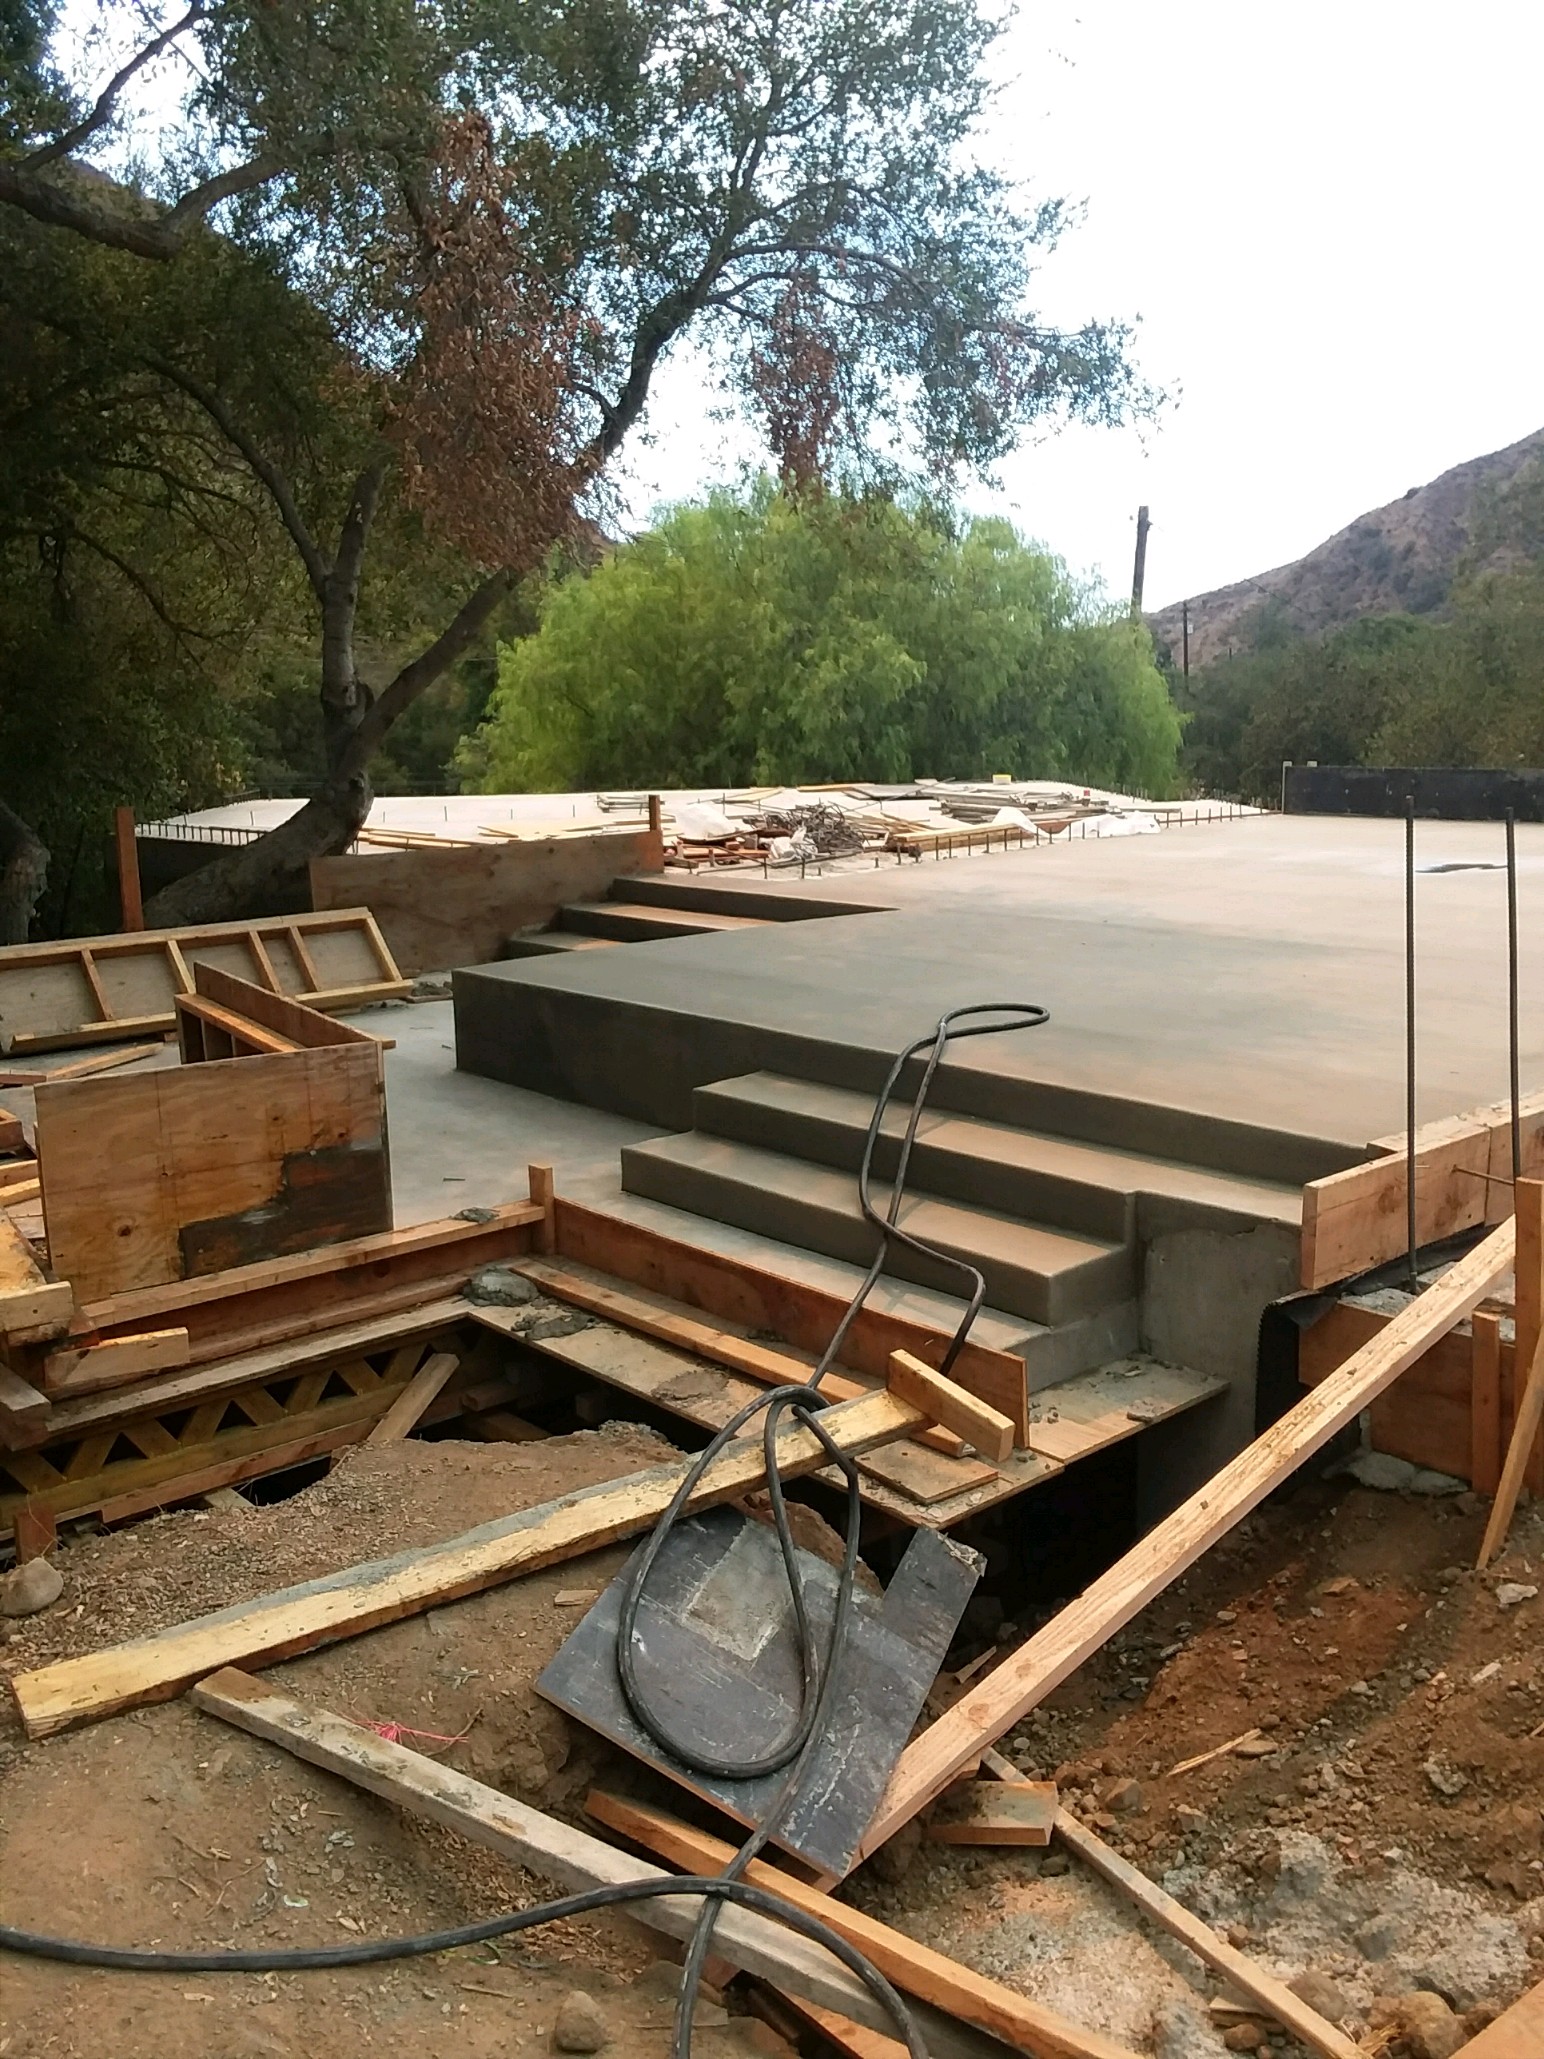
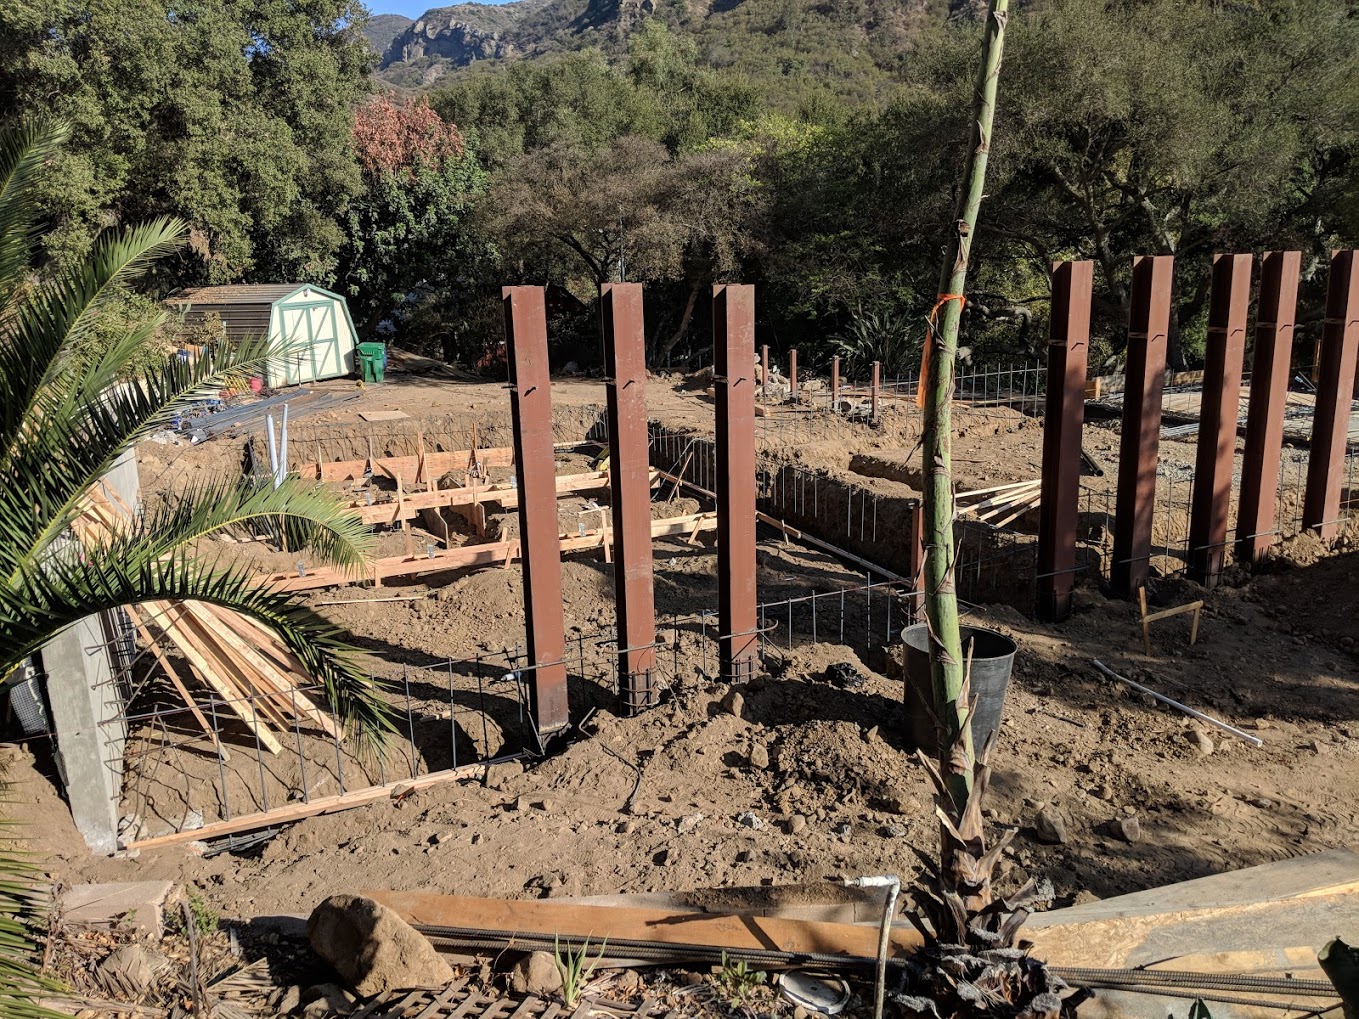
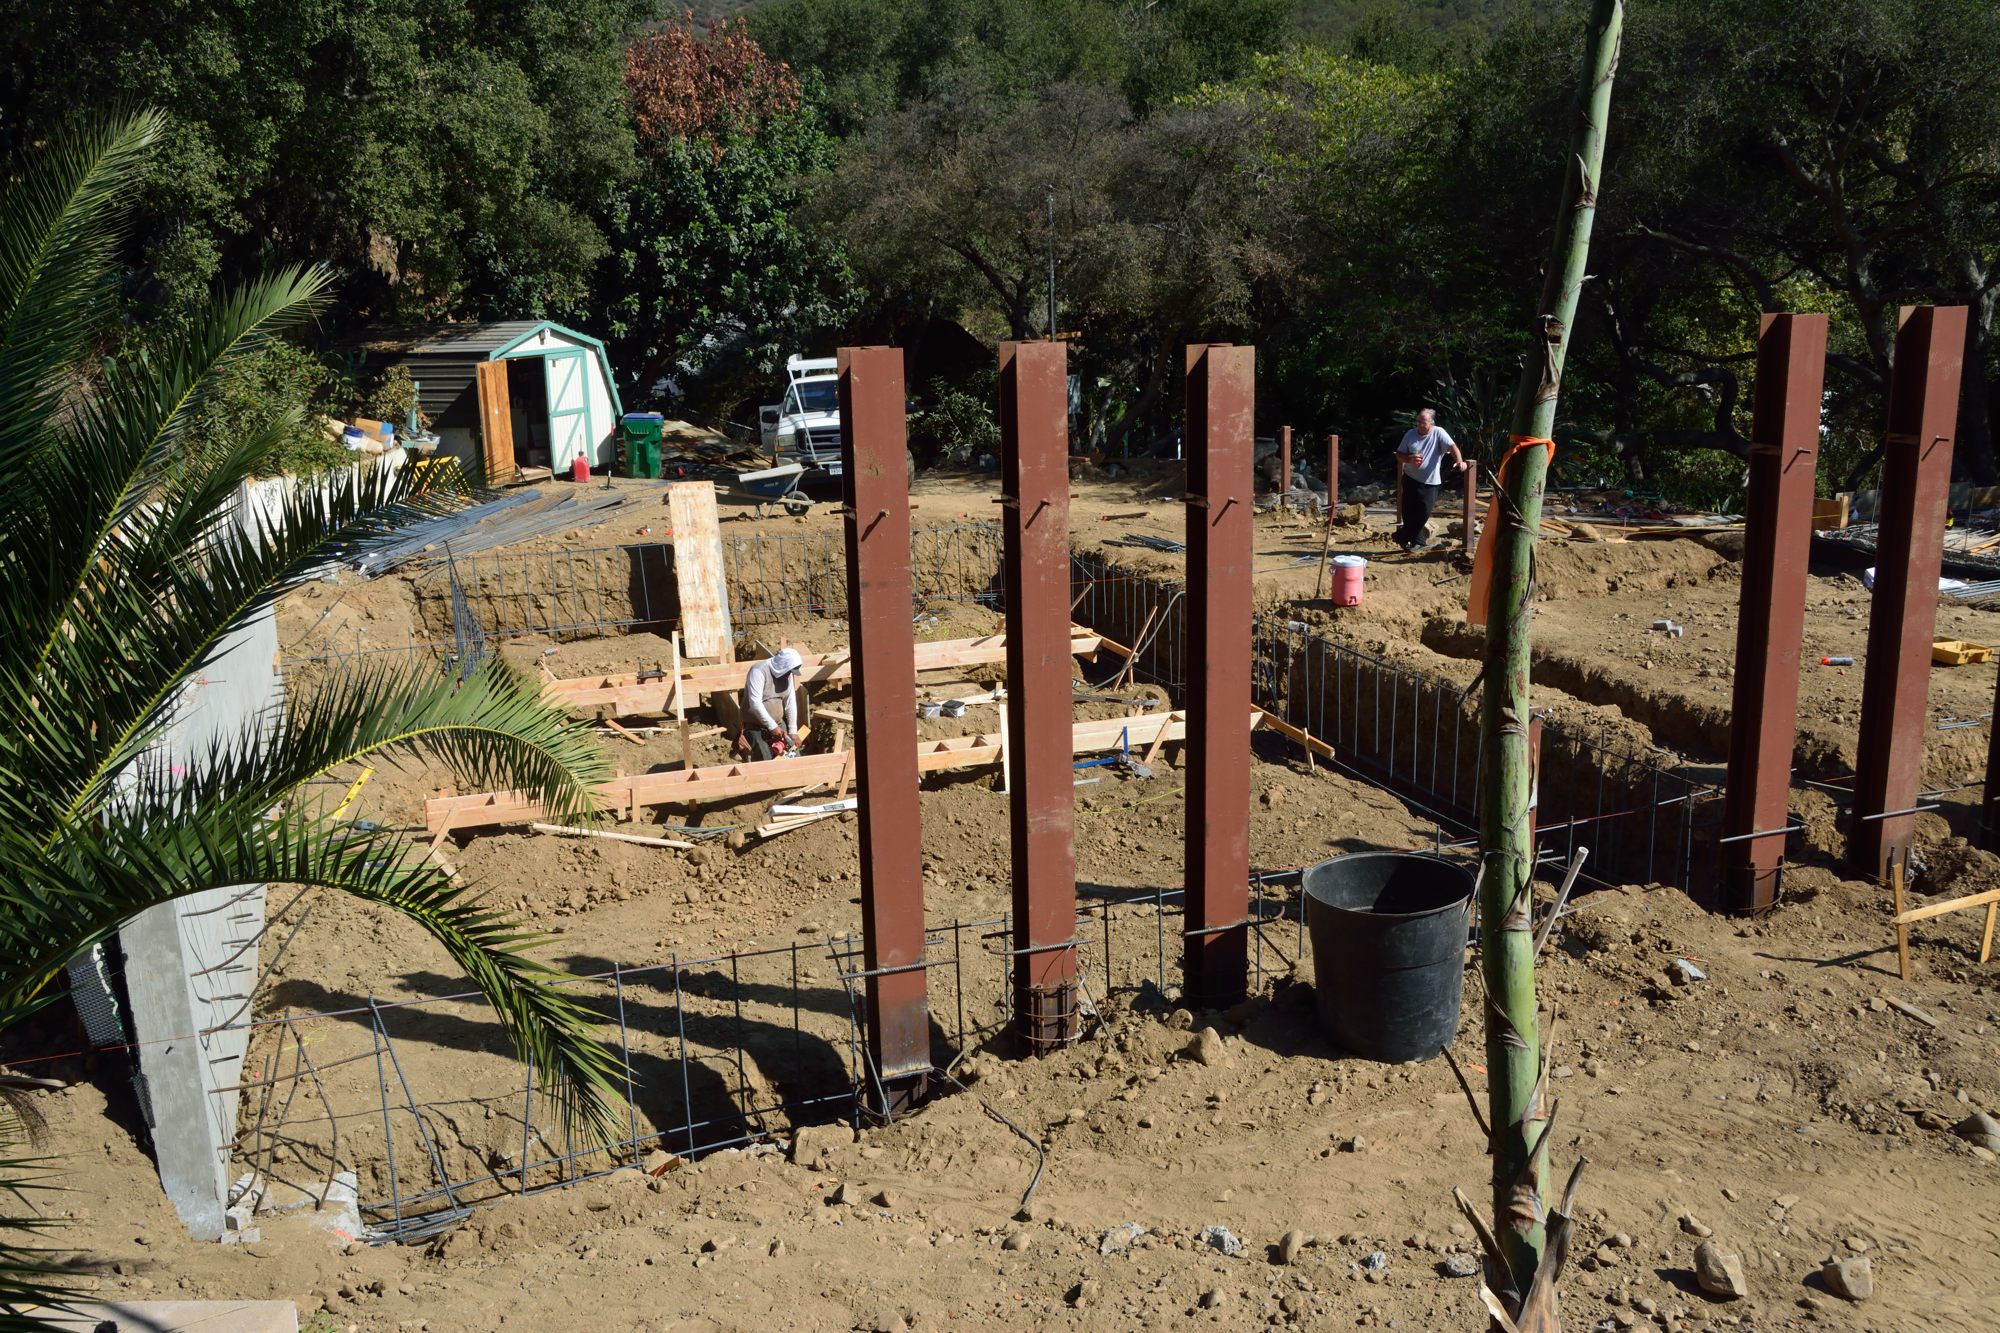
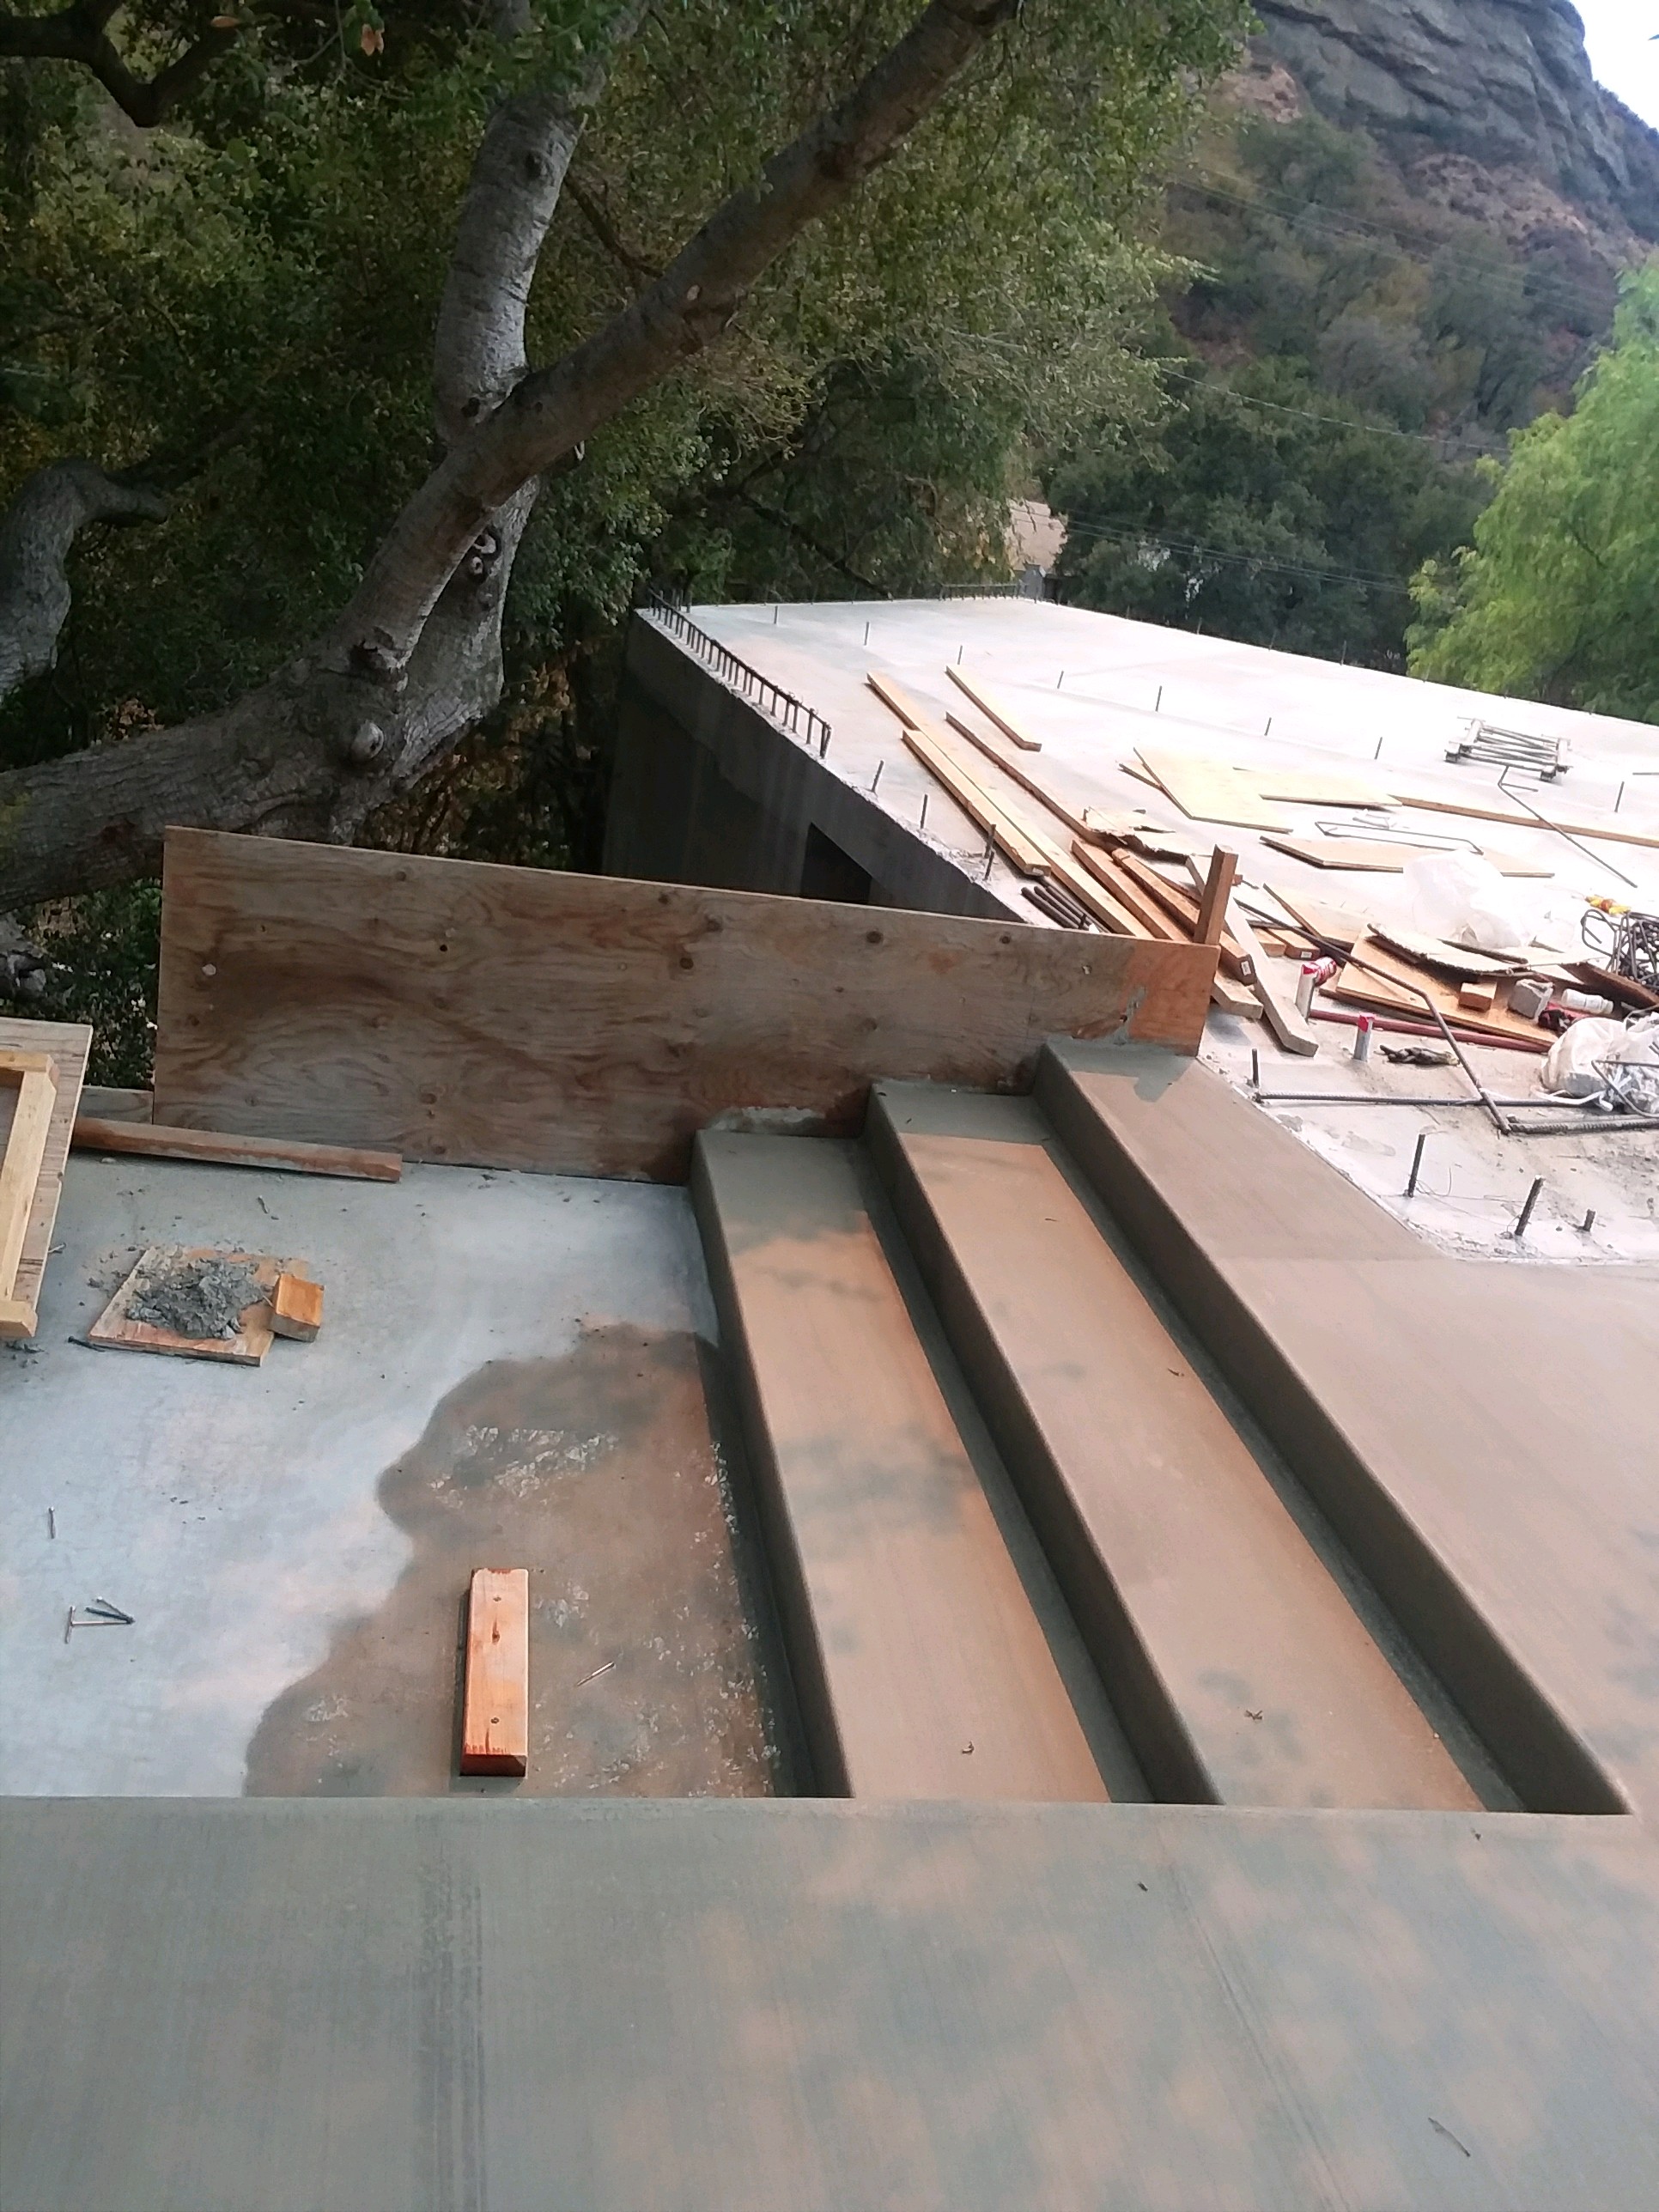
Picture 11 – the two decks and the stairs between them

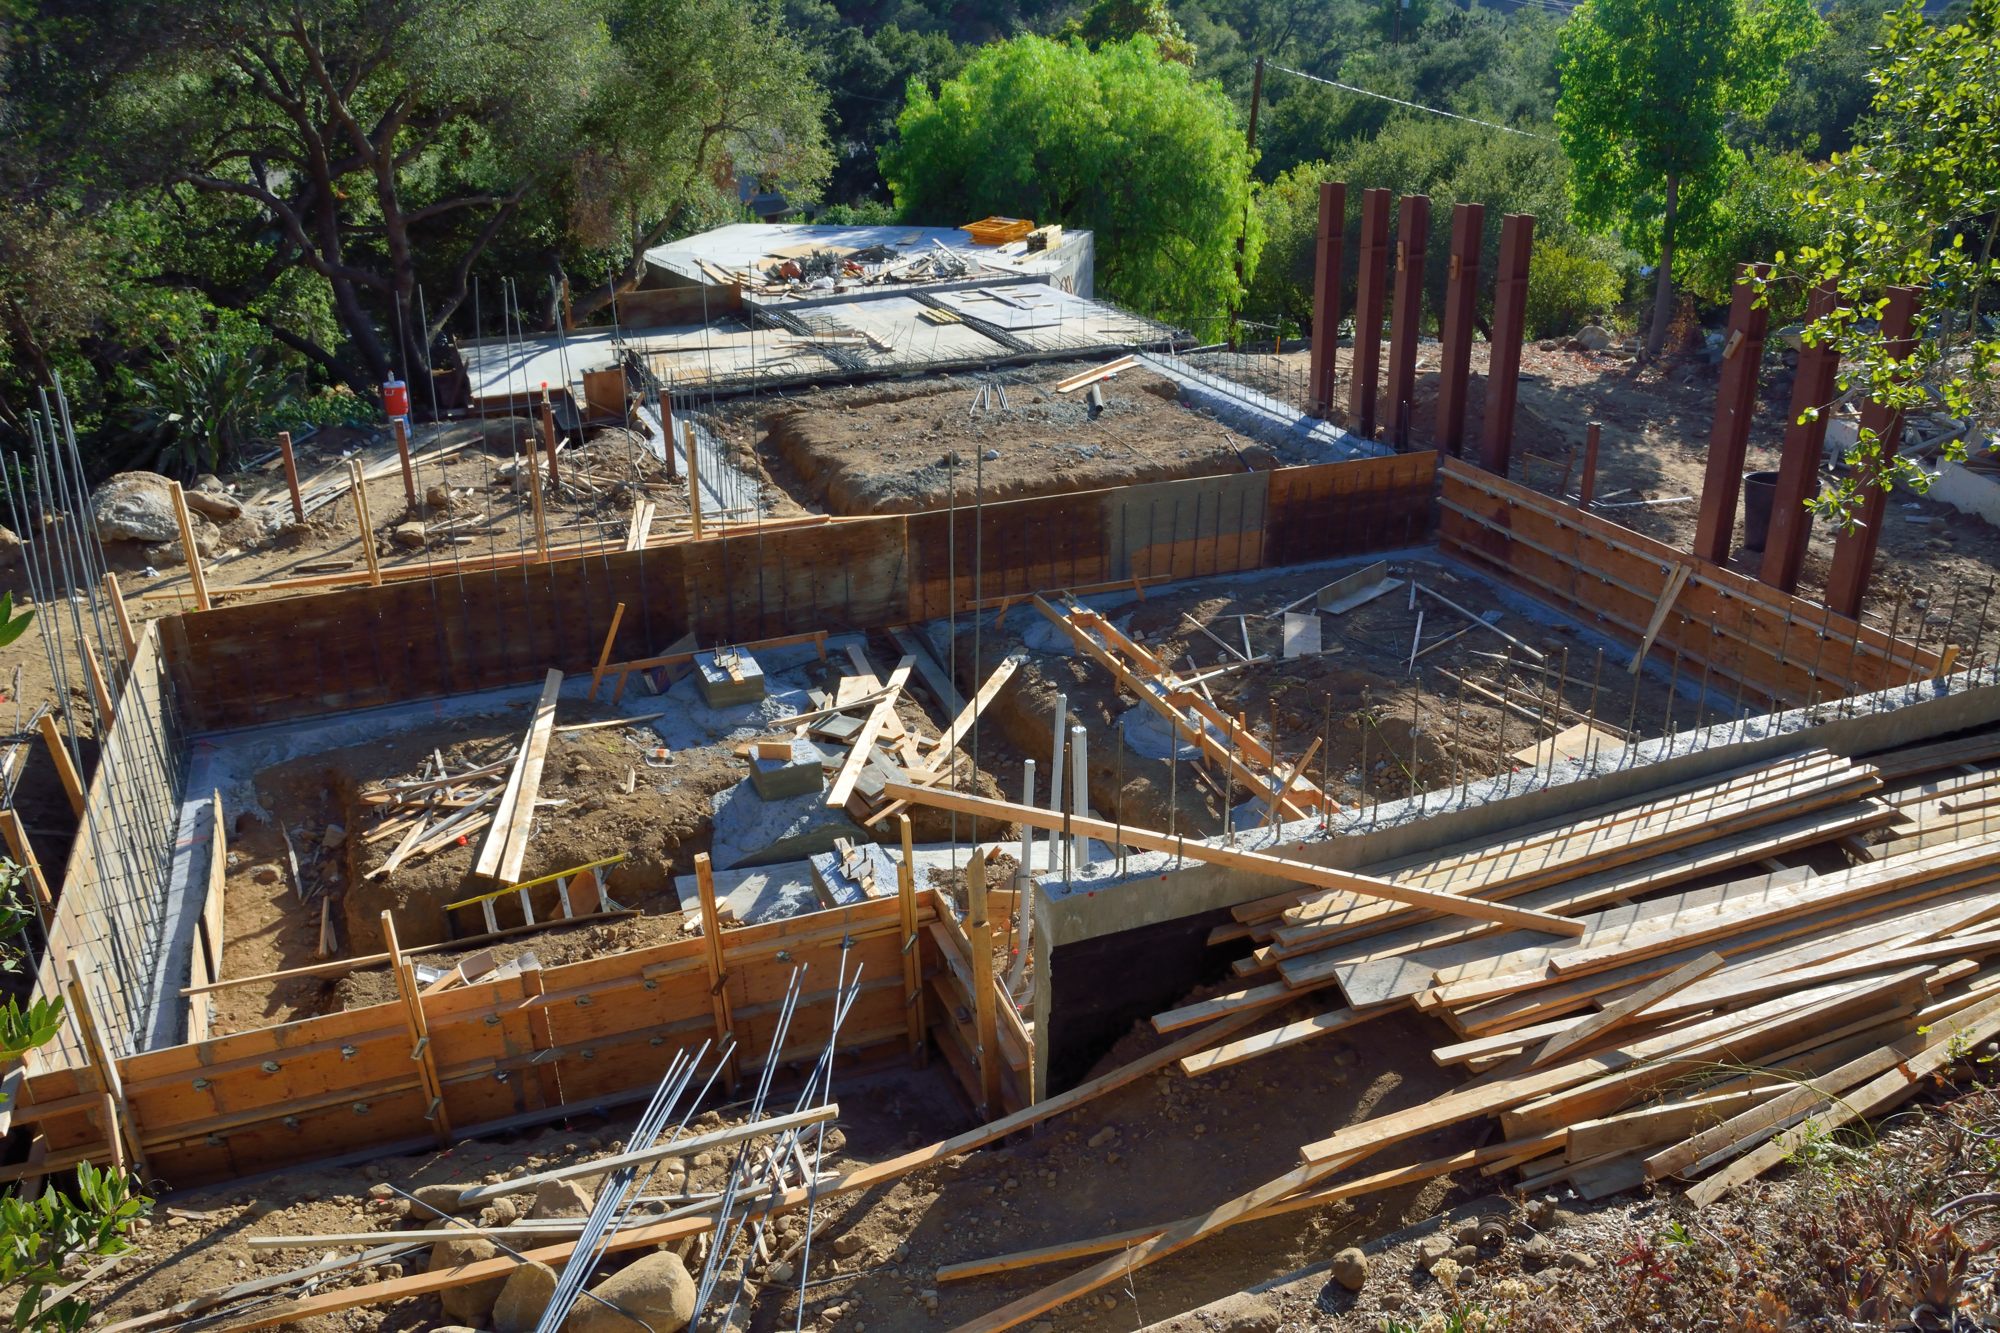
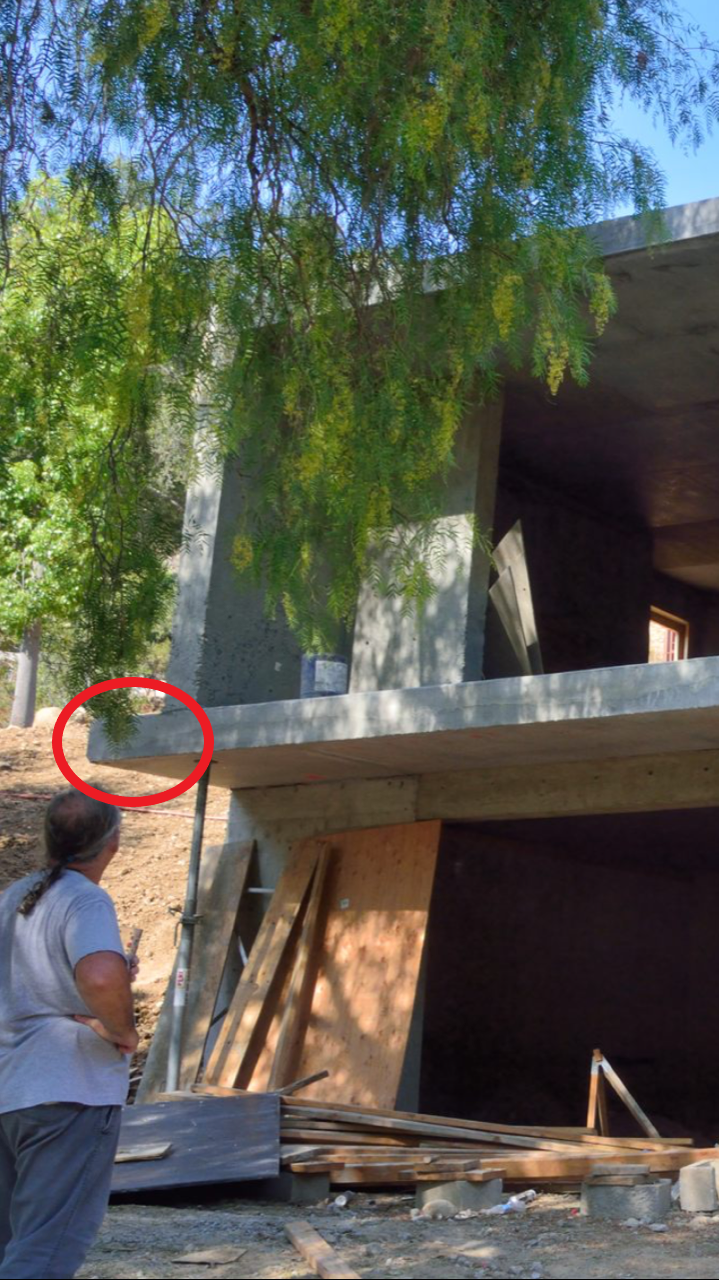
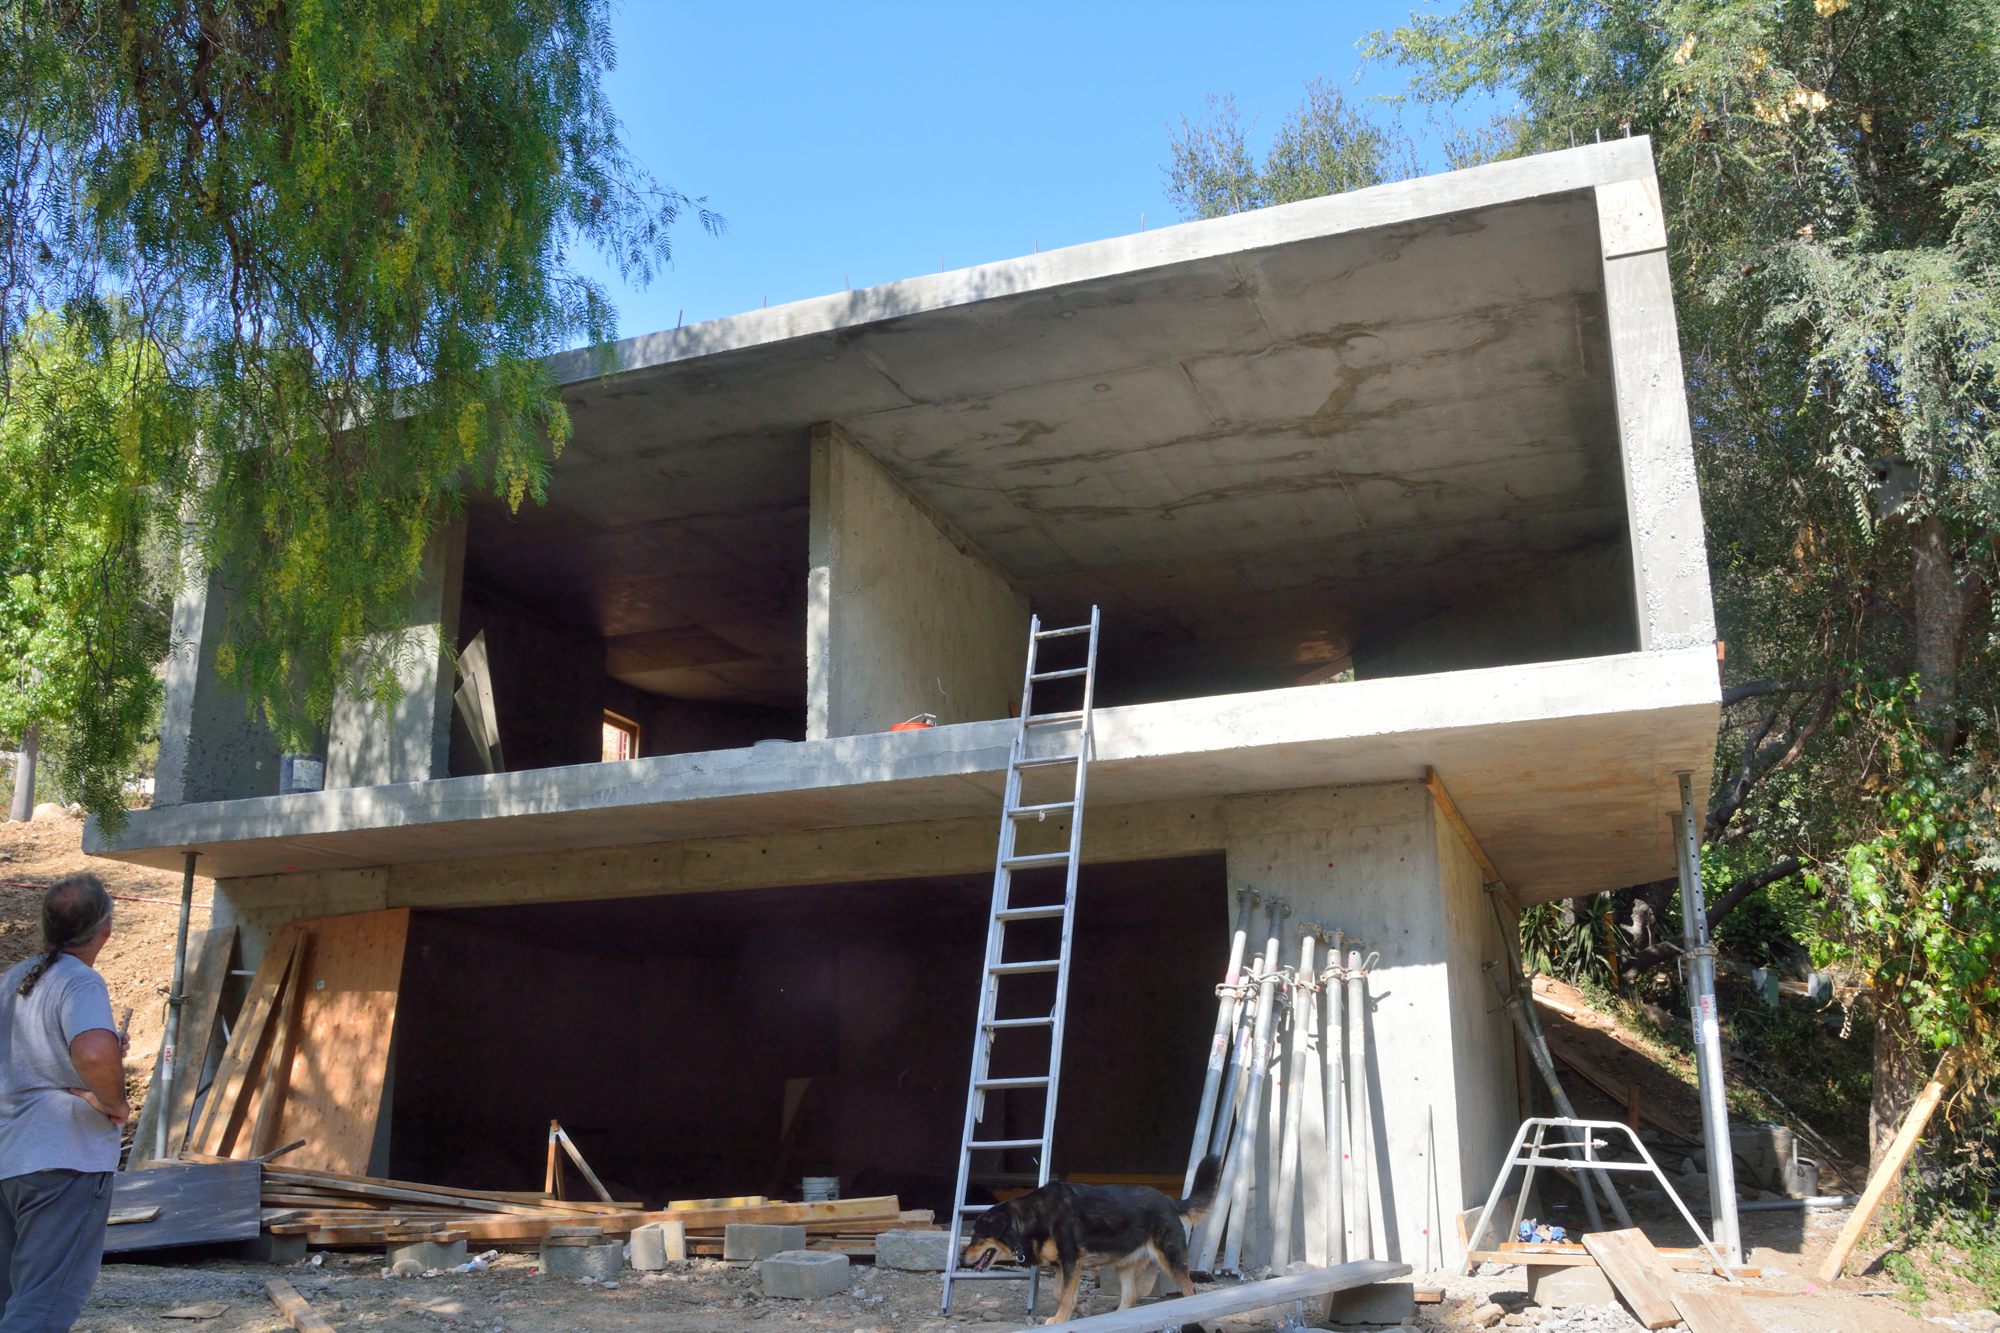
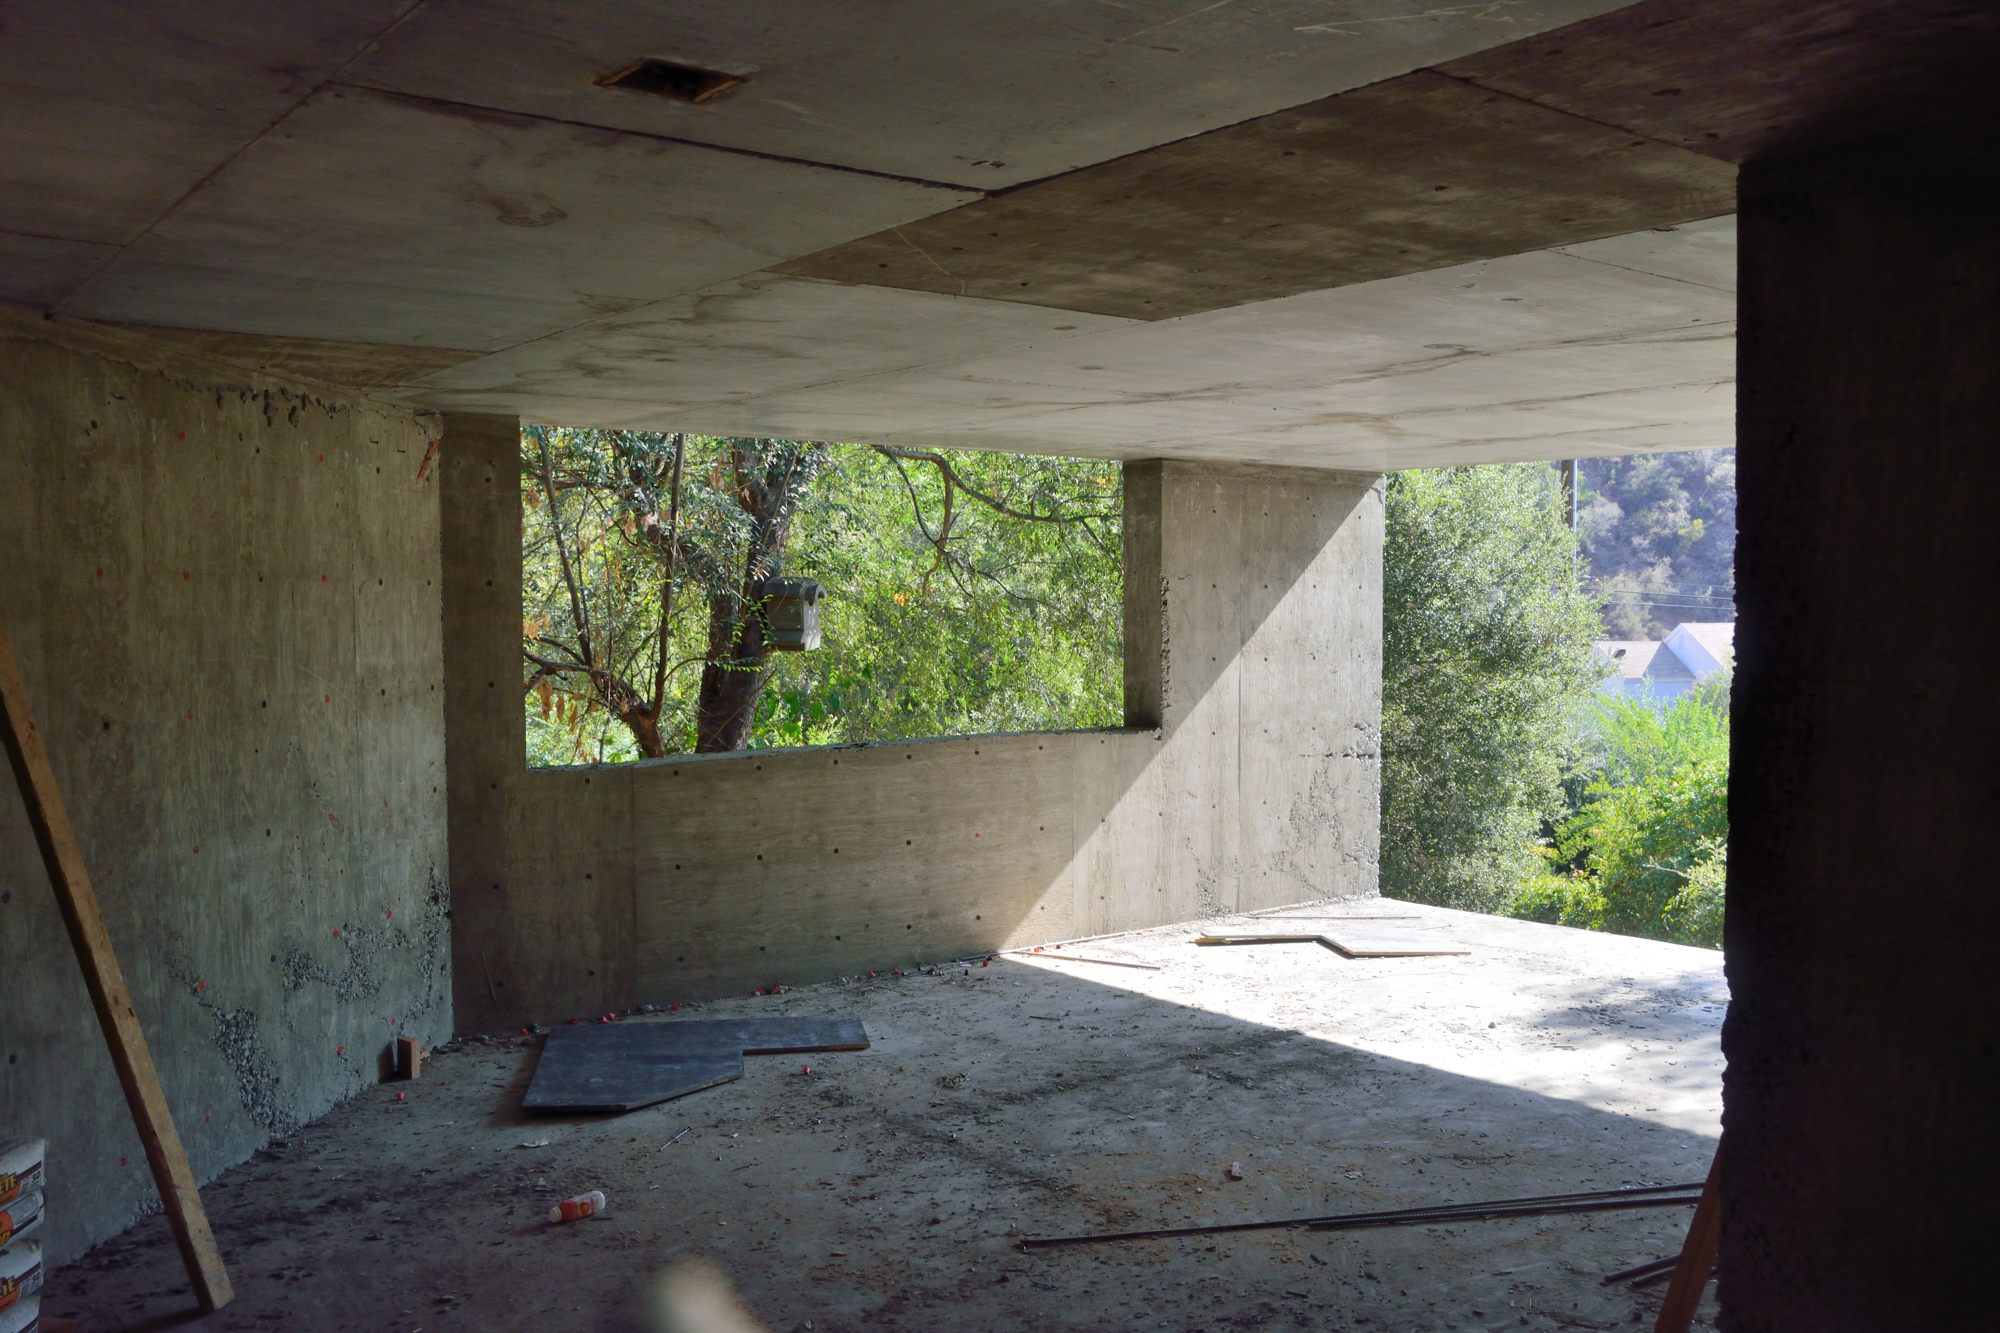
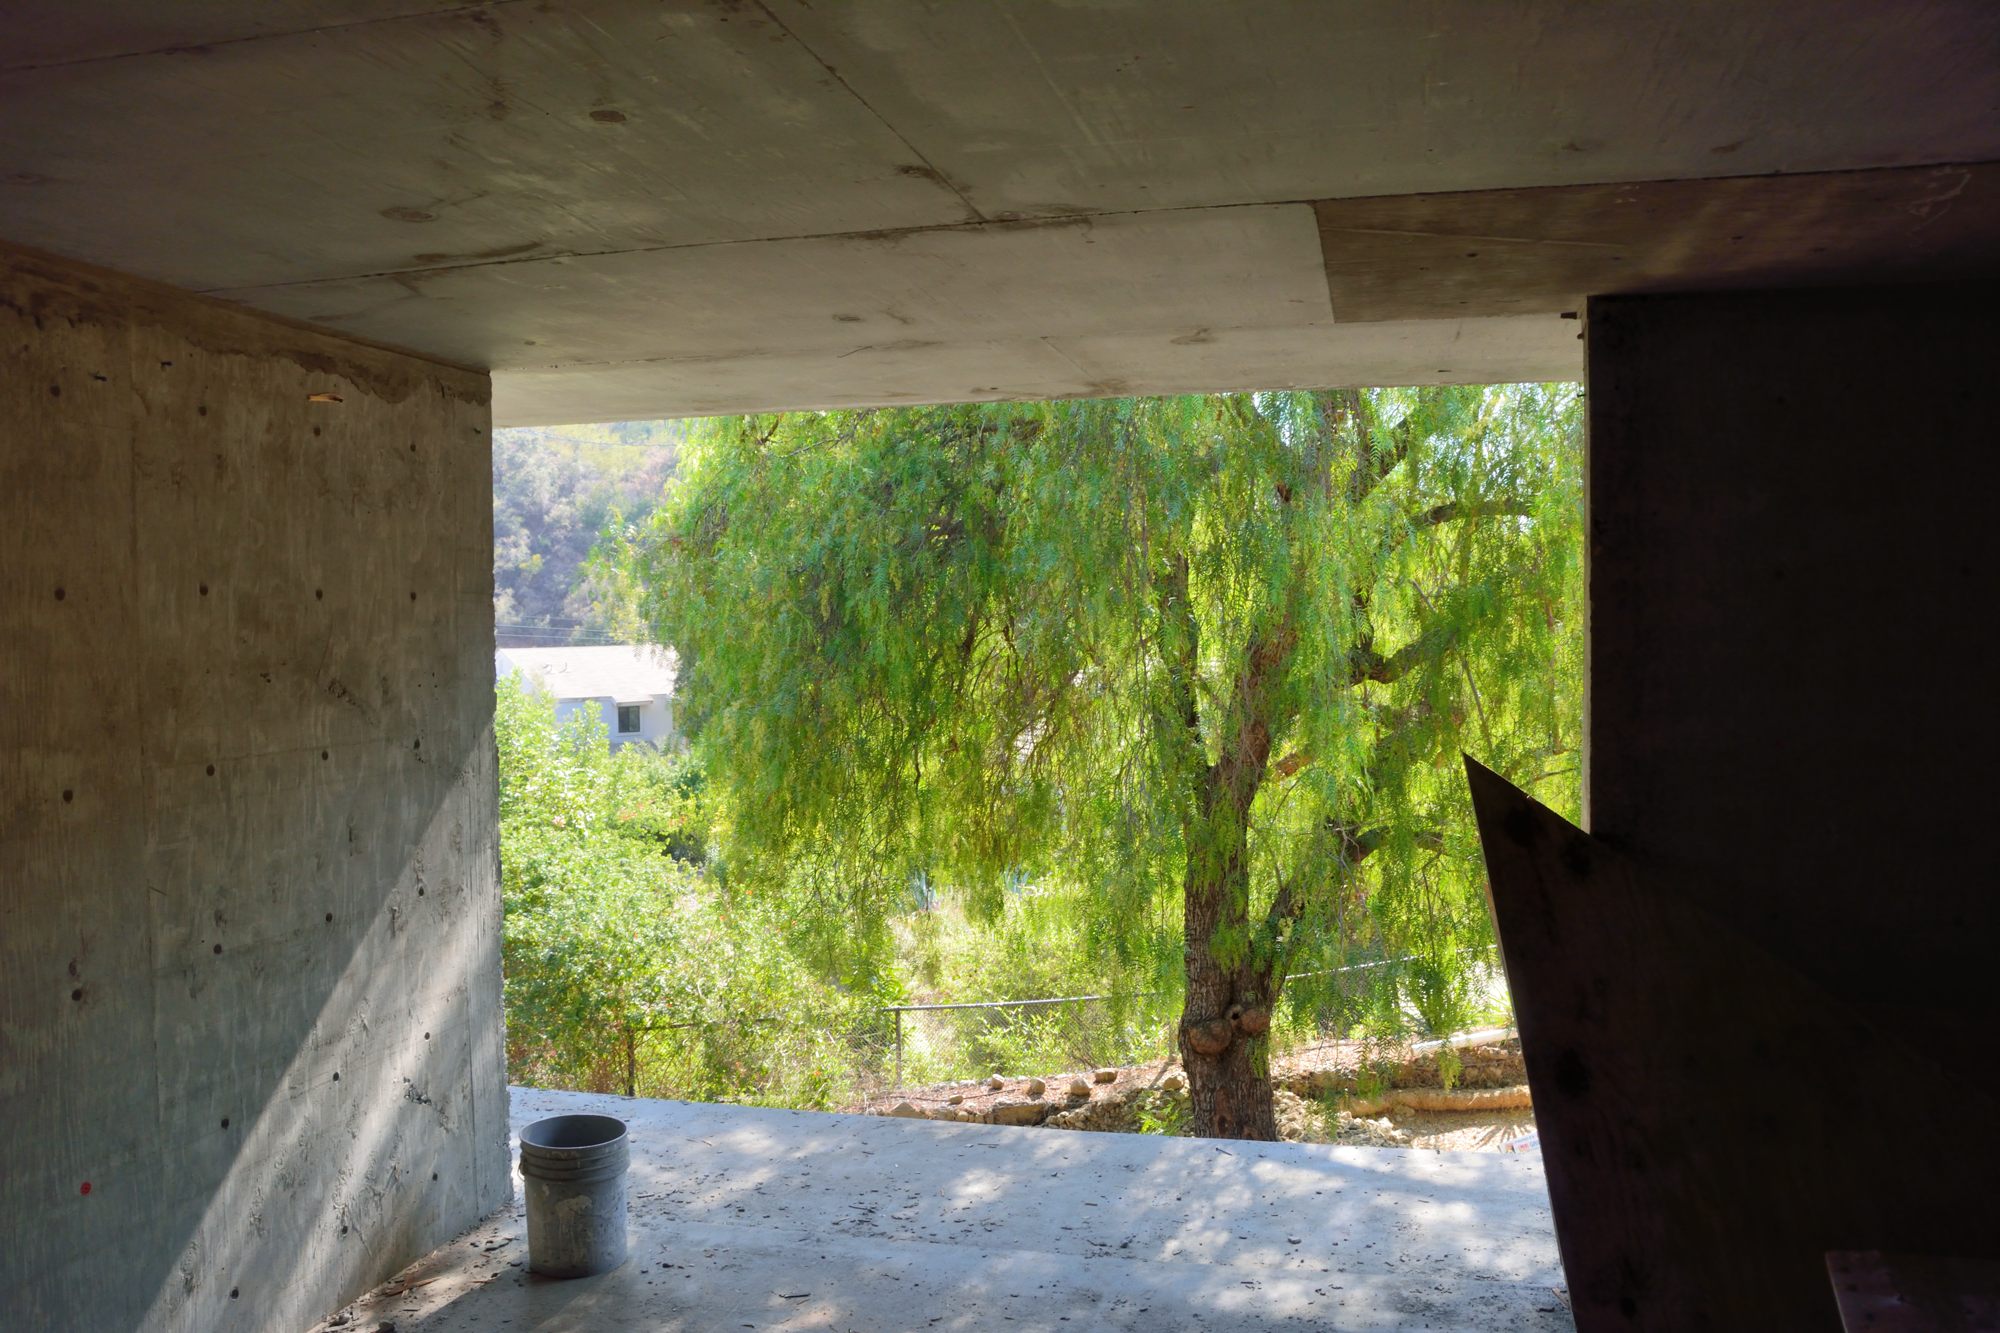
The final three pictures were all taken after the forms had been removed. These photos, taken from further away, give a better sense of the structure of the house. Picture 11 shows the two decks and the stairs between them. Picture 12 shows the back wall of the house. The opening will provide access to the crawl space from a walkway running at the back of the bedroom to the utility room, the door for which will be where the wall makes a right angle. Picture 13 is a view of the southeast corner of the house, where our bedroom will be.

Picture 12 – the back wall of the house. The opening will provide access to the crawl space from a walkway running at the back of the bedroom to the utility room, the door for which will be where the wall makes a right angle.

Picture 13 – a view of the southeast corner of the house, where our bedroom will be.


Posted in house | Leave a comment

Tuesday, July 31, 2018

Today there were only two guys there.  First they moved all the stuff off the main deck onto the garage roof to get it out of the way. 


Then they swept the deck. There was only vertical rebar around the deck before, but they started adding long pieces east to west. They had to be shoved into the grade beam at the far west end, which they did by pounding on the rebar with the sledge hammer, here in the foreground.  By 3 o’clock when I left Modjeska, they had added quite a bit.

Ted and I leave for Chicago early tomorrow morning on our way to Haywood and Curtis’s wedding this Saturday. We will not be back to take pictures until August 13th at the earliest. Perhaps our neighbor Michael will send us a few along the way.

Posted in house | Leave a comment

Monday, July 30th, 2018

They are trying to get ready to pour the upper deck and the walls around the crawl space of the house on Friday or Monday. Picture 1 shows the forms for the last section of the deck wall and the decking for the upper deck. The wood frame is for a low door that will give access to the area under the deck.

Picture 2 shows the plywood for one side of the forms for the foundation around the crawl space. for comparison, this photo is taken from roughly the same location as Picture 9 in the last blog entry.

Picture 3 shows a small goof. The area circled in red should not be there and makes the garage look asymmetric. This is a mistaken extension, shown by the blue rectangle in the inset (Picture 4) from the plans of a planter in the wall of the apartment along the stairway. Our architect caught this just from looking at one of the photos posted in the last blog!–I guess we know someone (besides Cecily) is looking at this. Fortunately, the contractor says that it should not be hard to cut this out.

Picture 1 – Forms for the last wall of the deck and the decking of the upper deck.

Picture 2 – Forms going up around the crawl space.

Picture 3 – Oops. The piece of concrete marked by the red circle is a mistake.

Picture 4 – Inset from the apartment plans.

Posted in house | Leave a comment

Friday-Saturday, July 27+28, 2018

There are a lot of pictures in today’s post because a number of interesting things happened on both Friday and Saturday. The big pour on Friday was similar in some ways to the previous 4, but also, because they were working on the deck and house, different in interesting ways. Taylor is here from Australia, on the way to Haywood’s wedding next weekend, so she got up early to view the events personally. Picture 1, shows her supervising. Pictures 2, 3 and 4 have become more familiar scenes for us. Picture 2 shows the rough smoothing of the new concrete on the lower deck. Picture 3, shows the pump operator manhandling the heavy tube spewing out the pumped concrete so that it fills the grade beam. Picture 4, shows the missing section of the slab below the deck being filled.

Picture 1 – Taylor supervising the pour from a vantage point on the hillside behind/above the house.

Picture 2 – Smoothing the concrete on the lower deck.

Picture 3 – The pump truck operator man-handling (literally) the tube carrying the concrete so that it fills one of the grade beams on the deck.

Picture 4 – Filling the void in the slab below the deck.

For this pour there were several places where they used a technique we had not seen before that let them avoid building extensive forms by using a little extra concrete in the foundation. Pictures 5 and 6 show one example of this. Because one of the buried ducts  will run close to the foundation for which they have already excavated the trench, the dirt that would have formed one side of the foundation was missing. However, they poured the lower two-thirds of the concrete, waited half an hour for it to harden somewhat, and then poured additional concrete on top. In Picture 5, they are shoveling the concrete from the second pour that has spread out too far back into the area of the foundation. Picture 6 shows the finished result.

Picture 5 – Heaping up concrete, that was poured on top of partially hardened concrete, to make a foundation wall where dirt is missing on one side of the foundation.

Picture 6 – The finished foundation wall. Note the missing dirt, which would have formed one side of this foundation wall, on the right.

Picture 7 and 8 show a similar process being applied to the pad that will support one of the steel, vertical posts in the center of the house. Picture 8 shows the result. The bottom half of the pad was first poured and allowed to partially harden. The second pour, 30 minutes later, filled in the form, but also spread out somewhat below it.

Picture 7 – Pad for a steel post. Note how they have only used forms on the top of the pad.

Picture 8 – the finished pad to support a steel post.

Picture 9 is a view of  all of the new concrete from above, in the backyard. With the foundations in place, this view gives a much better sense of the scope and layout of the house, deck, and garage apartment.

Picture 9 — the house site from above.

The crew surprised us by coming back on Saturday to clear out the scaffolding from the garage and the garage apartment. In picture 10 you can see the front of the garage and the windows of the apartment above it, much more clearly. Picture 11 shows the space that will be the living room. Straight ahead is a wonderful, large window with a tree0filled view looking out over the orchard. To the right is the glass wall that will open onto a small deck and provide another great view.

Picture 12 is the space that will be the bedroom with its large, floor-to-ceiling window looking out onto a pepper tree on the driveway.

Picture 10 – Front of the garage/apartment without the scaffolding.

Picture 11- Apartment living room.

Picture 12 – View from the apartment bedroom.

Posted in house | Leave a comment

Thursday, July 26, 2018

The steel for the deck and the footings for the house passed inspection today, so we are all set to pour concrete tomorrow. There were many small things done today, some related to the concrete pour and some not.

Picture 1 shows the completed rebar for the lower deck. You can also see the plywood forms for what will be the base of the upper deck. My understanding is that they will pour all of the lower deck but just the grade beams for the upper deck tomorrow.

Picture 2 shows the plywood form that separates the wall of the house, by the front door, from the stairs coming down from the deck to the ground level by the house. If you look carefully on the plywood, you can just see the pencil lines marking indicating where the stairs will go. The vertical rebar behind the plywood is coming up from the foundation for the wall of the house.

The foreground of Picture 3  shows the wooden forms for the top of the concrete pads that will support steel posts in the middle of the house. In the front center, you can see a steel plate with heavy bolts running through it.The parts of the bolts below the plate will be embedded in concrete. The parts above the plate will be used to bolt down the post that will sit on the plate. In the background, you can see several sections of electrical conduit sticking up in the air. One of these will carry the main electrical service into the house from the pole on the driveway. A second is to connect the house to the garage apartment.

Picture 4 is very similar to a photo posted yesterday. It is hard to see the difference. However, if you look closely, you can see vertical rebar sticking up on the right side of the photo for the walls on either side of the slab that will be the floor of the great room.

Picture 5 does not seem all that interesting, but it excites Ted. It shows that they have (finally!) buried the pipe that can carry rainwater from the west side of the house to the place where it will enter the rainwater storage tank under the deck. Ted pointed out to the builders that they needed to lay this pipe weeks ago, before they filled in all of the gravel that is behind the wall between the deck and the house. Had they put this pipe in then, it would have been easy; but they didn’t. So today they had to spend time to dig out the gravel, so that they could put the pipe in.

Saving the best for last! Picture 6 shows that they dug the hole for the sump in the floor of the garage. The sump will eventually have a pump in it — the sump pump. We need this because the septic system is up beside the house, well above the apartment and the garage. This means that all of the sewage from the apartment or the garage will flow down into this sump and then be pumped up to the septic system. Just to complete the irony, effluent from the septic system then flows back down the hill — this time thanks to gravity — to the leach field that is down next to the orchard, below the garage.

Picture 1 – Completed rebar and forms for the lower deck.

Picture 2 – Foreground: Stairs from upper deck to the ground level next to the house. Background: Rebar in the foundation for the wall around the living room slab.

Picture 3 – The foreground shows the wooden forms for the top of the concrete pads that will support steel posts in the middle of the house. In the background you can see electrical conduits.

Picture 4 – House foundation from the west.

Picture 5 – Tubing that will carry rain water to the storage tank under the deck.

Picture 6 – Sump (with its cover off) in the floor of the garage.


Posted in house | Leave a comment

Wednesday, July 25, 2018

After all the time it took to get the deck ready to be poured, the rebar for the foundation of the part of the house over the crawl space went in quickly. Below are two pictures of that. The first is from above the house to the west. The second is from the driveway, east of the house. Assuming that everything goes as planned, the inspectors will approve this today, the plywood forms for the foundation will be completed, and the concrete will be poured tomorrow.

While this work was going on, Ted put in new irrigation for the bananas growing in the gully to the west of the house. Also, we heard that the permit revisions for the forced-air heating/cooling were approved by the County, and Nina picked up the paperwork.

Foundation for the house over the crawl space – from the west.

Foundation for the house over the crawl space – from the driveway to the east.

Posted in house | Leave a comment

Monday-Tuesday, July 23-24, 2018

It has just been the steel guys for the last two days. They are trying to get ready for the inspectors on Thursday and the next cemnt pour on Friday. The backhoe and bobcat are still at the house, but there doesn’t seem to be anything for them to do and their operators have not been out.

Mostly they have been working on the rebar for the lower and upper decks. Picture 1 was taken Monday evening as they were just finishing the grade beam on the left side of the picture. This supports the cantilevered part of the lower deck that is under a pair of oak trees. This photo was taken from the cantilevered part of the deck.

The end of this beam furthest from the camera connects to massive beam that runs through what will be the upper part of the deck toward the house. Near this connection, the beam for the lower deck slopes up to the higher level of the upper deck. There will be a set of stairs between the two levels at this point. The rebar in this beam is quite heavy, 7/8″ in diameter and bending it into shape turned out to be a major task.

Picture 1: grade beam to support lower deck taken Monday evening.

Picture 2 was taken Tuesday evening and shows that they have added the matting rebar for the deck and so the rebar work for the deck is now almost complete. This photo was taken from a location near the front door of the house. It shows the lower deck in the foreground on the left, the upper deck on the right, and the roof of the garage in the background. The grade beam we highlighted in Picture 1, is hard to see here; it is in the dark area toward the back left of the picture, just in front of the plywood that will form the side  of the deck.

Picture 2 – The lower deck in the foreground on the left, the upper deck on the right, and the roof of the garage in the background. This was taken Tuesday evening.

Picture 3 is taken from the back of the house looking along the massive beam that runs through the center of the upper deck. Picture 4 shows the finished rebar in the section of the slab under the deck that they are having to fill in now because, without the grading that they finished last week, there was no ground for this slab to sit on.

Picture 3 – Looking from the back of the house toward the lower deck and the garage along a massive beam embedded in the upper deck.

Picture 4 – Finished rebar in the fill-in part of the slab under the deck.

At the end of the day on Tuesday, they also began work on the rebar for the house foundation. This is shown in Picture 5. This rebar goes up quickly, so they should not have any problem getting it completed tomorrow for the inspection on Thursday. One complicating factor in all of this is that we are having another heat wave, with high temperatures of about 100 and, what is making us more miserable, lows only down to about 68.

Picture 5 – Rebar for the stem wall, between the slab and the crawl space.

Posted in house | Leave a comment

Friday, July 20th, 2018

Another day of work on the deck, the final digging of footings for the foundation, and putting the resulting dirt on the slope by the garage. Picture 1 shows the scaffolding for the lower part of the deck under the oak tree. Picture 2 shows the new rebar work on the deck itself. Picture 3 shows the trenching in the area that will be the slab of the great room.

Picture 1 – Completed scaffolding under the lower part of the deck cantilevered under the oak tree.

Picture 2 – The deck itself with the rebar for the beams almost complete.

Picture 3 – Trenches for the house footings. This picture is taken from the deck, so the area in the foreground will be the slab under the great room. The trench on the right is for the foundation of the outside, eastern wall of the great room. The trench running parallel and just to the left of that first trench is for the buried duct that will bring forced air heating and cooling to the great room; this one turns the corner to also run along what will be the window walled front of the great room.

Posted in house | Leave a comment

Thursday, July 19th, 2018

The backhoe operator was back today and there was lots of progress that is visible in Picture 1.  This shows the part of the house that will be over the crawl space. In the back right, you can see a part of the large retaining wall that they poured weeks ago. Extending from it are the foundations for the walls of the house. You can see the rebar that they have already begun to put in place sticking up in nearer ones of these trenches. There is another trench, with no rebar yet, in the background of the picture (in front of the I-beams that will support the gabions outside the house wall) that will be the base of the west wall of the house. On the left side of the photo is the trench for a stem wall. This is not really a wall (it will not extend up into the house), but, instead, it will form one edge of the slab, which will be the floor of the great room in the front of the house. In the middle area in the photo are some square pits. These will be the foundations for posts that will support the center of the house. Finally, there is a large trench running in the center of the crawl space toward the camera. This intersects with another trench in the perpendicular direction. These are for the “blue” ducts, special ventilation ducts (the one dominant manufacturer always makes them blue), which are designed to be buried in the concrete slab.

Picture 1 – Trenching for the walls and ducts in the part of the house over the crawl space.

Picture 2 shows that they have now added the forms to the rebar for the missing section of the slab under the deck.

Picture 3 shows that they erected the remaining scaffolding for the lower deck under the oak tree. Midway back, on the right side of the photo, is the third pilaster. They need to extend the beam running from left to right to this pilaster and construct the last beam that runs perpendicular to this.

Picture 2 – Forms added outside of the rebar for the missing slab under the deck.

Picture 3 – Scaffolding for the last section of the lower deck under the oak tree.

Posted in house | Leave a comment

Wednesday, July 18, 2018

The backhoe driver was otherwise engaged today, but he will be back tomorrow and Friday to finish up the digging of the house foundation and, we hope, the area out by the street.

Picture 1: Rebar for the wall near the apartment door.

The steel guys were busy today.  They completed the rebar for the area next to the apartment door. Yesterday, the area to the left of the door was empty; today there is a rebar cage there for the wall to be built. (Picture 1)

Picture 2: Rebar grade beams for lower deck and the beginning of one for the upper deck.

Picture 2 shows that they also completed the grade beam running from left to right, which was in progress in yesterday’s photo, and started work on the grade beam perpendicular to it, which, in addition to providing structural support, also provides a boundary between the upper and lower parts of the deck.

The pieces of rebar that look like an inverted V in picture 2 are just sitting there waiting to be used.

While all of this was happening Nina and Ted met with the interior designer to finalize the order for the plumbing fixtures and to review the revised lighting plan for the house. The contractor will be needing all of this information once work on the house starts in earnest.

Picture 3: Overall look at the whole project. The brown fabric-like background is at this season mostly brown hillsides.

Picture 4: A view of the front door of the house.

We have had some requests for an overall view of the project; we have hesitated because the last model views we had don’t show the lower deck and there are a few other differences with the final plans. However, we are including them here and also on a page that you can get to from the top of any page of the blog.

Picture 3 shows the garage at the bottom of the picture with the apartment on top of it. The house is up above. Picture 4 is of the front door of the house, which is hidden in picture 3.

The green roofs in the images will be green roofs with sedums in them.

Posted in house | Leave a comment