We are about to leave for a two week trip to the Pacific. We will spend most of a week with Taylor on the Gold Coast of Australia, southeast of Brisbane, and then, on the way back, we will stop for three days on the beach in Fiji.
Although not much has work on the house has happened in the last few days, we are leaving on a positive note. In the last blog entry, I noted that we were trying to determine whether the insulation for most of the walls would be placed on the inside of the house or the outside, where it would be between the concrete wall and the stucco. It turns out that it would not only be easier but substantially less expensive to put the insulation on the inside. As you may recall from previous posts, they mounted studs on the inside so the spaces between them could simply be filled with insulation as in a standard wood-frame house. If we did this, stucco could then be applied directly to the concrete on the outside of all but the board-formed walls. So why not simply do this? This is a question our contractor has asked repeatedly. As he notes, correctly, the R-value (resistance to heat transfer) of the walls is almost identical whether the insulation is on the inside or the outside.
However, the house was designed with the insulation on the outside to make the most of the thermal heat mass of the concrete walls. Thermal mass acts as a thermal battery. During summer it absorbs heat during the day and releases it by night to cooling breezes or clear night skies, keeping the house comfortable. In winter the same thermal mass can store the heat from the sun or heaters to release it at night, helping the home stay warm. Thermal mass is not a substitute for insulation — thermal mass stores and re-releases heat; insulation stops heat flowing into or out of the building – but it can provide a useful tool for keeping a house comfortable. It is particularly beneficial where there is a big difference between day and night outdoor temperatures, as there is in the canyons here – typically 25 to 30 degrees.
Unfortunately, insulation on the inside of the house basically blocks the thermal mass effects – even the drywall that we will be putting on the walls reduces the benefits somewhat – and that is why I have been looking long and hard for a solution that avoids the inside the wall insulation. So what is the problem?
It turns out that in the 1980s and 90s, many houses were built with concrete or block walls and the insulation on the outside. Unfortunately, the construction techniques used did not consider the long-term effects of moisture trapped between the inside of the insulation and the outside of the wall. In some cases, this led to serious moisture problems and even mold issues. These problems led to lawsuits and insurance claims. As a result, even though new construction techniques have been developed that eliminate these issues, and these techniques are widely used in commercial construction, insurance to use these techniques on residential construction has been hard to get or usually quite expensive.
After many disappointments and just before we were going to give up and go with the insulation on the inside, we found an excellent local company that specializes in this work and provided a bid that seemed reasonable for one of the best of the new systems, DryVit Outsulation. It will cost us a little more money, but we are pleased to have found a solution that will let us go ahead with doing this the way we had planned. The figure below is from the DryVit literature and shows, in schematic form, how this system works.
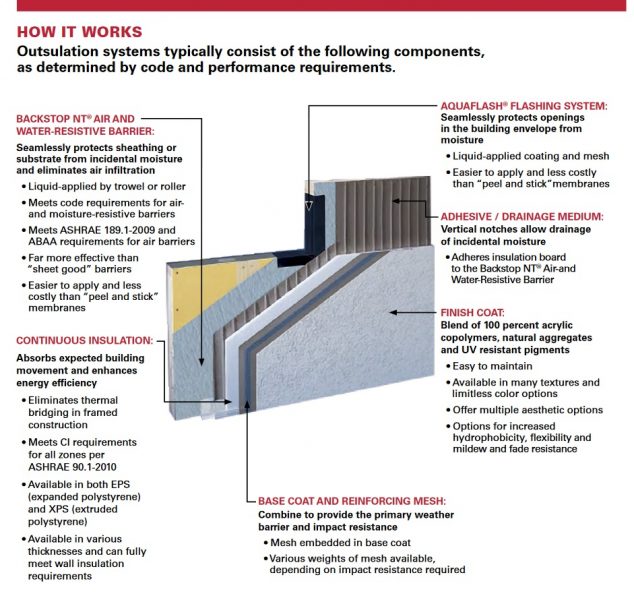
There are three key innovations to this (and other similar) systems. (1) A liquid-applied air and water barrier that goes directly on the concrete walls and provides a base for (2) an adhesive system that holds the rigid-panel insulation to the walls while also creating channels to the ground that allows any moisture that gets behind the panel to escape. (3) A thin, but very strong stucco system that can be applied directly to the insulating panels. Because this stucco system is lightweight, it is not necessary to penetrate the vapor barrier with nails or screws in order to hold the stucco and insulation in place.
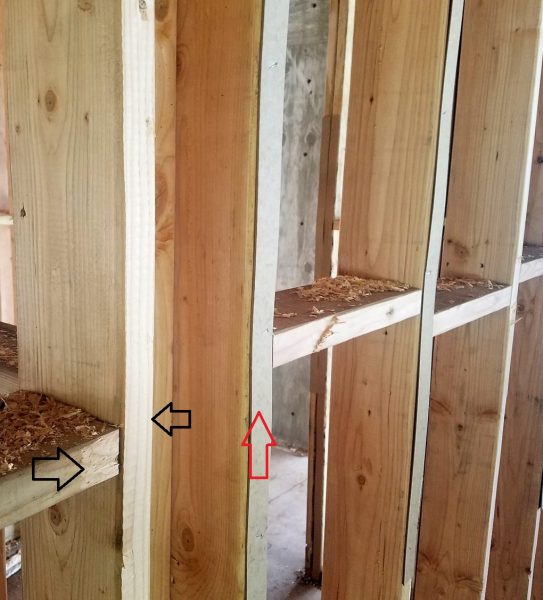
Inside the house, last week they also leveled all of the wall studs and the ceiling joists. They do this by planing the wood down in places where it is high and applying thin strips of cardboard or fiberboard where the wood is too low. The goal is that, when the drywall panels are put up, they will be reasonably flat without bulges or depressed spots. The photo below is of a place where you can see both techniques.
Also exciting
We should hear Monday about the delivery schedule for the doors and windows — probably another 6 weeks or so. In the interim, the contractor will be trying to finish everything that does not depend on them: the rough wiring and plumbing, the HVAC system, the interior fire sprinkler system, more of the roofing, and several retaining walls. As soon as the doors and windows are in, they can put up the drywall and start work on the insulation and stucco.